Beginner masters ACRLYLIC nail course
Licensed for use by OH SO HASTY
All Rights Reserved
No part of this publication, document or any part thereof may be reproduced or transmitted in any form or by any means, electronic or mechanical, including photocopying, recording, storage in a retrieval system, or otherwise without the prior permission of the author.
Course details
Aims
The course aims to ensure you; the student understands the basics of health and safety and anatomy and physiology of the treatment. This manual covers the treatment background, benefits, consultation and contra-indications, contra-actions, aftercare and equipment and products required to perform the treatment. The practical techniques will be covered on the practical session to ensure competency in the procedure.
Objectives
At the end of the course, you will be able to perform a treatment in a professional, safe, and hygienic manner in a commercially acceptable time, along with experience in carrying out a thorough consultation with the knowledge of the background, benefits, consultation, contra-indications, contra-actions, aftercare, equipment, and the products needed.
Accreditation
This course is accredited by:
· International approval limited
Insurance
Students will be able to gain insurance from the following provider(s) listed below, upon successful completion of your training:
Insurer name: INSYNC INSURANCE
A link will be sent on completion of the course
Medical Disclaimer
It is advised that you take medical advice if you or any of your clients have a health problem. Any qualification from OH SO HASTY BEAUTY ACADEMY will not qualify you to advise on or diagnose any medical condition.
Contact Details
Trainer: Della Jones
Address: 40 Hamble Drive, Penketh, WA5 2HT
Phone Number: 07590264553
Email Address:
Ohsohastybeauty@outlook.com
Website :
Ohsohastybeauty.co.uk
Facebook Page :
@ohsohasty
Instagram :
@ohsohastynailsandbeautyacademy
The course will consist of theory and practical elements.
Kit list
Acrylic liquid
Peach Acrylic powder
Opal pink Acrylic powder
Cover pink Acrylic powder
Sheer pink Acrylic powder
Cover peach Acrylic powder
White Acrylic powder
Clear Acrylic powder
Dehydrator
Primer
Acrylic brush
Scissors
Files
Orange sticks
Glue
Box of tips
Cuticle oil
Plush brush
Health & Safety
You will need to maintain a high standard of hygiene as well as health and safety, not only for yourself but also for your employees, clients, and any visitors to your business.
It is a legal requirement for employees to display an approved health and safety poster or to provide employees with an equivalent leaflet or information.
All businesses are required by law to comply with the following acts, which are monitored and managed by The Health & Safety Executive (HSE). You should also get copies of the following regulations from your local council or off the HSE website.
Health and Safety at Work Act 1974
This protects your rights as an employer or employee. The law states that the employer must provide a safe working environment, provide health and safety training for staff, produce a written policy of the company’s health and safety policy, and ensure that anyone on their premises is not exposed to any health or safety risks.
Trade Descriptions Act (1968 and 1972)
These Acts prohibit the use of false descriptions of goods or services. The information must always be accurate, false comparisons must not be made, and misleading price comparisons must not be made. A product may not be of a 'reduced' price if it has not been available at a higher price for a minimum of 28 days.
General Data Protection Regulation GDPR
If you are collecting and storing personal data as a therapist, then you will need to comply with GDPR. You will need to decide which of the six lawful bases on which you will collect and store personal data and inform your clients of how and why you will retain their data and for how long. The Independent Commissioners Office will provide you with all relevant information.
Sale and Supply of Goods Act 1994
This states that goods must be as described and of satisfactory quality. They should be fit for purpose and safe for use. It is the responsibility of the retailer to correct a problem where the goods are not as described.
COSHH Regulations and Risk Assessment (Control of Substances Hazardous to Health)
COSHH regulations cover the essential requirements for controlling exposure to hazardous substances, and for protecting people who may be affected by them. You should carry out a COSHH assessment to identify all chemicals, products or other substances which could cause harm.
A substance is hazardous if it can cause harm to the body. It poses a risk if it is inhaled, ingested, in contact with the skin, absorbed through the skin, injected into the body, or introduced to the body through cuts.
Always check the ingredients and instructions of all products to see what they contain and ensure they are correctly stored. If the product could cause harm, it should be listed on your COSHH assessment, together with what the risk is and who is at risk from it.
Next, decide on the degree of risk and who to minimise that risk. If you can, try to replace high-risk products with lower risk ones. Never leave chemicals identified as hazardous in areas accessible to the public. Do not forget, COSHH substances include both those used for treatments and cleaning.
Local Government (Miscellaneous Provisions) Act 1982
A special treatment licence will be required if you carry out any form of massage, electrolysis or ear piercing and tattooing as they may produce blood and body tissue fluid. Each borough council in the UK has different requirements, so you should contact them to see whether they require you to hold a licence for the treatments you offer.
The Management of Health and Safety at Work Regulations 1999
Employers should make formal arrangements for maintaining and improving safe working conditions and practices. This includes competency training and risk assessments.
Management of Health and Safety at Work Regulations 1999
Employers should make formal arrangements for maintaining and improving safe working conditions and practices. This includes competency training and risk assessments.
The Manual Handling Operations Regulations 1992
This is relevant wherever manual lifting occurs to prevent skeletal and muscular disorders. The employer should undertake a risk assessment for all activities involving manual lifting.
The Personal Protective Equipment at Work Regulations 2002
This requires employers to identify activities which require special protective clothing, which must then be made available.
The Health and Safety (Display Screen Equipment) Regulations 1992
This covers the use of display screens and computer screens. This specifies the acceptable levels of radiation emissions from the screen, as well as identifying the correct posture and the number of rest periods.
The Electricity at Work Regulations 1992
Electrical items are potentially hazardous and should be used and maintained properly. You should always ensure that you are fully trained on a piece of equipment before operating it.
All electrical equipment should be regularly PAT tested to ensure it is safe to use. If any equipment is deemed to be faulty or unsafe, you should stop using it immediately and report the problem. Make sure the equipment is clearly marked as faulty until the problem has been corrected to avoid it being used by other members of staff.
Health and Safety (First Aid) Regulations 1981
Whatever the size of your business, you should always make sure you have a First Aid kit on-site, as well as an eyewash bottle. You should ensure this is fully always stocked. You should have at least one 'Appointed Person' on hand to take charge in an emergency who holds an HSE-approved basic first aid qualification. You can contact the HSE on 0845 345 0055 for a list of suitable training providers.
RIDDOR-The Reporting of Injuries, Diseases & Dangerous Occurrences Regulations 1995
Employers should report any such cases to the HSE Incident Contact Centre. This includes loss of sight, amputation, fracture, and electric shock. In all cases where a personal injury of any type occurs, it should be recorded in an accident book.
The Regulatory Reform (Fire Safety) 2005
All premises must have adequate means of dealing with a fire, and all members of staff should know where these are. This can include fire extinguishers and blankets; however, you should only operate a fire extinguisher if you have been properly trained to do so. All equipment should be checked and maintained regularly.
Fire Drill notices should be clearly displayed and should inform people of what to do in case of a fire. All staff should be trained in the location of alarms, exits and meeting points.
Consumer Protection Act 1987
This Act aims to protect the customer from unsafe or defective services or products. All staff should be trained in using and maintaining products.
The Provision and Use of Work Equipment Regulations 1998
This states the duties of any users of the equipment. It identifies the requirements in selecting and maintaining suitable equipment, as well as the training and safe use of it.
Cosmetic Products (Safety) Regulations 2008
These regulations require that cosmetics and toiletries are safe for their intended purpose and comply with labelling requirements.
Disability Discrimination Act 1996
These Acts prohibit the use of false descriptions of goods or services. The information must always be accurate, false comparisons must not be made, and misleading price comparisons must not be made. A product may not be of a 'reduced' price if it has not been available at a higher price for a minimum of 28 days.
The Equality Act 2010
gives disabled people important rights of access to everyday services. Service providers have an obligation to make reasonable adjustments to premises or to the way they provide a service. Sometimes it just takes minor changes to make a service accessible. What is considered a reasonable adjustment for a large business such as a bank, may be different from what is a reasonable adjustment for a small local salon. It is about what is practical in the service provider’s individual situation and what resources the
business may have. They will not be required to make adjustments that are not reasonable because they are unaffordable or impractical.
Reporting Accidents
All accidents and near misses should be recorded in an Accident Report Book, which should be kept with a first aid kit on the premises.
The following information must be recorded:
Ø Full name and address of the person(s) involved in the accident.
Ø Circumstances of the accident.
Ø Date and time of the accident.
Ø All details of what may have contributed to the accident.
Ø The type of injury that occurred and treatment provided on or off-site.
Ø Details of any witnesses.
The Personal Protective Equipment at Work Regulations 1992
This act covers your requirements under the COSHH regulations. You are required to wear or provide to your employee's protective clothing or equipment (PPE) to ensure their health and safety when handling chemicals or meeting bodily fluids.
What PPE will you need?
Powder-free non-latex Gloves that must be changed for each new client.
Disposable aprons.
Face Masks
Eyewear (optional)
Some therapists like to wear eye protection, although the risk is very low from spillages or splashes. However, a new apron, facemask and gloves should be worn before each new client.
Salon Hygiene, Health & Safety
Ø The salon should be cleaned thoroughly every day.
Ø The working area must be cleaned before and after every client.
Ø Fresh towels and linen should be used for every new client that has been laundered at a minimum of 60°C.
Ø Couch roll, disposable plastic sheeting or waterproof bed sheets need to be used to protect the couch and keep the area as clean as possible.
Ø Products should be dispensed from purpose-specific pump or spray bottles. Creams can be removed from jars or bottles with clean spatulas.
Ø Replace all lids on products securely after use.
Ø All tools that are non-disposable should be sterilised prior to use.
Ø Bins should be metal and have foot pedal operations and be emptied every day. Bins should be collected by an appropriate commercial waste disposal company.
Ø All fire exits should be clearly always marked and accessible.
Ø Read all labels and follow manufactures instructions.
Ø Know the hazardous warning signs on products.
Ø Store products safely and in accordance with safety data sheets.
Ø Ensure equipment is placed on a sturdy surface and cannot fall off.
Ø Check wires and plugs regularly on any electrical equipment. Ensure electrical equipment is PAT tested annually. Faulty equipment should not be used.
Ø A first aid kit that complies with the Health and Safety (First Aid) Regulations 1981.
Appearance of the Therapist
A therapist should ensure that they look well always presented. Therapists will be working in close contact with a client, and it is important that a professional image is observed.
A therapist should:
Ø Wear clean, freshly laundered, and ironed uniform each day.
Ø Wear clean, flat, closed-toe shoes.
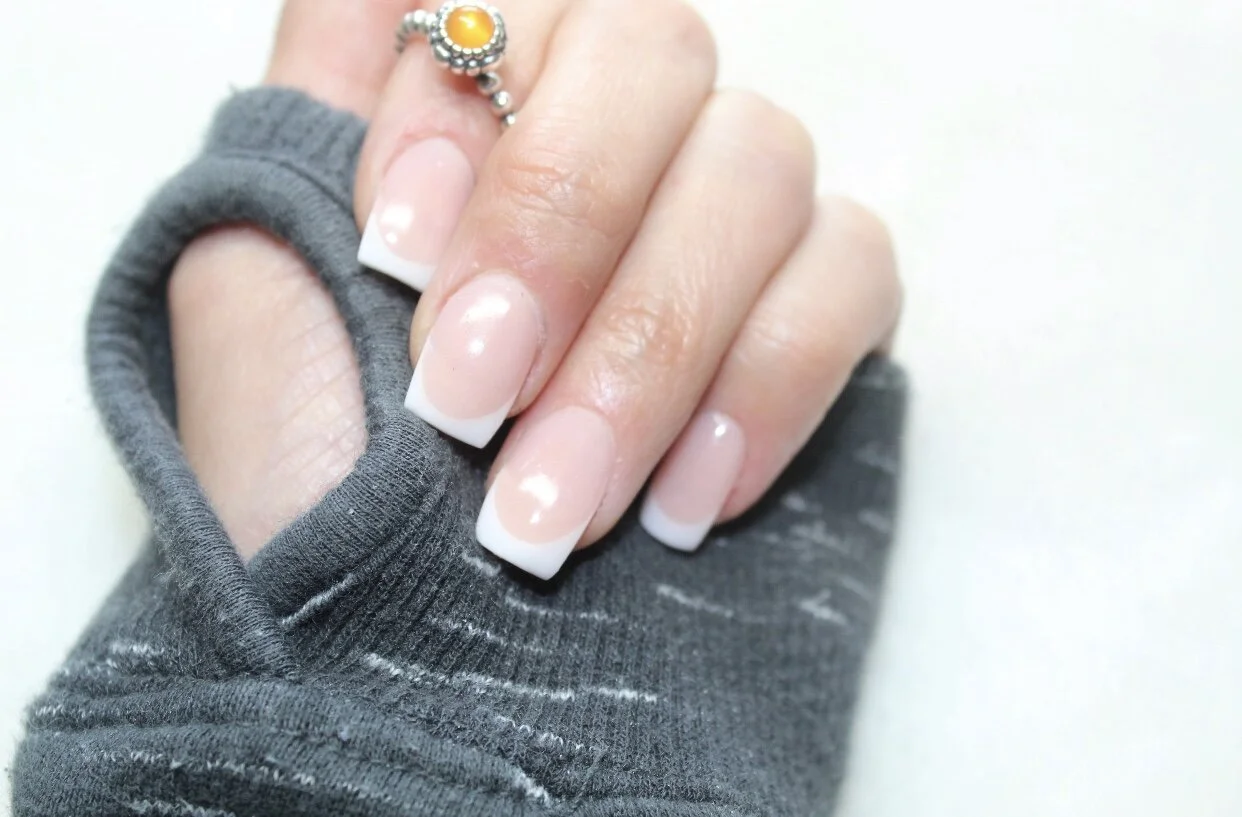
Ø Have short, clean, manicured nails.
Ø Have a fresh breath.
Ø Wear antiperspirant.
Ø Apply modest makeup for a natural look.
Ø Wear hair up and away from the face.
Ø Wear minimal jewellery.
Professional Ethics and Standards of Practice
Therapists should:
Ø Maintain the highest possible standards of professional conduct.
Ø Always be courteous and show respect for clients, colleagues, and other professionals.
Ø Never gossip or criticise another therapist, salon, or brand.
Ø Never talk across a client to another member of staff.
Ø Not to engage in conversations about politics, religion or race that may cause offence.
Ø Maintain a good reputation by setting an example of good conduct in all your communication with clients, team members and visitors to the business.
Ø Ensure to make the treatment or service special for every client.
Ø Respect client confidentiality.
Ø Explain the treatment to the client and answer any questions and queries prior to carrying out the treatment.
Ø Always treat all clients in a professional manner regardless of their race, colour, religion, sexual orientation, or ability.
Ø Not to treat minors or clients with limited mental capacities, such as those with Alzheimer's or dementia without prior written consent from a parent or carer.
Practising good ethics is essential for the reputation of the therapist and the welfare of the clients. The following is an example of standards and ethics for therapists:
Ø Conduct yourself in a professional, honest, and ethical manner.
Ø Promote professionalism
Ø Establish a treatment plan with your client and evaluate the outcome at the end of every session.
Ø Truthfully represent your credentials, qualifications and education, experience, training, and competence relevant to practice.
Ø Maintain the confidentiality of the client.
Ø Take a full medical history of the client and ensure that they are suitable for treatment and the treatment is the best solution for their concerns.
Ø Give full aftercare advice.
Precautions Taken in the Salon to Prevent Contamination and Cross-Infection
Hands
Wash with soap/disinfectant and warm water before and after each client—dry hands with a paper towel or blower.
Surfaces
Wipe over with disinfectants, e.g., Alcohol, Surgical spirits.
Treatment of Wounds
If the skin bruises or bleeds after the insertion of a needle, a small pad of dry cotton wool should be used over the area to cover it and apply pressure until the bleeding stops. Apply aftercare solution to the area and work in a different area. The same applies to extractions or any other form of skin piercing. Use disinfectant to clean area.
Disposal
Sharp metal instruments, e.g., needles, lancets, should be placed in a sharps box after use. When the box is about 3/4 full, it may be disposed of by special arrangement. Usually collected by local health office and incinerated at a local hospital.
Metal Instruments
Sterilised before and after each client in Autoclave or in Glass bead steriliser, and wipe with Chlorhexidine Gluconate or Methylated spirits.
Skin Preparation
Do not use sharp or pointed instruments on or at least near areas of a client's skin that are obviously diseased, infected, or inflamed. Except in facial treatments during the extracting phase (a tile with a lancet and cotton wool dampened with methylated spirits and an antiseptic solution containing Chlorhexidine Gluconate must be prepared, hands should be washed before and after extractions and finger cots or gloves must be used).
Cuts on your Hands
Cover existing wounds with a waterproof dressing, wash fresh cuts and encourage bleeding under running water and then cover with a waterproof dressing. Clean with an antiseptic. Always have a box of plasters/waterproof dressing available. No salon should be without a first aid kit.
Needles
Do not test needles on yourself. Test needles on a damp of cotton wool held with tweezers. Needles should only be used once, and needles must not be used on more than one client.
Creams
Tubes are better than jars. Always use a spatula to obtain creams from containers. Never use fingers and always close a container after use. Excess product must not be returned to containers.
Blood
Anything that has meet blood must be disposed of in the correct manner. Pay attention to the following: Hands, lancets, tweezers, surface, disposal gloves, bin liners, cotton wool or gauze and needles)
Colds/Flu
Wear a surgical mask. Wash your hands regularly, especially after sneezing or blowing the nose. Also, wash hands in general after touching other surface areas. General advice - stay at home when feeling ill or send employees home if they develop cold/flu symptoms at work.
Waste Bins
Bin liners. Emptied regularly. Bins should have lids.
Gloves
Surgical gloves can be used, e.g., epilation or, to prevent contamination. Used always when performing any procedure that breaks the skin and any action that may come into touch with blood.
Instruments
Must be cleaned, sanitised, and sterilised or where appropriate disposable tools should be used.
Sterilisation Methods
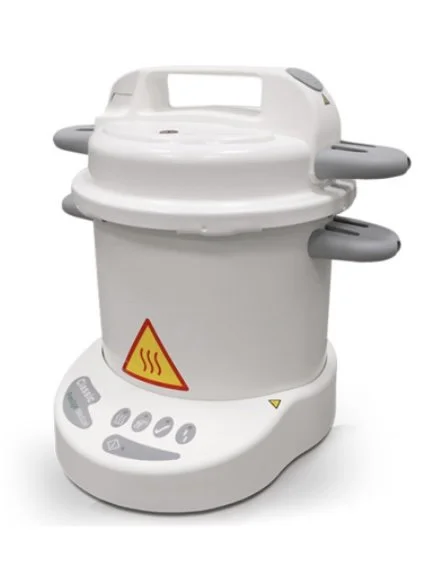
Autoclave
· Works like a pressure cooker.
· Consists of 2 chambers. Water in the lower chamber and instruments on the upper chamber.
· The principle of sterilisation is moist heat.
· The water boils in the lower chamber and steam are released towards the upper chamber. Instruments are left in the unit for 10 - 20 min. Afterwards, instruments must be placed in a sterile and clean container.
· The moist heat autoclave operates at 121°C and is considered a very effective means of sterilisation.
· Other types available, e.g., dry heat autoclave, vacuum autoclave, flash instrument autoclave.
· The time and temperature of dry heat autoclave is 160°C (320°F) for 2 hours or 180°C (356°F) for one hour.
· Consult manufacturer's instructions and local government laws and regulations on sterilisation times and temperatures.
Advantages of an Autoclave
· Economical and very effective
· Non-toxic on instruments
· Easy to operate
Disadvantages of an Autoclave
· Sharp instruments can become blunt.
· Metal instruments might rust. Recommend use of stainless-steel instruments.
· Expensive
· Plastic instruments will be damaged.
· Autoclaves will need to be kept clean.
· Regular servicing and calibration are required of the device.
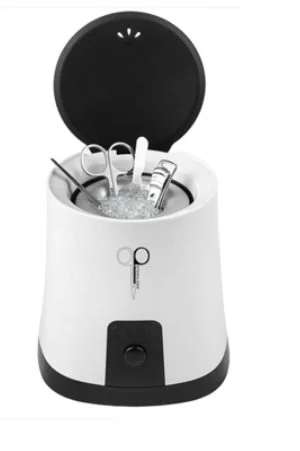
Glass Bead Steriliser
§ Operates at approximately 300°C.
§ Metal instruments will thus be completely sterilised within minutes.
§ Only the parts covered with beads will be sterilised.
§ The unit takes + 20 - 30 minutes to warm up before sterilisation can take place.
§ If more than one instrument is placed in the container, a longer time must be added for sterilisation.
§ Consult manufacturers` instructions and local government laws and regulations on sterilisation times and temperatures
Wet Sterilisation (Chemical)
Asepsis can be obtained by washing down all surfaces, walls, floors, treatment beds, tiles, trolleys, work surfaces, basins etc. after basic cleaning with an antiseptic solution. EG: Antiseptic solution concentrates, diluted according to manufacturers' instructions. Towels can also be disinfected in this method. If metal tools are sterilised by this method, the liquid must contain a rust inhibitor.
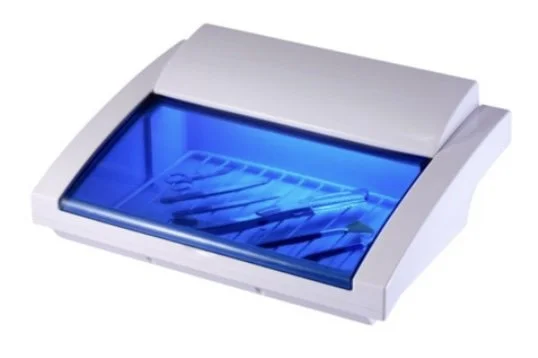
UV Cabinet
· They are used for the maintenance of your sterilisation process.
· Basically, used as a storage unit.
· They are not used for sterilisation only for sanitation.
· This cabinet will keep your item as clean as it was when you first inserted it.
Antiseptics and Disinfectants
Antiseptic
A diluted disinfectant that is safe to apply to the skin. Its' task is to slow down multiplication, growth and in some cases may destroy/kill micro-organisms if the strength of the solution is correct, e.g., some soaps (hands), alcohol and hydrogen peroxide etc.
Disinfectant
A chemical agent which destroys or kills all micro-organisms. Safe to apply on surfaces but too toxic to be applied directly onto the skin, e.g., Quaternary Ammonium compound/Quats, formalin, ethyl, or grain alcohol.
Ergonomics
Posture is important, whether you are sitting or standing up to do a treatment. Try to find a working position that is comfortable for you and reduces the need to lean over to just one side.
Using height adjustable treatment couches and chairs. Choose a height that reduces your need for bending over the client. Ideally, your back should be at a 90-degree angle. Your chair should be comfortable to avoid pressure point sores or injury.
Try to avoid twisting the neck, keep your head upright and keep your shoulders relaxed.
Never ignore pain; look at ways to alleviate the symptoms. If you cannot take a break during treatment, then you can adopt gentle stretching techniques.
Repetitive strain injuries can be caused by using the same movements repeatedly. Try to avoid repetitive flexing of the wrist and instead alternate by bending elbows or shoulders instead. Equipment should feel comfortable in your hand and have as minimal vibration as possible.
Storage
Ø Make sure you receive a copy of Material Safety Data Sheets (MSDS) from your suppliers.
Ø All staff must be trained on the use of products and equipment.
Ø Training manuals and information leaflets should be accessible to all staff.
Ø Store your products correctly by following the guidance on the MSDS.
Ø Carry out a risk assessment on each product or COSHH report if required.
Ø Keep products in original containers where possible and ensure any decanted products are fully labelled in smaller, purpose-built containers.
Ø Keep all flammable products out of direct sunlight and at room temperature or below.
Ø Mobile therapists must make suitable travel arrangements to avoid spillage and ensure safe working practice and be professional in appearance.
Insurance
There are several types of insurance that are potentially relevant to you as a therapist. The most important is the 'Professional Indemnity Insurance' and 'Public Liability Insurance'. Both are necessary in the unlikely event that a client decided to sue you.
Public Liability Insurance - This covers you if a member of the public, i.e., a client or passer-by is injured on your premises or if their personal property is damaged in any way.
Professional Indemnity Insurance - This protects you should a client decide to sue you claiming personal injury or damage because of treatments carried out by you.
Employer’s Liability Insurance - This is only necessary if you hire others to work for you. This type of insurance would cover you should a member of your staff have an injury on your premises.
Product Liability Insurance - This insurance is important if you plan to use, manufacture, or sell products as part of your business. This will protect you if a client is dissatisfied with the product or experiences a reaction to using the product.
Car Insurance - If a car is used for business purposes, ensure that this is covered by the policy and that theft of equipment is included.
Anatomy and Physiology
Skin Anatomy
The skin makes up around 12% of an adult's body weight. The skin has several important functions which include:
Sensation
The main sensory organ for temperature control, pressure, touch, and pain.
H
Heat Regulation
The skin helps to regulate the bodies temperature by sweating to cool the body down when it overheats and shivering when the body is cold.
A
Absorption
Some creams, essential oils and even much-needed water can be absorbed through the skin.
P
Protection
Overexposure to UV light may harm the skin; the skin protects itself by producing a pigment, called melanin, which we see when we tan. Bacteria and germs are also prevented from entering the skin by a protective barrier called the Acid Mantle. This barrier also helps to protect against moisture loss.
E
Excretion
Waste products and toxins are eliminated from the body through sweat glands.
S
Secretion
Sebum and sweat are secreted onto the skin's surface. The sebum keeps the skin lubricated and soft, and the sweat combines with the sebum to form the acid mantle.
V
Vitamin D Production
Absorption of UV rays from the sun helps with the formation of Vitamin D, which is needed by the body for the formation of strong bones and good eyesight.
Skin is made up of 3 major layers known as the Epidermis, Dermis and the Subcutaneous.
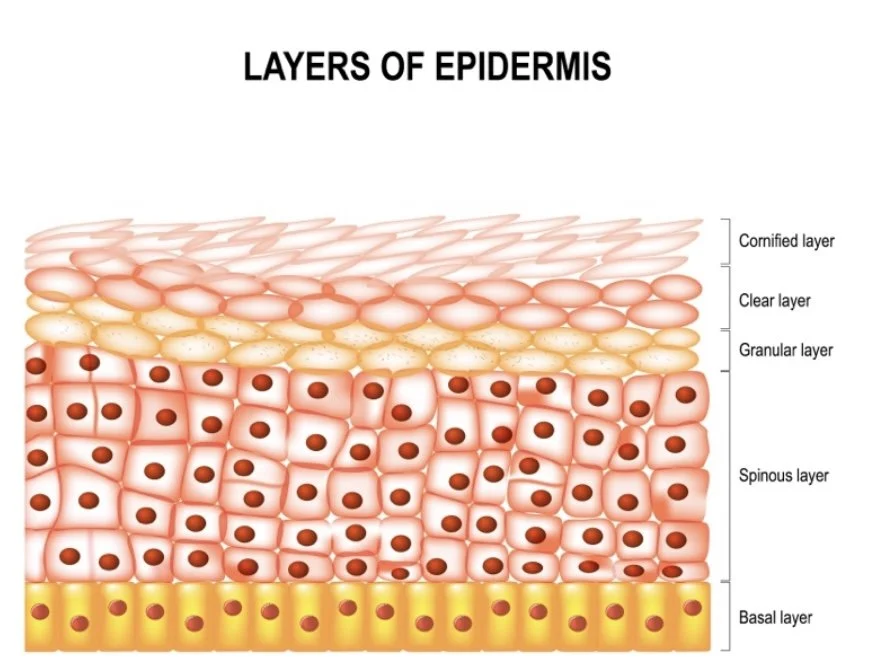
The Epidermis
This is the outermost layer of the skin. There are various layers of cells within the epidermis, the outermost of which is called the stratum corneum (or horny layer). The layers can be seen clearly in the diagram of the skin. The surface layer is composed of twenty-five to thirty sub-layers of flattened scale-like cells, that are continually being exfoliated off by friction and replaced by the cells beneath.
The surface layer is considered the real protective layer of the skin. Cells are called keratinised cells because the living matter within the cell (protoplasm) has changed to form a protein (keratin) which helps to give the skin its protective properties.
New skin cells are formed in the deepest layer of the epidermis. This layer is known as the stratum Basale. New cells being to gradually move from this layer towards the stratum corneum to be shed. As they move towards the surface, the cells undergo a process of change from a round, living cell to a flat, hardened cell.
The layers of the epidermis from top to bottom are known as:
· Stratum Corneum/Horny Layer
· Stratum Lucidum/Clear Layer (only found in the palms on the hands and soles of the feet)
· Stratum Granulosum/Granular Layer
· Stratum Spinosum/Prickle Cell Layer
· Stratum Basale/Basal or Germinative Layer
Dermis Layer
The dermis is a tough and elastic layer containing white fibrous tissue interlaced with yellow elastic fibres.
The dermis is an expanse layer and contains:
· Blood vessels
· Lymphatic capillaries and vessels
· Sweat glands and their ducts
· Sebaceous glands
· Sensory nerve endings
· The erector pili – which involuntary activates tiny muscles attached to the hair follicle in cold weather to trap heat.
· Hair follicles, hair bulbs and hair roots
Subcutaneous Layer
This is the deepest layer of the skin and located beneath the dermis. It connects the dermis to the underlying organs. The subcutaneous layer is mainly composed of loose fibrous connective tissue and fat (adipose) cells interlaced with blood vessels. This layer is generally around 8% thicker in females than in males. The functions of this layer include insulation, storage of lipids, cushioning of the body and temperature regulation.

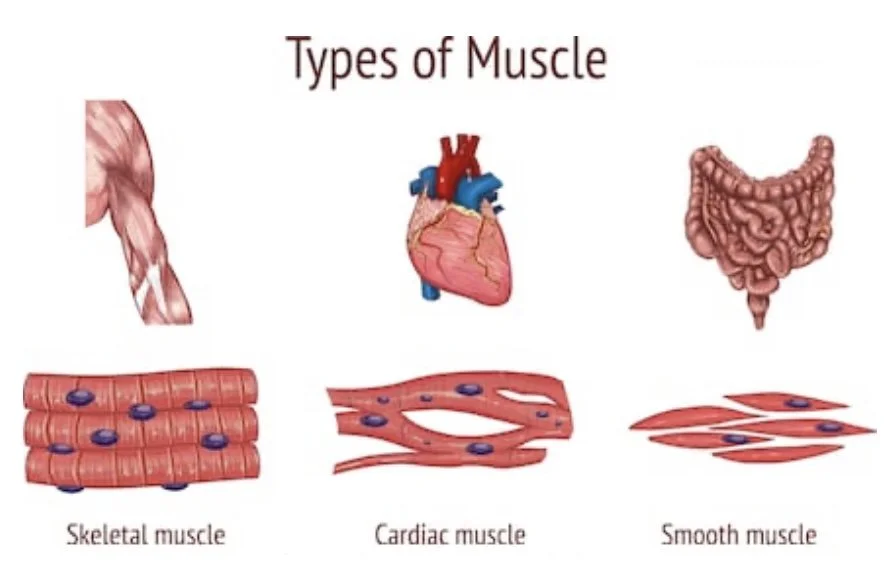
Muscles
Muscles are classified into three different types, which are skeletal, smooth, and cardiac.
Skeletal muscles, also known as striated due to its appearance or voluntary due to its action, are attached to bones and deal with movement. These muscles are made up of fine, thread-like fibres of muscles containing light and dark bands. Skeletal muscles can be made to contract and relax by voluntary will. They have striations due to the actin and myosin fibres and create movement when contracted.
This system gives individuals the ability to move using muscles and the skeleton. It consists of the body's bones, muscles, tendons, ligaments, joints, cartilage, and other connective tissue.
Smooth muscles, also called unstriated or involuntary, tend to be found within hollow organs such as blood vessels, the intestines, and the respiratory tract. This muscle works automatically with no participant control. This type of muscle does not tire easily, and the contractions are slow, rhythmic, and automatic.
Cardiac muscle is what the heart is made up of and only exists in your heart. It is similar in appearance to skeletal muscle in that it is striated. This type of muscle never tires and contracts and relaxes with no participant control. It is made up of short, cylindrical fibres and is purely controlled by the nervous system.
There are over 650 different types of muscles in the human body, making up nearly half of the body weight. The main function is to move joints, to which they are joined, by shortening and pulling one end of the muscle closer to the other end. Each muscle is made up of muscle fibres that are controlled by the brain, sending an impulse to the fibres via the nerves.
When a muscle is damaged, fibres become torn, and the connective tissue around the muscle is also damaged. The fibres are damaged, and fluid seeps out of torn fibres, which causes localised swelling. This fluid tends to stick the fibres together, which causes pain as the muscle is irritated by the slightest contraction. Stretching exercises will increase the length, flexibility and tone of muscles which allows the joint to move further than before.
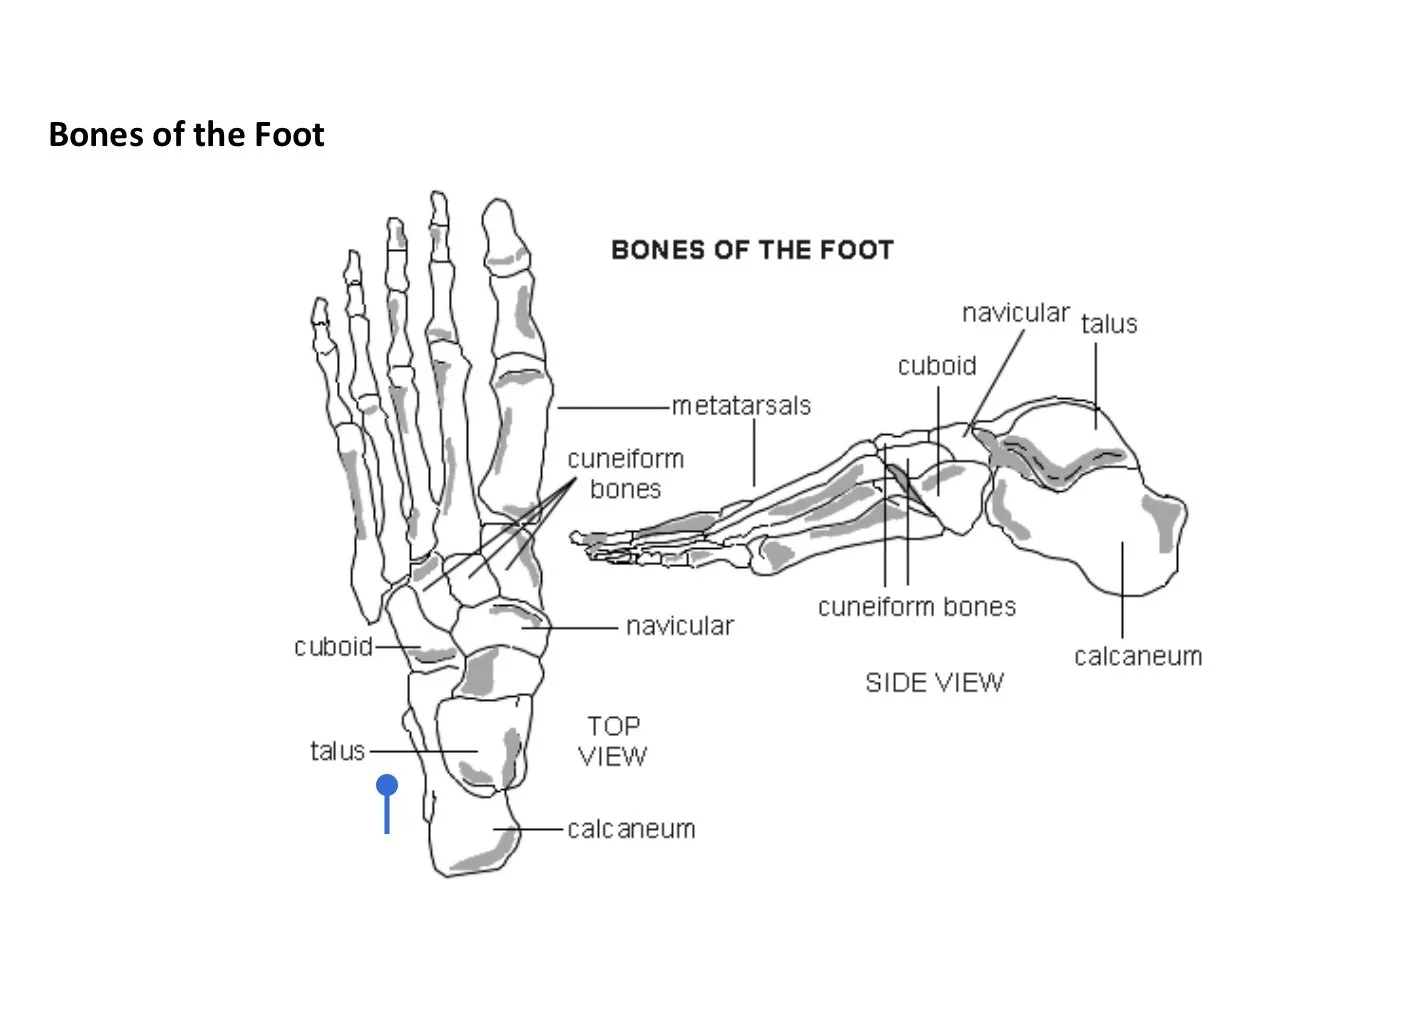
Bones of the body
The Skeletal System serves many important functions; it provides the shape and form for our bodies in addition to supporting, protecting, allowing bodily movement, producing blood for the body, and storing minerals.
Functions:
Its 206 bones form a rigid framework to which the softer tissues and organs of the body are attached.
Vital organs are protected by the skeletal system. The brain is protected by the surrounding skull, and the heart and lungs are encased by the sternum and rib cage.
Bodily movement is carried out by the interaction of the muscular and skeletal systems. For this reason, they are often grouped together as the muscular-skeletal system. Muscles are connected to bones by tendons. Bones are connected to each other by ligaments. A joint is where bones meet one another. Muscles that cause movement of a joint are connected to two different bones and contract to pull them together. An example would be the contraction of the biceps and the relaxation of the triceps. This produces a bend at the elbow. The contraction of the triceps and relaxation of the biceps produces the effect of straightening the arm.
Blood cells are produced by the marrow located in some bones. An average of 2.6 million red blood cells is produced each second by the bone marrow to replace those worn out and destroyed by the liver.
Bones serve as a storage area for minerals such as calcium and phosphorus. When an excess is present in the blood, the build-up will occur within the bones. When the supply of these minerals within the blood is low, it will be withdrawn from the bones to replenish the supply.
Divisions of the Skeleton:
The human skeleton is divided into two distinct parts:
The axial skeleton consists of bones that form the axis of the body and support and protect the organs of the head, neck, and trunk:
Skull
Sternum
Ribs
Vertebral Column.
The appendicular skeleton is composed of bones that anchor the appendages to the axial skeleton:
Upper Extremities
Lower Extremities
Shoulder Girdle
Pelvic Girdle.
(The sacrum and coccyx are considered part of the vertebral column)
Types of Bone
The bones of the body fall into four general categories: long bones, short bones, flat bones, and irregular bones.
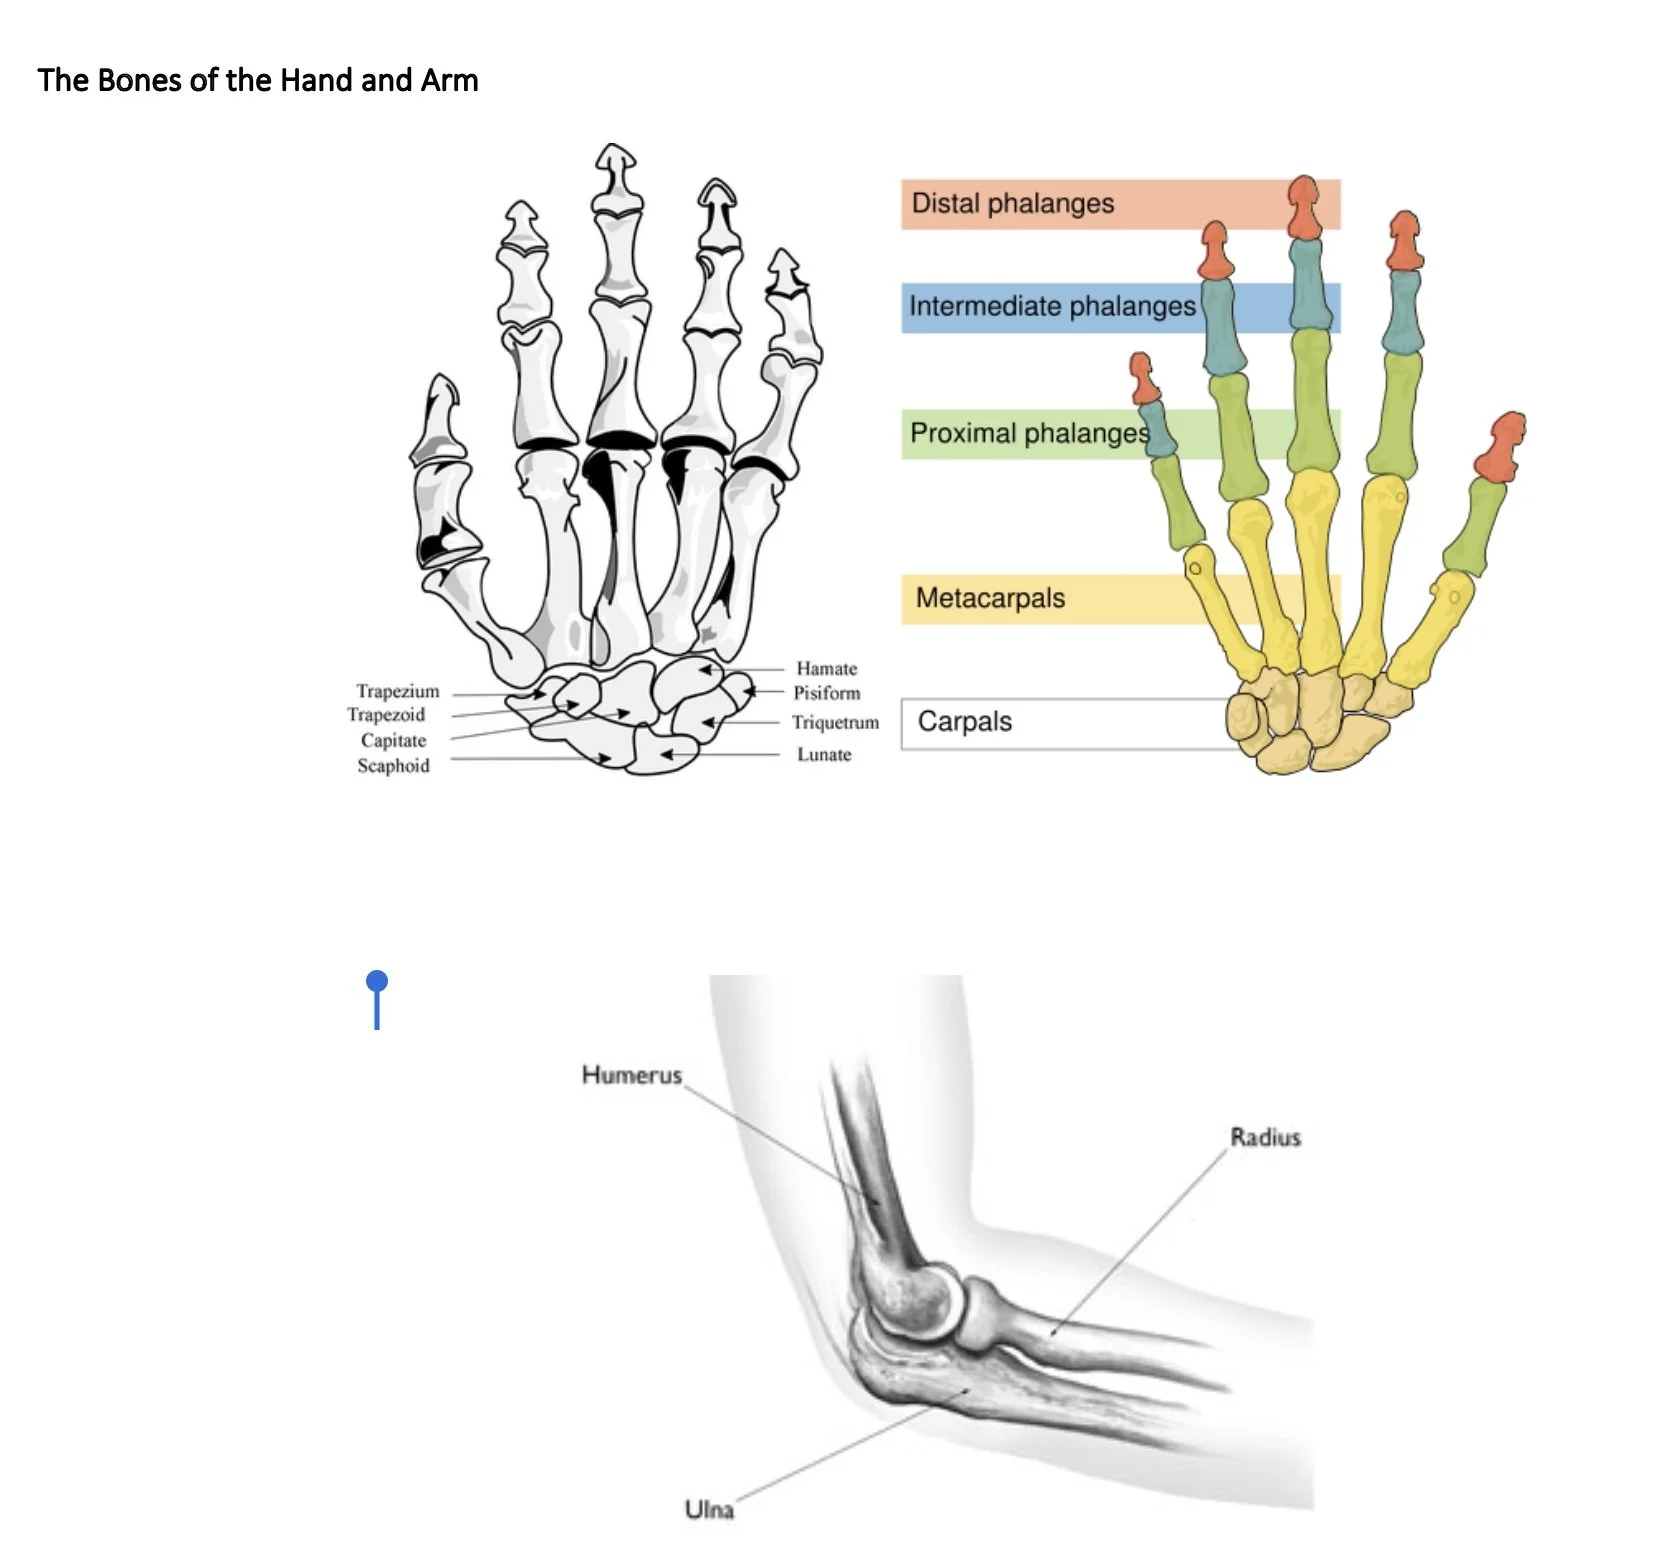
Long bones are longer than they are wide and work like levers. The bones of the upper and lower extremities (e.g., humerus, tibia, femur, ulna, metacarpals, etc.) are of this type.
Short bones are short, cube-shaped, and found in the wrists and ankles. Flat bones have broad surfaces for the protection of organs and attachment of muscles (e.g., ribs, cranial bones, bones of shoulder girdle).
Irregular bones are all others that do not fall into the previous categories. They have varied shapes, sizes, and surface features and include the bones of the vertebrae and a few in the skull.
Bone Composition:
Bones are composed of tissue that may take one of two forms—compact or dense bone, spongy or cancellous bone. Most bones contain both types.
Compact bone is dense, hard and forms the protective exterior portion of all bones.
Spongy bone is inside the compact bone and is very porous (full of tiny holes). Spongy bone occurs in most bones.
The charts on the following pages show the main bones that you will need to have good knowledge of.
The Cardiovascular System
All body systems are linked by the cardiovascular system, a transport network that affects every part of the body. To maintain homeostasis, the cardiovascular system must provide for the rapid transport of water, nutrients, electrolytes, hormones, enzymes, antibodies, cells, and gases to all cells. In addition, it contributes to body defences and the coagulation process and controls body temperature. The term cardiovascular refers to the cardiac (heart) muscle, the vascular system (a network of blood vessels that includes veins, arteries, and capillaries), and the circulating blood. Thus, the three primary components of the cardiovascular system are:
Heart
Circulating blood
Blood vessels (the circulatory system)
Organ/Structure
Primary Functions
Heart
· Muscular organ about the size of an adult's closed first
· Contractions push blood throughout the body
· The average heart beats 60 to 80 times per minute
Arteries
· Transport blood from the right and left chambers of the heart to the entire body
· Large arteries branch into arterioles the farther they are from the heart
· Carry oxygenated blood that is bright red in color
· Have thicker elastic walls than veins do
· Have a pulse
· Are located deep in muscles/tissues
Veins
· Blood is transported from peripheral tissues back to the heart and lungs
· Large veins branch into venules in the peripheral tissues
· Deoxygenated blood is carried back to the lungs to release carbon dioxide
· Carry blood that is normally dark red in color
· Have thinner walls than arteries; walls appear bluish
· Valves prevent the backflow of blood
· Are located both deep and superficially (close to the surface of the skin)
Capillaries
· Connect arterioles with venules via microscopic vessels
· Oxygen and carbon dioxide, nutrients, and fluids in tissue capillaries are exchanged
· Waste products from tissue cells are passed into capillary blood, then onto removal from the body
· Carry blood that is a mixture of arterial blood and venous blood
Circulating Blood
· Oxygen and carbon dioxide, nutrients, and fluids are transported by circulating blood
· Waste products are removed
· Nutrients are disbursed
· Regulates body temperature and electrolytes
· Regulates the blood-clotting system
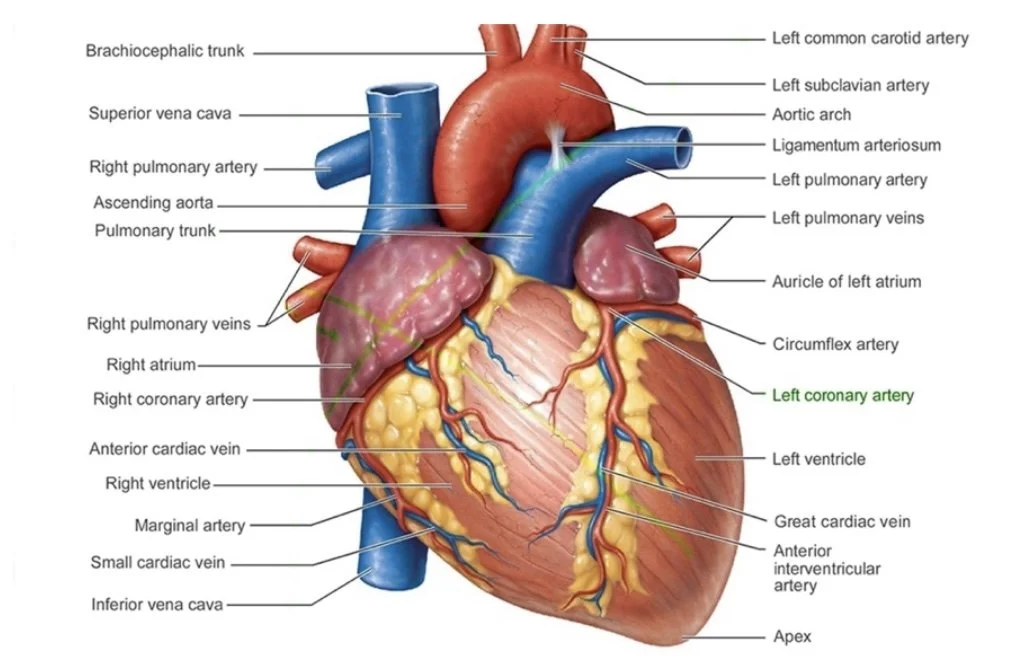
The Heart
The human heart is a muscular organ about the size of a man's closed fist. The heart contains four chambers and is located slightly left of the midline in the thoracic cavity. The two atria are separated by the interatrial septum (wall), and the interventricular septum divides the two ventricles. Heart valves are positioned between each atrium and ventricle so that blood can flow in one direction only, thereby preventing backflow. The right atrium of the heart receives o2-poor blood from two large veins: the superior vena cava and the inferior vena cava. The superior vena cava brings blood from the head, neck, arms, and chest; the inferior vena cava carries blood from the rest of the trunk and the legs. Once the blood enters the right atrium, it passes through the heart valve (right atrioventricular, or tricuspid, valve) into the right ventricle. When blood exits the right ventricle, it begins the pulmonary circuit—it enters the right and left pulmonary arteries. Arteries of the pulmonary circuit differ from those of the systemic circuit because they carry deoxygenated blood.
Like veins, they are usually shown in blue on colour-coded charts. These vessels branch into smaller arterioles and capillaries within the lungs, where gaseous exchange occurs (o2 is picked up, and Co2 is released). From the respiratory capillaries, blood flows into the left and right pulmonary veins and then into the left atrium. The left atrium also has a valve (left atrioventricular, bicuspid, or mitral valve). Blood flows through the mitral valve into the left ventricle. When blood exits the left ventricle, it passes through the aortic semilunar valve and into the systemic circuit by means of the ascending aorta. The systemic circuit carries blood to the tissues of the body. If a valve malfunctions, blood flows backwards and a heart murmur results. The right side of the heart pumps o2 poor blood to the lungs to pick up more o2; the left side pumps o2-rich blood toward the legs, head, and organs. The heart's function is to pump enough blood to all cells of the body by contraction (systole) and relaxation (diastole). Because the lungs are close to the heart, and the pulmonary arteries and veins are short and wide, the right ventricle does not need to pump very hard to propel blood through the pulmonary circuit. Thus, the heart wall of the right ventricle is relatively thin. On the other hand, the left ventricle must push blood around the systemic circuit, which covers the entire body. As a result, the left ventricle has a thick, muscular wall and a powerful contraction.
Blood pressure increases during ventricular systole and decreases during ventricular diastole. Blood pressure not only forces blood through vessels but also pushes it against the walls of the vessels like air in a balloon. Therefore, it can be measured by how forcefully it presses against vascular walls.
The average heart beats 60 to 80 times per minute. Children have faster heart rates than adults, and athletes have slower rates because more blood can be pumped with each beat. During exercise, the heart beats faster to supply muscles with more blood. During and after meals, it also beats faster to pump blood to the digestive system. During a fever, the heart pumps more blood to the skin surface to release heat. Remember that all
responses are designed to maintain homeostasis. The heart rate (pulse rate) is measured by feeling for a pulse and counting the pulses per minute.
The Vessels and Circulation
Three kinds of blood vessels exist in the human body:
Arteries
Veins
Capillaries
This intricate system travels to every inch of the human body through repeatedly branching vessels that get smaller and smaller as they move away from the heart (arteries) and then get larger again as they return toward the heart (veins). The largest artery (aorta) and veins (venae cavae) are approximately 1 inch wide.


Arteries
Arteries are highly oxygenated vessels that carry blood away from the heart (efferent vessels). They branch into smaller vessels, called arterioles, and into capillaries. Arteries appear brighter red in colour, have thicker elastic walls than veins do, and have a pulse.
Veins
Blood is carried toward the heart by the veins (afferent vessels). It is remarkable that the blood in veins flows against gravity in many areas of the body; these vessels have one-way valves and rely on weak muscular action to move blood cells. The one-way valves prevent the backflow of blood. All veins (except the pulmonary veins) contain deoxygenated blood. Veins appear bluish in colour under the skin and have thinner walls than arteries. You should become familiar with the principal veins of the arms and legs. The antecubital area of the forearm is most commonly and generally the largest and best-anchored vein. Others in the antecubital area that are acceptable are the basilic vein and the cephalic vein.
Capillaries
Capillaries are tiny, microscopic vessels that connect or link arteries (arterioles) and veins (venules) and may be so small in diameter as to allow only one blood cell to pass through at any given time. They are the only vessels that permit the exchange of gases (o2 and Co2) and other molecules between blood and surrounding tissues.
Capillaries do not work independently but are a part of an interconnected network. Each arteriole ends in dozens of capillaries (capillary bed) that eventually feed-back into a venule (when gas/ the nutrient exchange has been completed). Blood in the capillary bed is a mixture of arterial and venous blood.
Comparing External Bleeding from Arteries, Veins, and Capillaries
The nature of taking blood requires you to regularly deal with clients who are bleeding. External bleeding can be described according to the type of blood vessel that is injured and losing blood.
Types of External Bleeding
Arterial blood is bright red in colour (due to high o2 content), and since the pressure is higher in arteries, bleeding is usually quicker, more abundant, and in spurts (with each heartbeat). Arterial bleeding is the hardest to control and usually requires special attention from a nurse and/or doctor. During a venepuncture procedure, if you accidentally puncture an artery instead of a vein, you should follow immediate steps to terminate the procedure and apply pressure to the site. Accidental incidents such as this should be reported in an accident form immediately.
Venous blood is dark red in colour (because it lacks o2), and bleeding occurs in a steady flow. In normal, healthy adults, venous bleeding is easy to stop by simply applying pressure because venous pressure is lower than arterial pressure.
The Blood
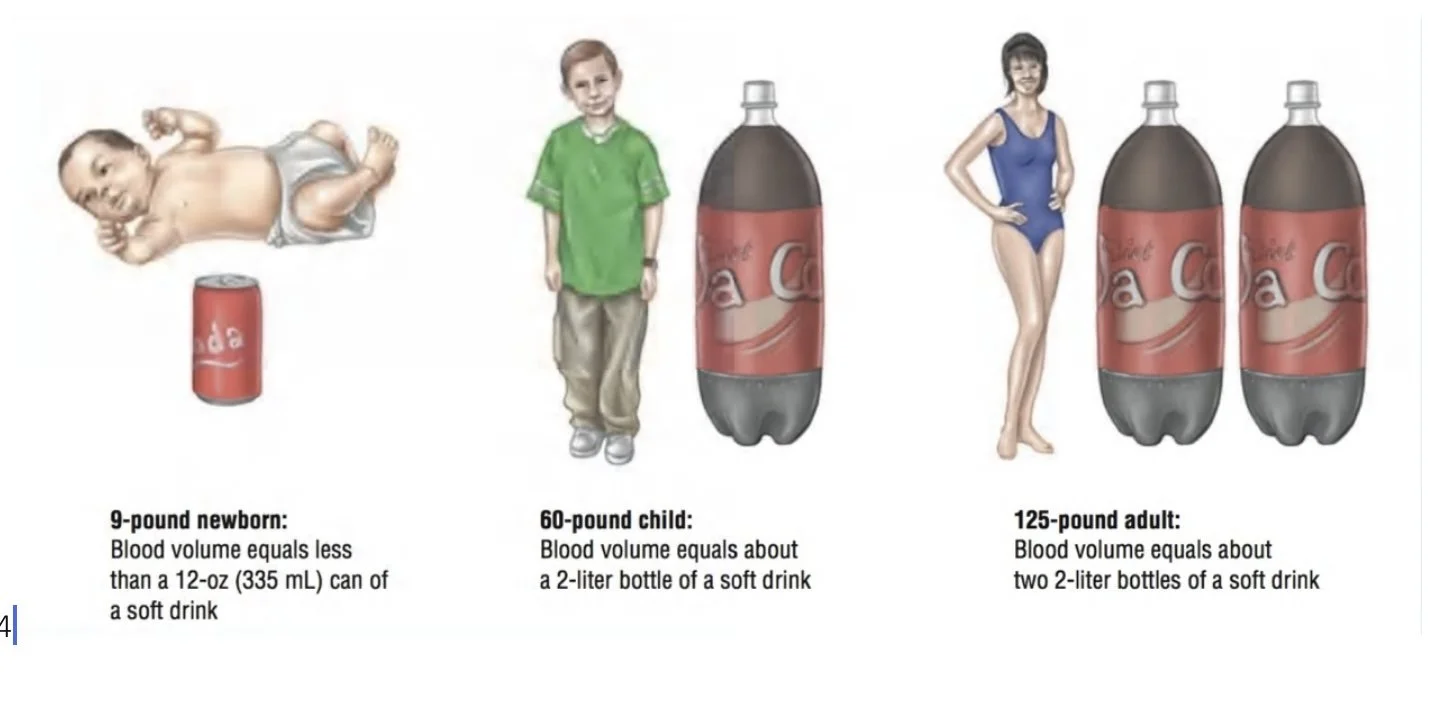
Circulating blood provides nutrients, oxygen, chemical substances, and waste removal for each of the billions of individual cells in the body and is essential to homeostasis and to sustaining life. Any region of the body that is deprived of blood and 02 soon becomes oxygen-deficient, and the tissues may die within minutes. This condition is called hypoxia.
Human bodies contain approximately 4.73 litres of whole blood, which is composed of water, solutes (dissolved substances), and cells. The volume of blood in an individual varies according to body weight; for instance, adult men usually have 5 to 6 litres of whole blood, whereas adult women usually have 4 to 5 litres.
Abnormally low or high blood volumes can seriously affect other parts of the cardiovascular system. Whole blood is normally composed of approximately 2.84 litres, or about 55 to 60 percent, of plasma and 1.89 litres, or about 40 to 45 percent, of cells. Thus, if a blood specimen is withdrawn into a test tube from a vein and centrifuged, about 55 percent will be plasma, and 45 percent will be formed elements (cells). The plasma portion contains approximately 92 percent water and 8 percent solutes. Solutes include proteins, such as albumin (maintains water balance in the blood); fibrinogen (for blood clotting); metabolites, such as lipids; glucose; nitrogen wastes; amino acids; and ions, such as sodium (Na), potassium (K), calcium (Ca), magnesium (Mg), and chloride (Cl).
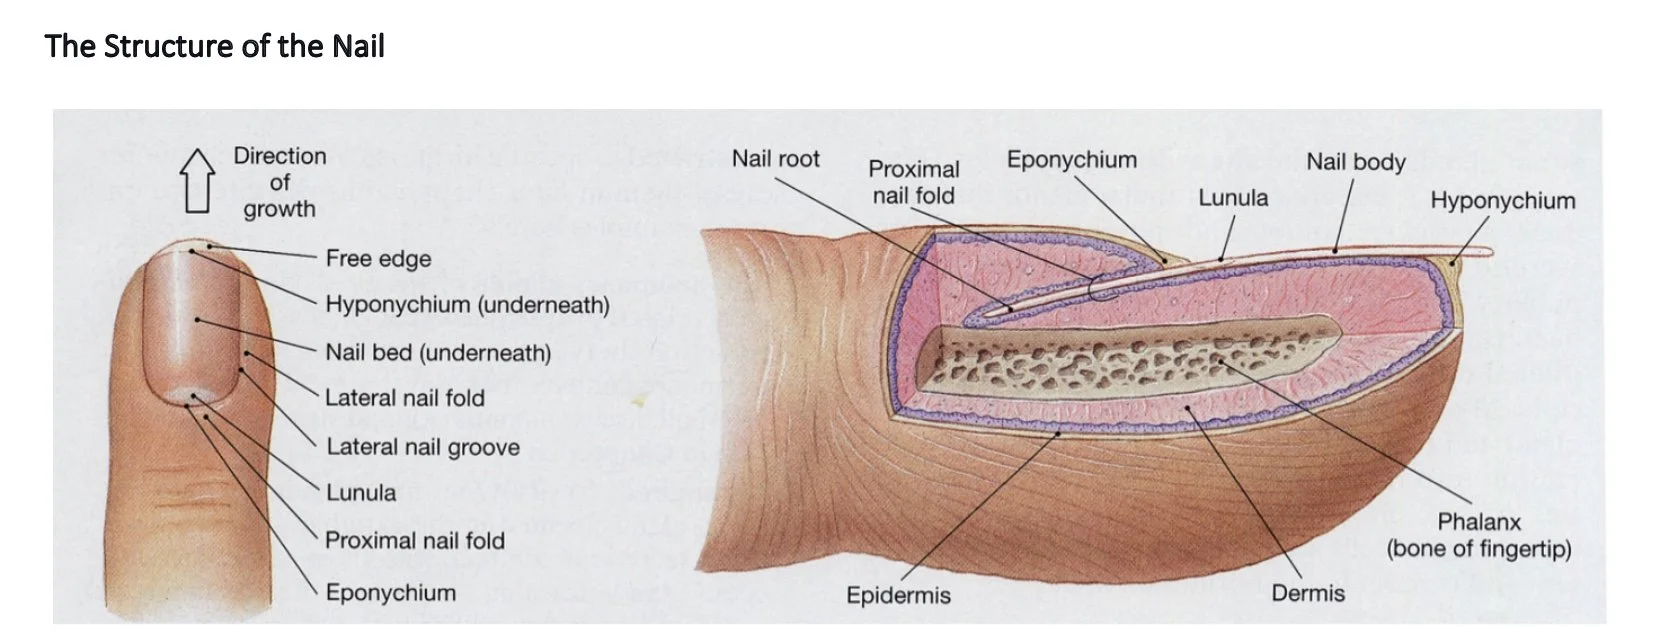
Matrix
This lies below the eponychium, and it is a small area of living tissue. This area is the most important part of the nail as this is where the cells are produced that make up the nail plate. These cells are made of the protein Keratin.
Eponychium
The eponychium is the skin that lies directly on the top of the newly growing nail. It is living tissue and often mistaken for cuticle.
Proximal Nail Fold
This is the bend of skin that folds underneath itself and is found at the point where the nail grows.
Lunula
The Lunula is the whitish half-moon area at the base of the nail plate. The Lunula is the front part of the matrix that you can see. The Lunula is not visible on all nails.
Lateral Nail Fold
The lateral nail folds are the tight skin folds that run on either side of the nail.
Lateral Nail Groove
This is the groove in the Lateral Fold within which the nail sits.
Nail Bed
The nail bed lies below the nail and is an area of pinkish tissue that supports the entire nail plate.
Hyponychium
The Hyponychium is located under the free edge of the nail plate. It is composed of epidermis tissue and helps to seal the nail bed to the nail plate and protect it from bacteria.
Nail Plate
The nail plate is built up of layers of Keratin. Keratin is also found in hair and is made up of long chains of Amino Acids.
Cuticle
The cuticle is a non-living tissue that is shed from the underside of the eponychium. It attaches itself to the nail plate and is pulled along as the nail grows outwards. It also helps to create a seal to protect the body from bacteria.
Free Edge
It is the part of the nail which grows over and beyond the fingertip and does not adhere to the nail bed.
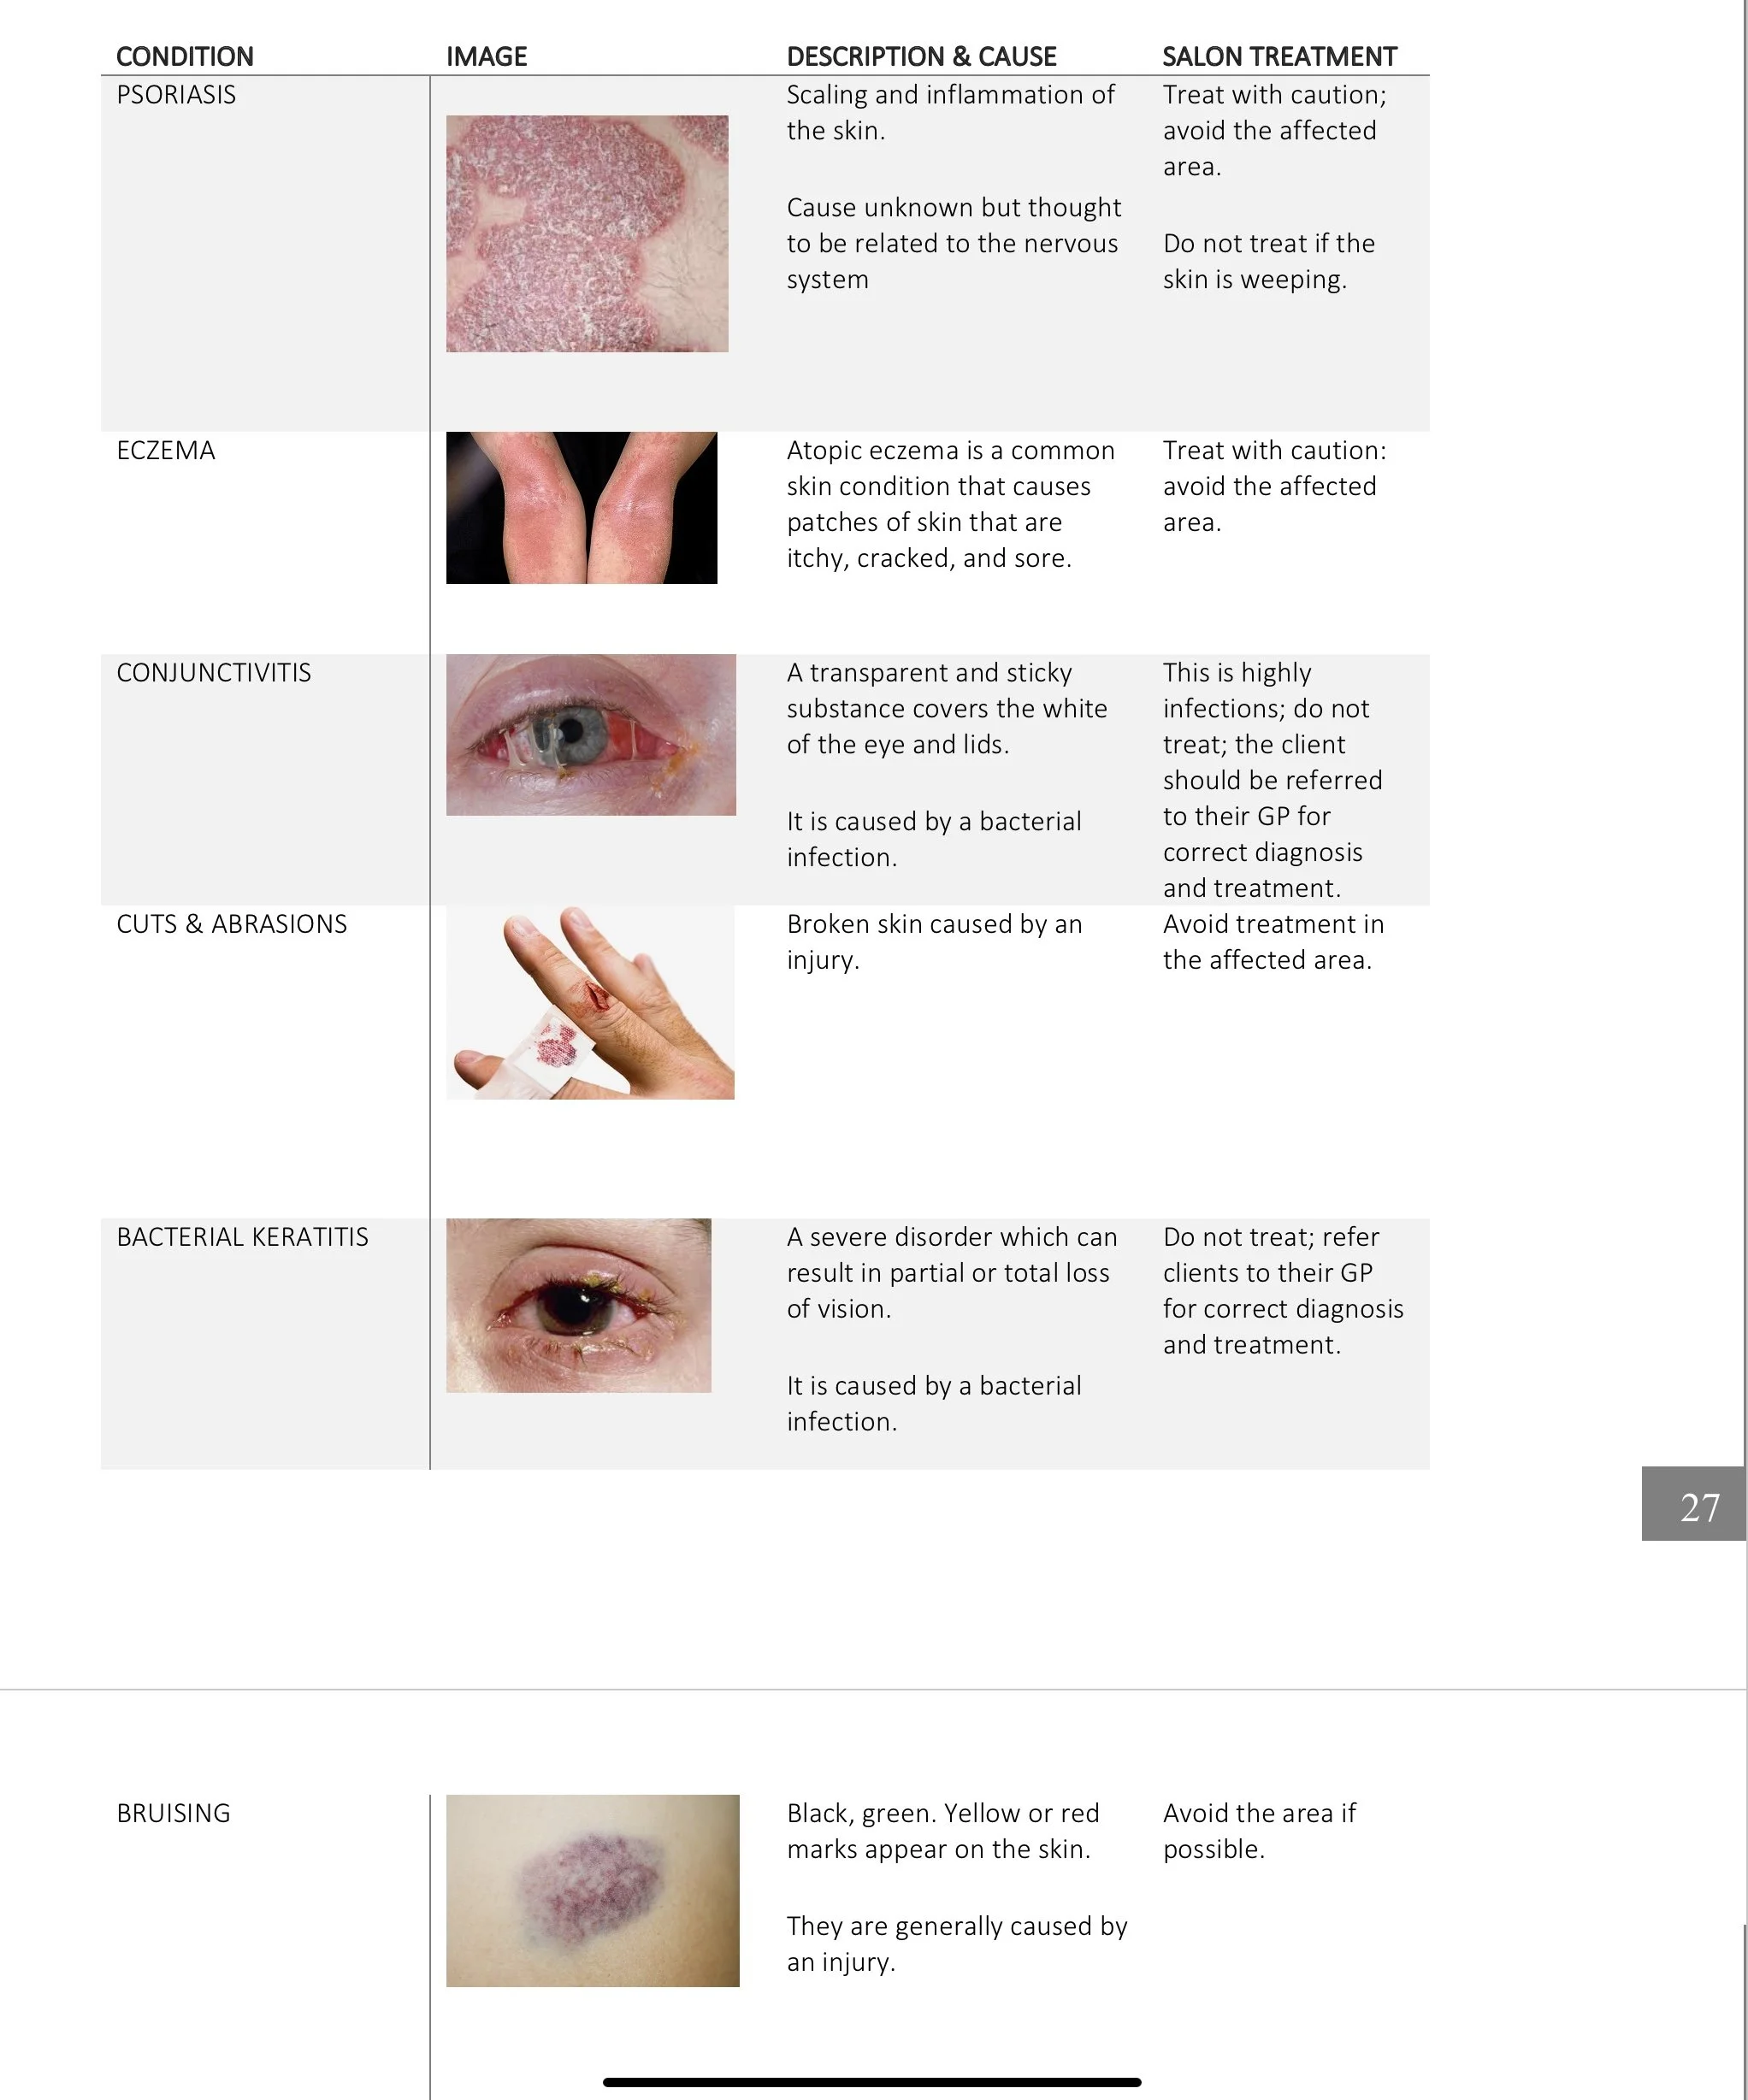
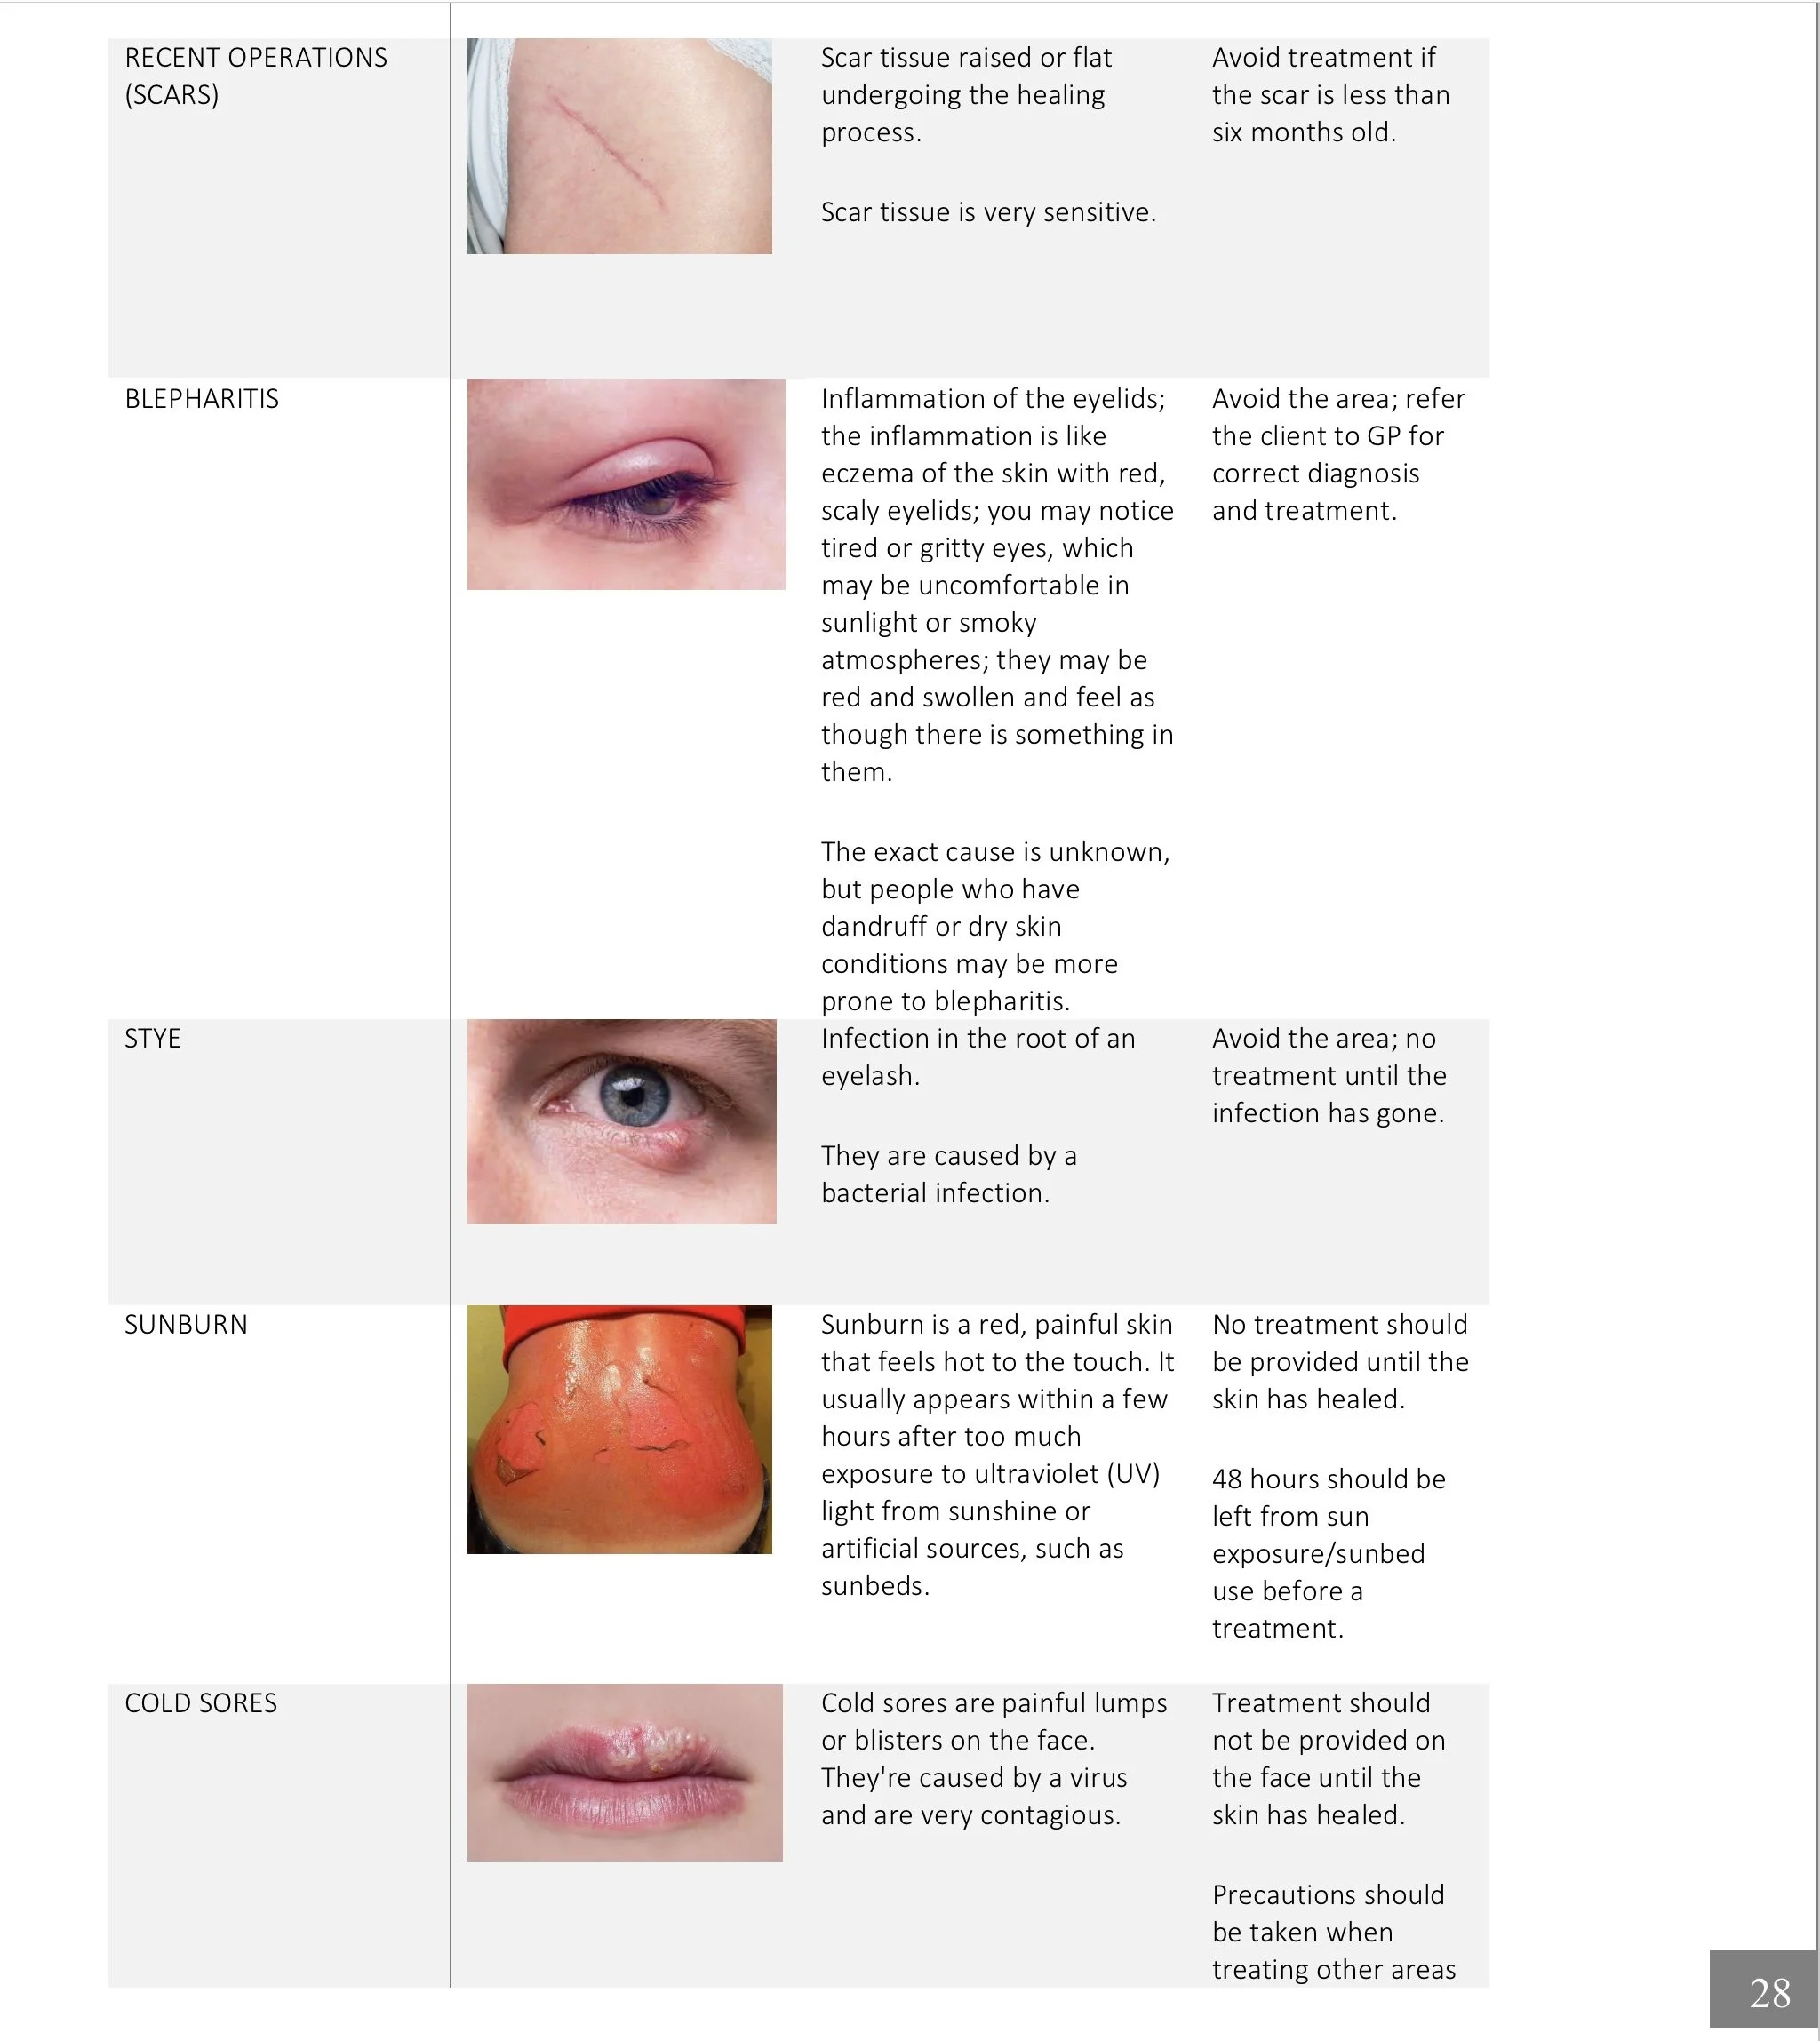
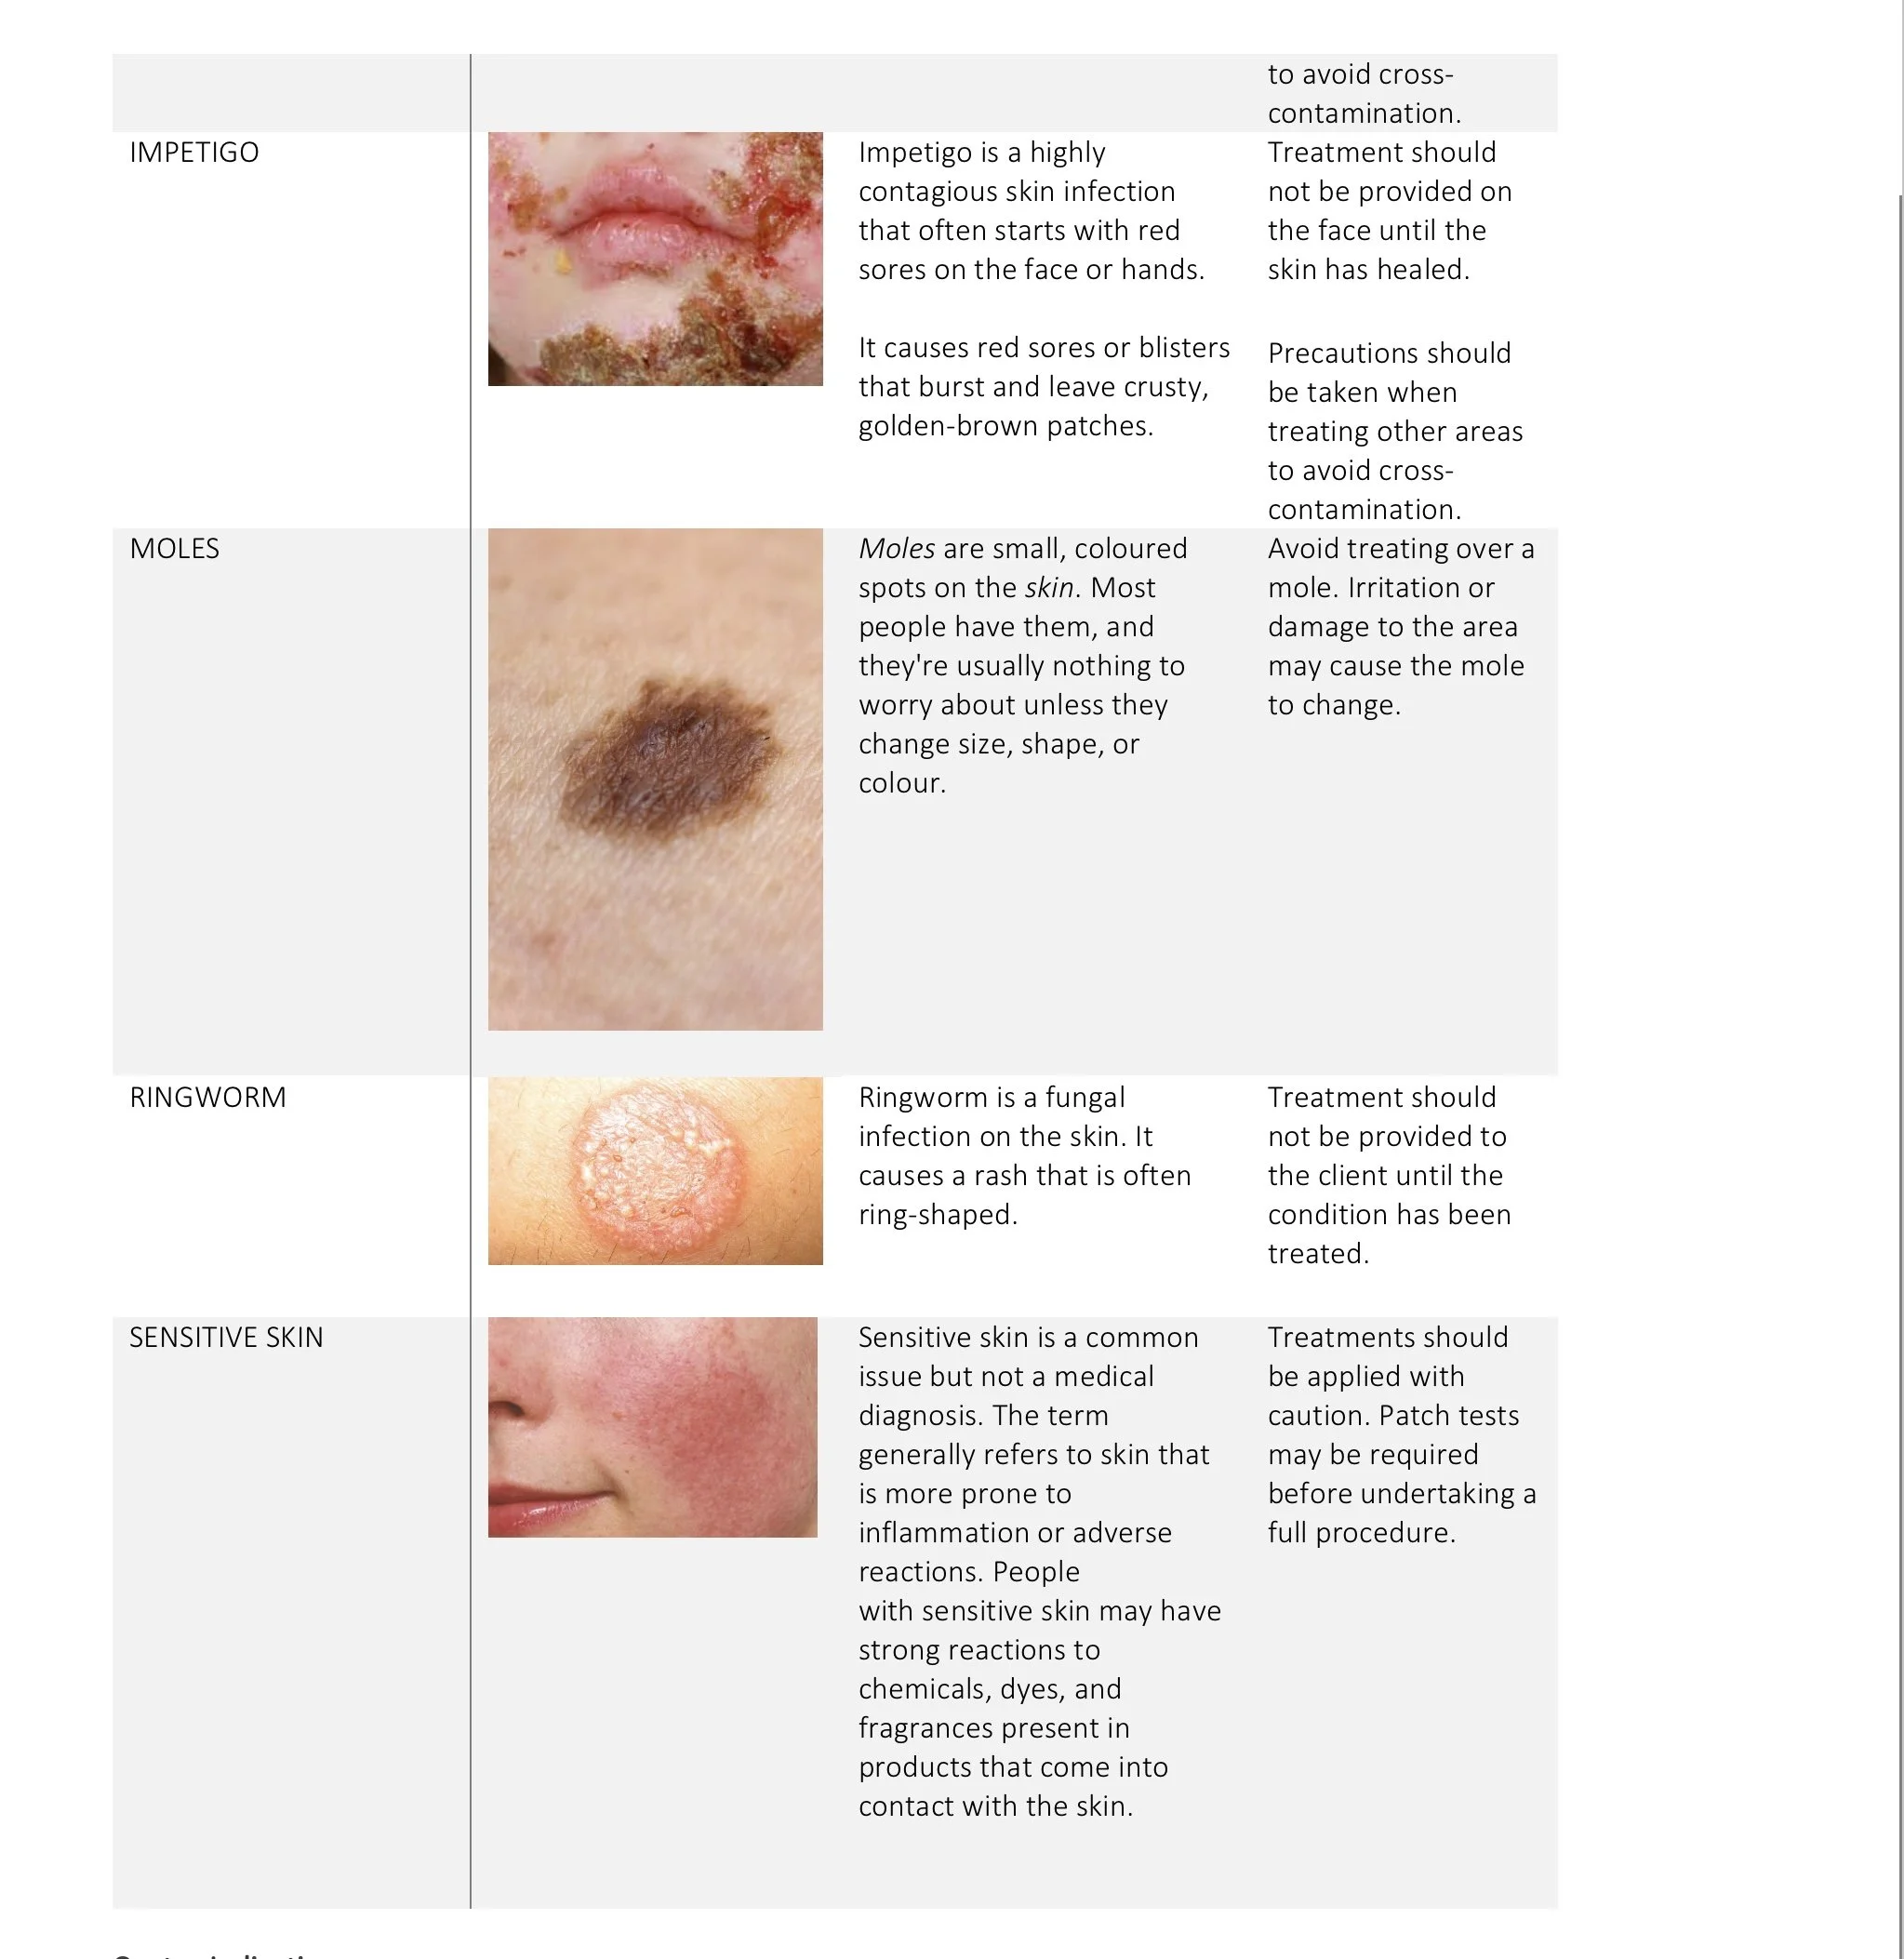
Contra-indications
A contraindication is the presence of a condition which may make the client unsuitable for the treatment. The treatment may not be able to take place, or the treatment will need to be adapted.
When treating a client, if they show any signs of contra-indications, you should tactfully refer them to their GP for treatment or advice. You should never make a diagnosis even if you are certain of the condition as you may be wrong.
If you are unsure about any contra-indications, then do not treat the client and refer them to their GP.
Be careful if you deal with a contra-indication, and they can often be contagious. Make sure you clean the work area and any implements between clients to prevent cross-infection.
Common contra-indications
General Health & Wellness
Condition
Description
Salon Treatment
Diabetes
Diabetes is a lifelong condition that causes a person's blood sugar level to become too high.
There are two main types of diabetes:
type 1 diabetes – where the body's immune system attacks and destroys the cells that produce insulin
type 2 diabetes – where the body does not produce enough insulin or the body's cells do not react to insulin.
Type 2 diabetes is far more common than type 1. In the UK, around 90% of all adults with diabetes have type 2.
The amount of sugar in the blood is controlled by a hormone called insulin, which is produced by the pancreas (a gland behind the stomach).
When food is digested and enters the bloodstream, insulin moves glucose out of the blood and into cells, where it's broken down to produce energy.
However, with diabetes, the body is unable to break down glucose into energy. This is because there's either not enough insulin to move the glucose, or the insulin produced does not work properly.
Can often be treated if the client is managing their diabetes well. Check with your insurer as their criteria may not allow treatment. A GP note may be required.
Treatments that cause injury to the skin can increase the risk of infection. Those with diabetes will need to understand wound management and treatments should be done under extreme caution as to not injure the skin if necessary.
Diabetics have a slower wound healing response and have a higher risk of infection. All products used must be sterile, and care should be taken not to injure the skin.
Epilepsy
Epilepsy is diagnosed when a person has had more than one epileptic seizure and could have more in the future.
Electrical activity is happening in our brain all the time. A seizure happens when there is a sudden burst of intense electrical activity. This is often referred to as epileptic activity. This intense electrical activity causes a temporary disruption to the way the brain normally works, meaning that the brain’s messages become mixed up. The result is an epileptic seizure.
There are many different types of seizure, and each person will experience epilepsy in a way that is unique to them.
Some things make seizures more likely for some people with epilepsy. These are often referred to as ‘triggers. Triggers are things like stress, not sleeping well and drinking too much alcohol. Some people say they have more seizures if they miss meals. Not taking epilepsy medicine is another common trigger. A very small number of people with epilepsy have seizures triggered by lights that flash or flicker. Avoiding triggers can stop them from having seizures.
If well-managed treatments may be able to be undertaken. It is worth assessing the client and finding out what triggers a fit and when as well as how it is managed and their last episode.
You may also need to check your insurer's terms and refer the client to a GP for a letter of approval.
Heart conditions
Heart disease describes a range of conditions that affect the heart. Heart diseases include:
· Blood vessel disease, such as coronary artery disease
· Heart rhythm problems (arrhythmias)
· Heart defects you're born with (congenital heart defects)
· Heart valve disease
· Disease of the heart muscle
· Heart infection
Risk of fainting, risk of slow healing or chances that the client may be medicated to keep their condition under control are some risks you will need to be aware of when treating the client. Clients may also have a heart catheter or a pacemaker.
Treatments that do not involve electrical currents being passed through the body are usually safe. Heart conditions should be well managed. You will need to check the terms of your insurance policy. A referral to a GP may be required.
Deficient Immune System
Immunodeficiency disorders prevent the body from fighting infections and diseases. This type of disorder makes it easier to catch viruses and bacterial infections.
Immunodeficiency disorders are either congenital or acquired. A congenital, or primary disorder is one you were born with. Acquired, or secondary, disorders you get later in life. Acquired disorders are more common than congenital disorders.
Your immune system includes the following organs:
· spleen
· tonsils
· bone marrow
· lymph nodes
These organs make and release lymphocytes. These are white blood cells that fight invaders cells called antigens. Cells release antibodies specific to the disease the body detects. White blood cells destroy foreign or abnormal cells.
Examples of antigens that white cells might need to fight off include:
· bacteria
· viruses
· cancer cells
· parasites
An immunodeficiency disorder disrupts your body’s ability to defend itself against these antigens.
A deficient immune system can increase the risk of infection. Treatments that break the skin may increase the risk of infection. Clients may need a GP referral and understand wound management.
Pregnancy
Pregnancy is a period of considerable changes in a woman's body. These changes, affecting virtually every part of the body, are all geared towards growing and delivering a healthy baby, without harming the mother.
Changes begin within days of conception when the fertilised egg implants itself in the wall of the uterus. The first changes are subtle, and most women will not notice them.
Pregnancy lasts an average of 266 days (38 weeks) from the date of conception or 40 weeks from the first day of the last menstrual period. Pregnancy is divided into three periods of three months each. These periods are known as the first, second and third trimesters. Each trimester brings with its own unique set of experiences.
Risks of pregnancy include:
· Miscarriage
· Increased/decreased blood flow
· Risk of fainting
· Oedema
· Pigmentation/Chloasma/mask of pregnancy
· Pelvic trauma
Nearly all treatments are contraindicated in the first trimester. Treatments that cause friction may have a side effect of PIH and should not be performed. Electrical treatments must not be performed at any point.
Breastfeeding
Anything the mother consumes or applies to her skin could be absorbed into the bloodstream and through into the milk ducts, where this can pass to the baby. Great care should be taken with what is being applied to the skin as well as avoiding treatments that could cause open wounds. An open wound is susceptible to infection, and this can cause infection or septicaemia.
During breastfeeding, hormones are still active within the body, and these can have an overall effect on the skin. This may lead to dehydrated skin (if the mother is not ingesting enough water) and lead to a high risk of pigmentation. Invasive procedures should be avoided until a few months after the mother has stopped producing milk.
Treatments that break the skin are strictly contraindicated. The client also has a high amount of hormone imbalance still and may be susceptible to PIH on certain treatments.
Electrical implants or pacemakers
A small battery-operated device called a pacemaker is placed into the chest. It sends regular electrical impulses, which help keep the heart beating regularly.
The pacemaker is a small metal box weighing 20–50g. It is attached to one or more wires, known as pacing leads, that run to the heart.
If the pacemaker senses that the heart has missed a beat or is beating too slowly, it sends signals at a steady rate. If it senses that the heart is beating normally by itself, it does not send out any signals.
Most pacemakers have a special sensor that recognises body movement or the breathing rate. This allows them to speed up the discharge rate when active.
An implantable cardioverter-defibrillator (ICD) is a device like a pacemaker. An ICD delivers an electrical shock to the heart during a life-threatening heart rhythm. The aim is to 'reboot' the heart to get it back into a normal rhythm again. Some modern devices contain both a pacemaker and an ICD.
Electrical implants contra-indicate any treatment that involves an electrical current. Other treatments that may affect blood pressure may also contra-indicate a procedure. Check your insurer's terms and refer the client to GP for a letter of approval.
Anticoagulant medicines such as warfarin or aspirin
Anticoagulants are medicines that help prevent blood clots. They're given to people at a high risk of getting clots, to reduce their chances of developing serious conditions such as strokes and heart attacks.
A blood clot is a seal created by the blood to stop bleeding from wounds. While they're useful in stopping bleeding, they can block blood vessels and stop blood flowing to organs such as the brain, heart, or lungs if they form in the wrong place.
Anticoagulants work by interrupting the process involved in the formation of blood clots. They're sometimes called "blood-thinning" medicines, although they don't make the blood thinner.
Although they're used for similar purposes, anticoagulants are different from antiplatelet medicines, such as low-dose aspirin and clopidogrel.
Anticoagulants prevent the blood from clotting and can affect the healing process of the skin. The client will be at higher risk of bruising also. Treatments that injure the skin or cause trauma will need to be avoided. A GP letter may be required for some services.
Steroids, antidepressants, antibiotics, and other medications
Many drugs can affect the skin. For example, prescription antidepressants, especially the popular class of medications called selective serotonin reuptake inhibitors (SSRIs), can cause a wide variety of adverse skin reactions, including bruising. Acne medications and certain antibiotics may make the skin more sensitive to sunlight and light or heat-based procedures.
It is vital that we find out the medications both prescription and over the counter drugs that the client is taking. The internet is a great source of information to establish the risks the medication may have on the skin during a procedure.
Medications can have numerous effects on the skin. If you are unsure, you should ascertain how the treatment affects the skin and the effects of the medication that is being taken. A patch test may be required or a letter from the clients GP. Where the side effects may be photosensitivity or thinning of the skin, then treatments should be avoided until the client has come off their medication for three months at their GPs request.
Recent surgery
Clients will have surgery for a variety of reasons and on any area of the body. Surgery puts the body under extreme pressure. The client may be on pain medication which could affect their susceptibility to feeling pain during treatment.
Surgery wounds can take many months to fully heal. Post-surgery complications can also arise a few months after the procedure. This can include, infection or necrosis of the wound, infection of the blood, blood clots, internal bleeding, or fever.
If the client has had recent surgery, you will need to weigh up the risk of the procedure, the length of time between the surgery and treatment as well as where the surgery was. In most cases, it is advised to wait six months post-surgery before undertaking any procedures, especially where these may involve invasive techniques, massage, or electrical machines.
Metal plates or pins
If you break a bone, it will need to be held in place while it heals. This can be done using a splint, sling, brace, or cast. But sometimes a broken bone will need to be fixed with surgery, using metal plates, rods, wires, screws, or pins.
Implanted metal can help broken bones heal in proper alignment. While these implants do not help the bone heal faster, they can help to hold bones in the proper position while healing takes place. Implants may include metal plates and screws, pins, and intramedullary rods inserted into the cavity of a bone.
Electrical treatments are almost always contraindicated for clients with metal implants in their body. However, this can vary depending on the area of the implant vs the area of treatment.
Care may also need to be taken when massaging over the area or any pressure is applied.
Chemotherapy/
radiotherapy
Chemotherapy is a form of cancer treatment where a patient is given drugs designed to kill cancer cells. Radiation is a type of cancer treatment where high doses of radiation are delivered to cancerous tumours in the body.
Both procedures can affect the sensitivity of the skin, and the skin texture may change. A waxy appearance to the skin can alter the effects of treatments and treatments may not be suitable. Clients may also be at risk of pigmentation.
Clients undergoing treatment for cancer may benefit from a few procedures in a salon for the purpose of relaxation and pain management as well as to make them feel good.
Some treatments may be too much for the client to handle and cause unwanted side-effects.
It is worth discussing the treatment with the client and working out alternatives where suitable. If unsure, you may wish to ask for a letter from the client's oncologist.
Broken bones
When a bone has an outside force exerted upon it, like a blow or a fall, there is potential that it cannot withstand the amount of force and it breaks. That loss of integrity results in a fracture. It is important to remember that a fracture, break, or crack all describe the same situation, an injury to the bone where it has been damaged. One term is not more serious than another. Fracture break and crack all mean the same thing.
Clients with a suspected or recent fracture should be treated with caution. If working over the area of a recent break, then the time between the break and the treatment should be at least six months. If working on other areas of the body, it is best to wait for 6-8 weeks post-injury as the client may be more susceptible to an embolism.
Previous or recent treatments in the area
When providing a service to the client, it is important to establish what previous treatments they have had, not only at clinics but at home. You should look to enquire over the products they use regularly that may affect the skin and the treatment outcome.
Some treatments can affect the skin by either removing out layers of the stratum corneum or stimulating a healing response. You will need to identify if the client has had any recent procedures in the treatment area you will be working on.
Contra-indications
A contraindication is the presence of a condition which may make the client unsuitable for the treatment. The treatment may not be able to take place, or the treatment will need to be adapted.
When treating a client, if they show any signs of contra-indications, you should tactfully refer them to their GP for treatment or advice. You should never make a diagnosis even if you are sure of the condition as you may be wrong.
If you are unsure about any contra-indications, then do not treat the client and refer them to their GP.
Be careful if you deal with a contra-indication, and they can often be contagious. Make sure you clean the work area and any implements between clients to prevent cross-infection.
Contra-Indications
A contra indication is something that you can see or that the client tells you about during consultation that prevents the client from being able to have the treatment. Treating a client with a contra indication could put your client at risk and will make your insurance invalid.
If you notice something on the client that Contra Indicates the treatment that the client has not mentioned during consultation, then you must cease treating them and explain why. However, it is important as beauty therapists that we do not make a diagnosis but instead ask the client to seek professional Care to rule it out as a contra indication before rebooking them back in.


Other Contraindications
· Cuts and abrasions – ones which cannot be covered or avoided.
· Arthritis - rheumatoid arthritis is an inflammatory condition so it is best to avoid massage, paraffin wax, or any other heat treatments on these clients. Those with osteoarthritis may benefit from light massage.
· Diabetes - clients may have reduced skin sensitivity caused by peripheral neuropathy (nerve numbness).
Contra-Actions
· Allergic reaction from the products used, resulting in swelling, redness, itching or irritation.
· Nips or cuts from the tools used.
· Heat on the nail plate from excessive buffing, filling or from the curing process of the LED Light.
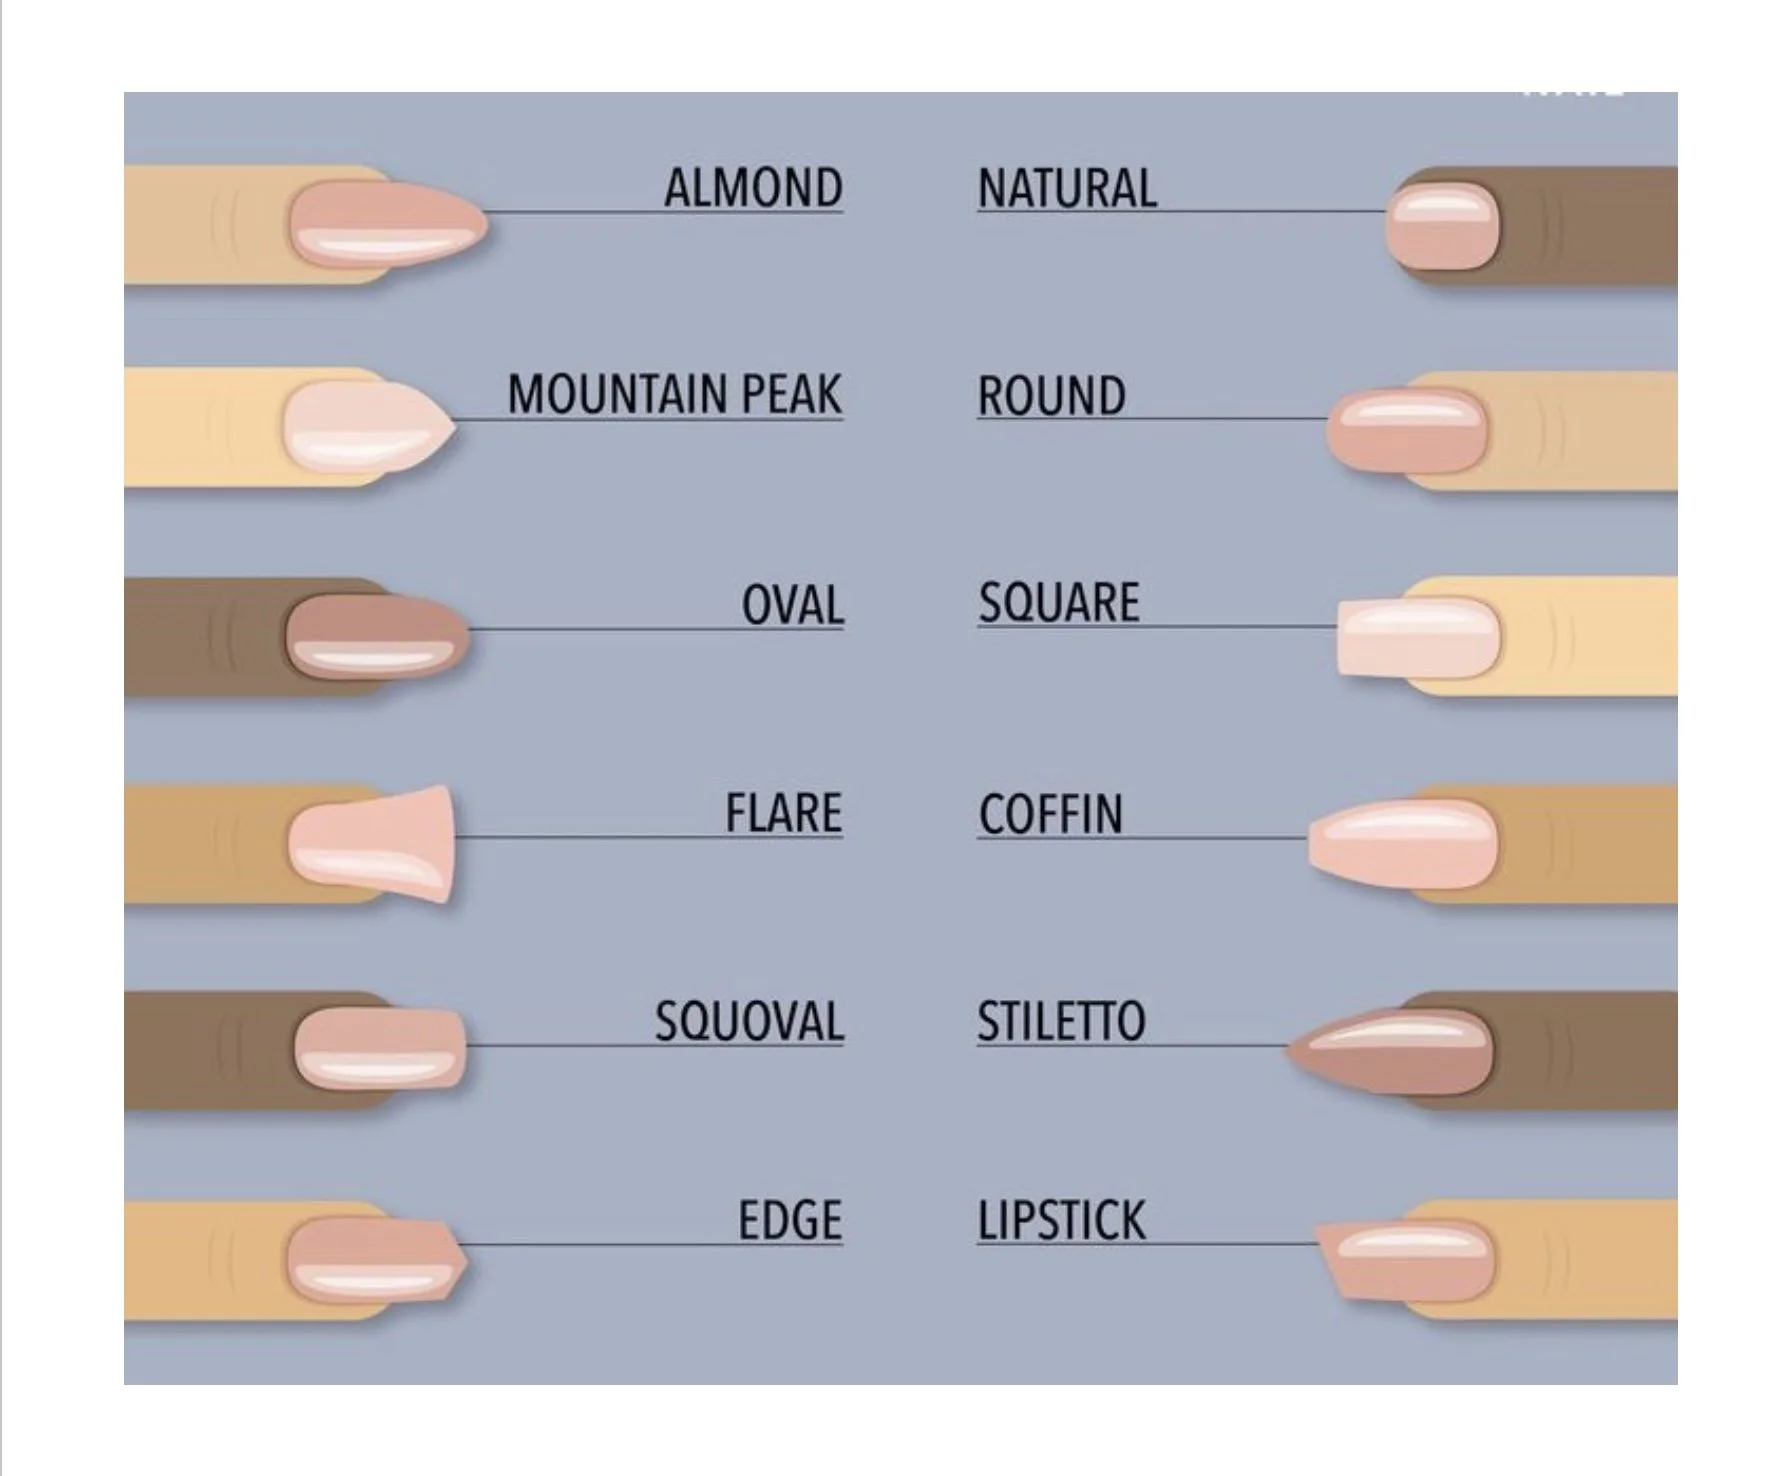
Nail Shapes
Oval – This shape is suitable for most handshapes; it is the ideal shape.
Square - Very hard shape to maintain as the corners easily break. It is a very well-liked shape, but most suited for a client with a longer finger and nail plate.
Squoval – Most suitable for a client that has a longer finger and nail plate. It is a very popular shape for people that cannot sustain a square shape.
Round – This shape is easy to maintain, most suited for a person that has an occupation where they are not allowed a longer nail. It would also be suited for someone that has a naturally short, round nail plate.
Almond – This shape makes short nails appear-longer, it is quite alike to the oval nail shape. This is a more realistic choice.
Pointed – This nail shape offers no support to the nail and leaves the nail tip very fragile. Recommend an almond shape.
Coffin – This shape is very popular. A long shape and flat at the tip.
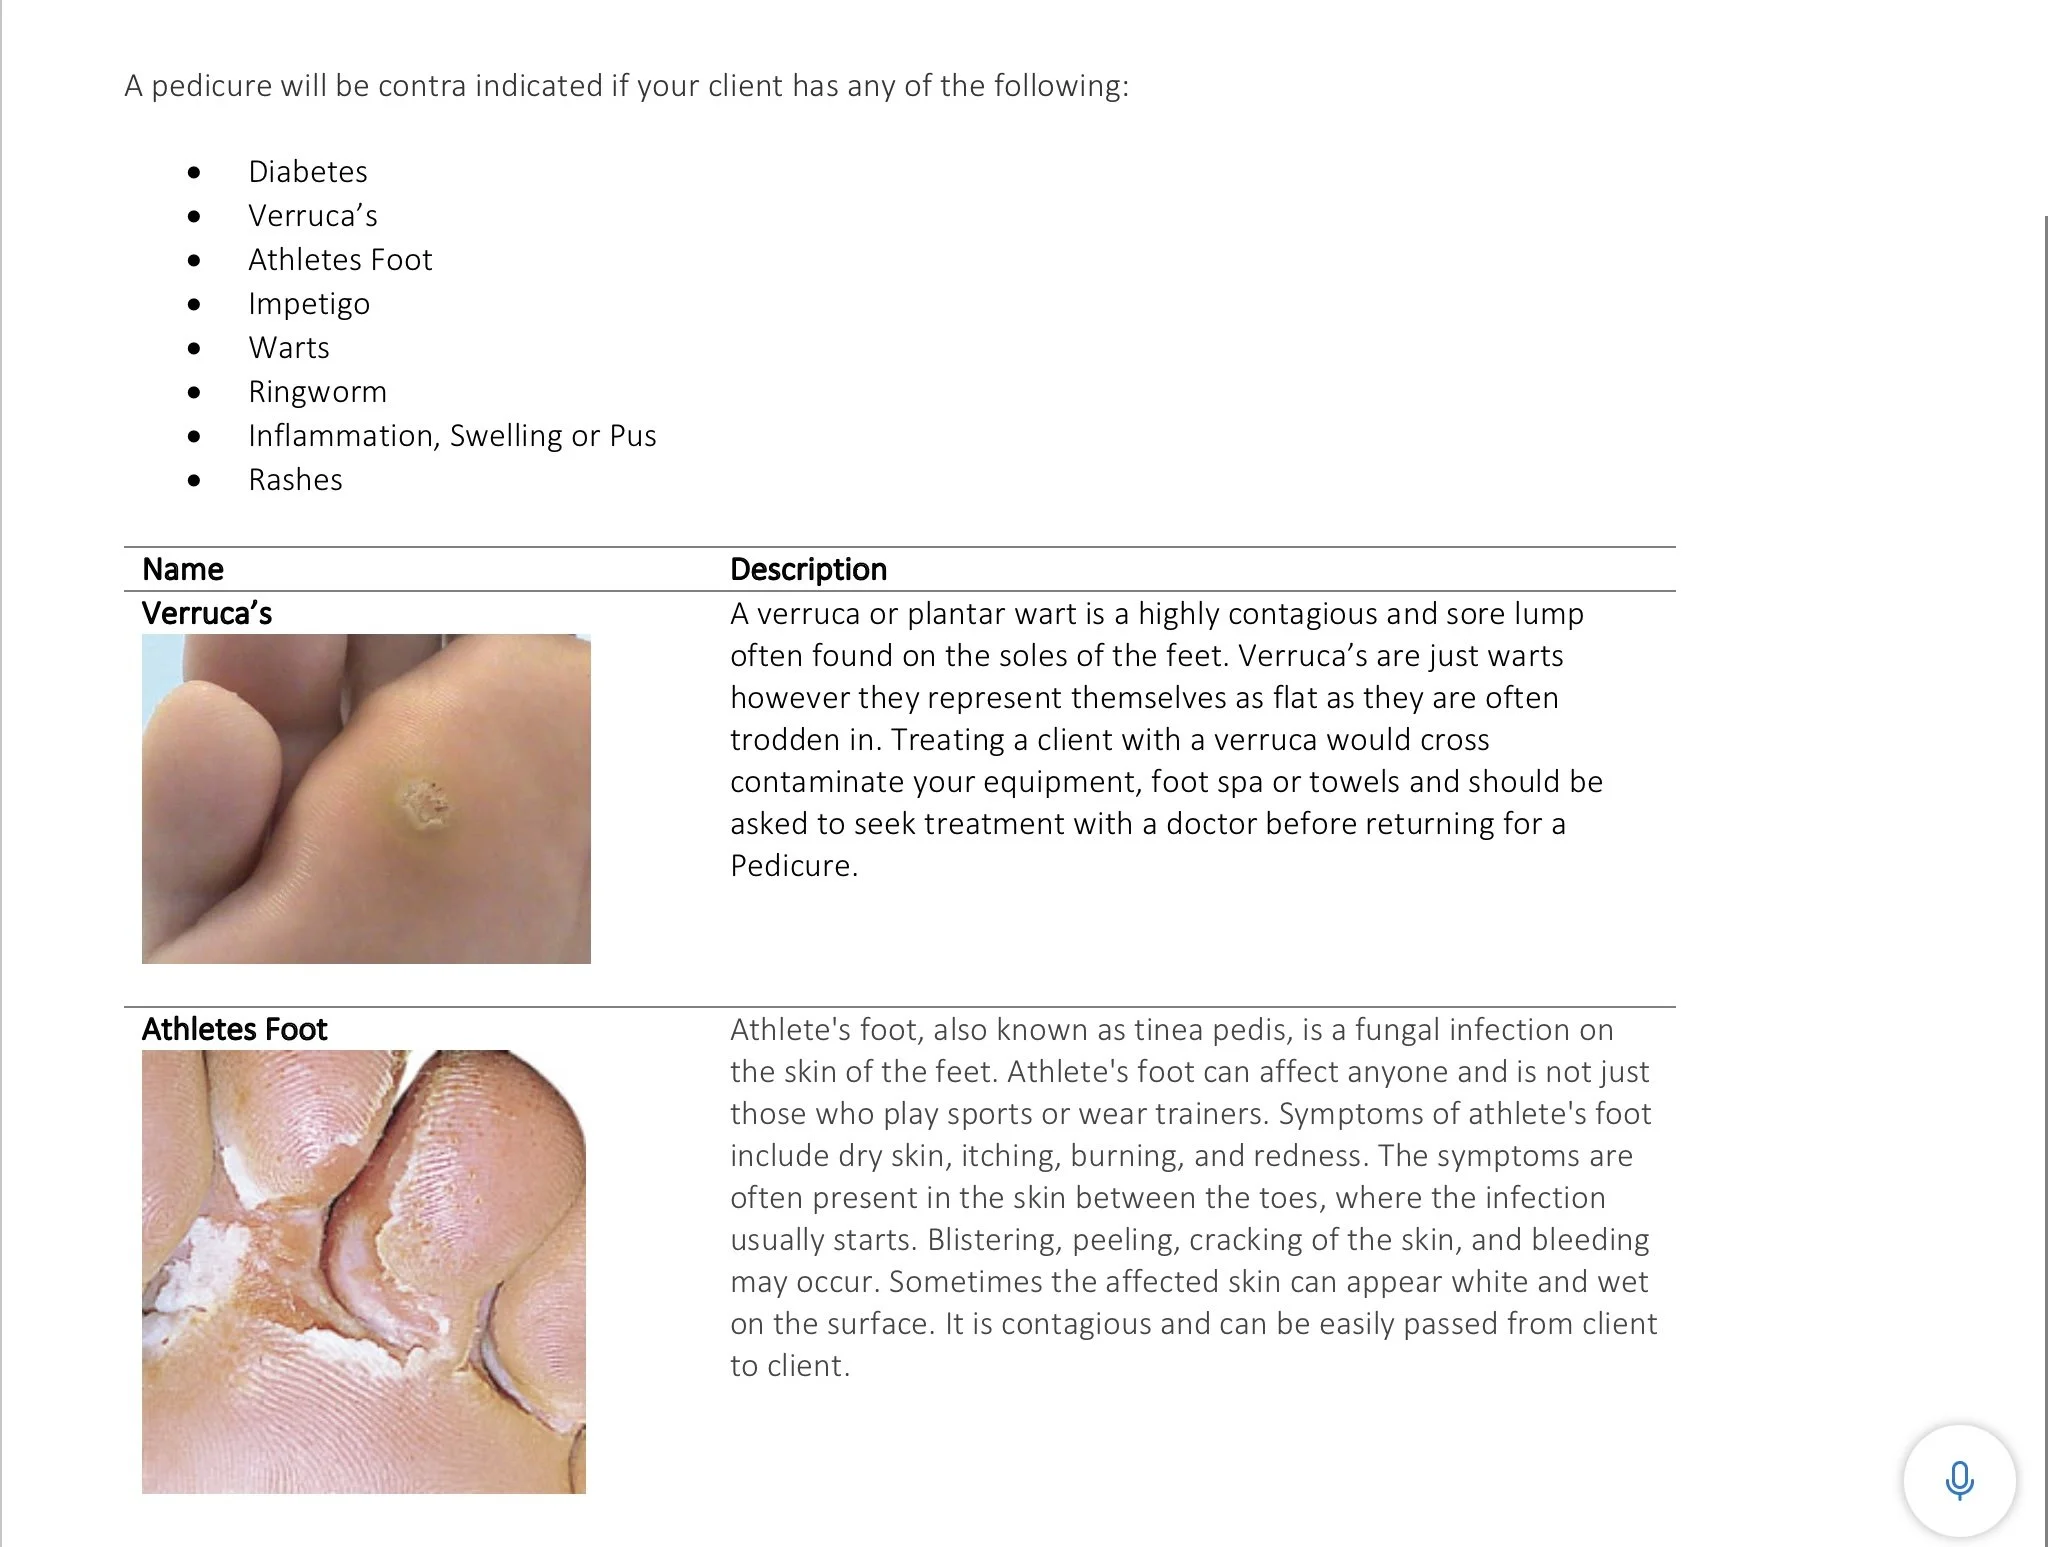
Setting up your Work Area
Seating
When offering Pedicure services, you should ensure that both client and you are comfortable during the treatment. A comfortable high-backed armchair is best for your client, with a low stool for yourself that prevents you from bending over the client. Some therapists like to work on a treatment couch, and this is ok too.
When offering Manicure services, you should ensure that both client and you are comfortable during the treatment. A comfortable high-backed armchair is best for your client, with an adjustable high-backed chair for yourself that prevents you from bending over the nail desk.
Drawers/Desk
You need somewhere to keep your equipment and products within reach. There are specialist pedicure trolleys for this, or you can use your nail desk or a shelf or another surface that can be brought close to you whilst you are working.
Adequate Lighting
Good lighting is essential to prevent you from straining your eyes whilst working on your clients. If you cannot have natural sunlight, then ensure the room itself is well lit with high voltage lighting. A nail lamp is ideal for giving you additional light over your working area without creating shadows.
Electricity Supply
You should be as close to a plug socket as possible to prevent trailing wires and possible accidents.
Ventilation
Councils are now trying to ensure that anyone offering nail services has adequate ventilation to remove dust and fumes from the environment. You can purchase dust and fume extractors to add to your working area and ensure windows can be easily opened to allow fresh air in too.
Sanitiser Spray
It helps to kill any germs or bacteria on the feet before commencing the treatment. It can also be used on your own hands or equipment as a sanitiser.
Nail files
Nail files are made from different types of material and come in different grit levels. The grit level states the coarseness or fineness of the file. Never use a coarse file on thin, weak nails.
The rule is: start with a finer grit if uncertain about the condition of the nail.
Note that the lower the number the coarser the grit.
80 grits: This is very coarse and should never be used on natural nails. Some might use this on artificial nails but even then, it's still a little too rough.
100 grits: This is still a coarse file, but 100 grits can safely be used on artificial nails only.
180 grits: This is the lowest grit that should be used on natural nails but if the nails are damaged or prone to damage, you might want to use a finer grit.
240 grits: This is a softer grit and a file with this grit is often used for buffing the nails to a smooth finish or buffing away stains.
500 grits: A file with this grit is a very soft one that would usually only be used to polish the nail.
Now that you understand grit levels, let's discuss the different types of files that are available.
Double-sided emery board Is ideal as it is not too bulky and has a fine and coarse side.
Crystal file Is ideal for fragile nails. It has the highest grit number making it very fine. It may be too fine for strong, thick nails. It is more expensive but lasts a long time.
Metal file This type of file must be avoided. It is very hard on nails and causes damage to nail if not used properly.
Orange Sticks
Can be used to push back the cuticle and clean up the nail polish from the cuticle.
Cuticle Knife/Pusher
A stainless-steel tool that should be used to gently push back the cuticle from the nail plate. This must be sterilised between clients.
Cuticle Nippers
A stainless-steel tool that looks like a small pair of pliers. These can be used to trim away excess cuticle or Hangnails.
Spatulas
Useful to use to take products out of jars to prevent cross-contamination.
Disinfectant Jar
A small jar next to you with a disinfectant for keeping tools clean between clients.
Tissues
A good supply of tissues can help clean up the excess product, wrap sterilised tools in or use between the toes as a toe separator.
Cotton Wool
A good supply of cotton wool should be close buy. An alternative to this is lint pads.
Nail Polish Remover
This contains a solvent such as Acetone which removes nail varnish from the nail plate. Acetone Free Nail Polish Remover is far gentler on the nail plate and less dehydrating.
Cuticle Remover
This works by breaking down the Eponychium so that it can be easily removed from the nail plate. Cuticle remover is an irritant and should not be left on the skin for long periods.
Buffers
A buffing file or buffing paste helps to create a natural shine on the nail plate and remover or reduce the appearance of ridges. This is great for clients that do not want to wear nail varnish.
Moisturiser
Used to hydrate the skin post-treatment. This cream should be light and not leave a sticky film or residue on the skin.
Client Consultation
A client consultation is a one-to-one talk with your client. During this time, you will find out very important and confidential information that will allow you to advise and provide the best treatment for the client.
It is important to always introduce yourself to the client as this removes any barriers and relaxes them. Consultations should always be undertaken in a private room or area where you cannot be overheard by others.
A client should first fill out a client consultation which helps identify any contra-indications that may mean you have to alter the treatment or be unable to treat them at all. If their form shows no reason why they cannot proceed with the treatment, then you can move onto verbal questioning.
Verbal questions would be to establish why the client has visited the salon and what their expectations and outcome of the treatment may be. Asking what they want ensures you can provide customer satisfaction as the client should be pleased with the outcome of their treatment. It is good practice to speak to the client in front of a mirror and explain the treatment to them and see if that meets their requirements.
Once you have established what the client is after, then a physical examination should be undertaken. This allows you to further check for any undeclared contra-indications and get a better overview of any issues that you may face during the procedure.
Allow around 15 minutes for the client's first salon visit. Ideally, you should sit face to face or next to the client to create an open atmosphere. Avoid barriers such as a couch or table between you.
Use open questions to tactfully encourage the client to give you information that you may need rather than using interrogating questioning techniques. Use the consultation form to work from and record anything you may discuss.
Record Keeping
Records must be maintained and updated for several reasons.
· They provide contact details in case you need to alter or cancel an upcoming appointment.
· So that you can track client’s progression.
· To record the products used and timings so you can use these at further visits and adjust the treatment plan if required.
· Tracks any aftercare you provide the client.
· Records patch test history.
· As a backup in case, the client has an adverse reaction to treatment.
· For legal reasons if the client brings a claim against you.
Client records can be stored electronically or filed away manually and should be updated at every visit. If consultation forms are not updated and do not contain a history of services and dates, then you may find your insurance invalid.
Forms should be kept for the timeframe suggested by your insurance company. This may be for up to six years. If a client is under 21 at the time of service, then it is recommended to keep the forms for six years past their 21st birthday.
Client confidentiality must be always protected. Forms need to be locked away in a secure cabinet, and electronic records should be held on a password-protected computer. You may also need to register with the ICO as a data controller.
· All information must be accurate and necessary for the service or treatment being performed.
· Individual client records must be available for the clients to view if requested.
· Data should not be passed on or sold without the client’s prior written permission.
The following details should be recorded on the client consultation form:
· Personal details – name, address, contact details
· Results of any patch tests
· Contra-indications
· Contra-actions
· Reasons for the treatment
· Any reactions to treatments/previous treatments
· Home care advice/suggested retail items.
· Any sales
· Treatment timings/products used etc.
· Next appointment or recommendations
Any contra-indications and possible contra-actions should be identified and discussed prior to the treatment. In the case of a medical referral, the therapist should keep a copy of the GP's letter with the client's record card.
Consultation forms must be signed and dated to prove that you have covered everything and given the correct advice and treatment plan.
Acrylic Nail Consultation
Client Name: ___________________________________________DOB: _______________
Address: __________________________________________________________________
_____________________________________________________Postcode: ____________
Phone Number: ____________________________E-Mail: ___________________________
Occupation: _______________________________How did you hear about us? __________
Please tick any of the below that may apply to you:
Open wounds () Pregnancy () Allergies ()
Asthma () Verruca’s () Eczema ()
Epilepsy () Cold Sores () Rashes ()
Psoriasis () Sunburn () Recent Scars ()
Conjunctivitis () Impetigo () Ringworm ()
Burns ()
Date
Treatment
Nail Condition
Nail Finish/Shape
Tip Size Left (thumb to little finger)
1.
2.
3.
4.
5.
Tip Size Right (thumb to little finger)
1.
2.
3.
4.
5.
Clients Sign
Therapists Sign
Date
Treatment
Nail Condition
Nail Finish/Shape
Tip Size Left (thumb to little finger)
1.
2.
3.
4.
5.
Tip Size Right (thumb to little finger)
1.
2.
3.
4.
5.
Clients Sign
Therapists Sign
Date
Treatment
Nail Condition
Nail Finish/Shape
Tip Size Left (thumb to little finger)
1.
2.
3.
4.
5.
Tip Size Right (thumb to little finger)
1.
2.
3.
4.
5.
Clients Sign
Therapists Sign
Nail Extension Systems
There are three main Nail Extension systems that the industry is familiar with – acrylic, UV gel and fibreglass – but these names are inaccurate and can be misleading. The inaccuracy of the names of the systems is unimportant as they are widely accepted and understood, but an understanding of the underlying chemistry will show the discrepancies. The three main systems have several derivatives that confuse the situation even more, but the different systems refer more to application methods than the system components and chemistry. We can briefly look at each of them.
· Acrylic: This system uses a liquid monomer and a powder polymer that, when mixed, forms a solid. This should more accurately be called liquid and powder.
· UV gel: This system uses a gel supplied as a ‘pre-mixed’ product and forms a solid when exposed to ultraviolet (UV) light.
· Fibreglass – This system utilises the additional strength of a fibre mesh – that can be man-made fibreglass or natural silk or cotton – together with a resin that hardens.
How each of these systems works from a chemistry point of view is very similar. The application and type of product differ greatly.
The chemistry of nail products
The chemistry of nail products for all brands is similar. Nail technicians need to know how nail products work together on the nail. The word ‘chemicals’ instantly makes people think of danger! It is important to remember that everything in the world is made of chemicals, including the human body. The only exceptions are heat, light, and electricity, which are energies that affect chemicals.
Atoms and atomic structures
The smallest state in which a chemical can recognisably exist is an atom. This is a microscopic piece of matter that is organised in a way that is specific to the simplest chemicals in existence, that is, elements. Examples of elements are oxygen, carbon, hydrogen, calcium; there are over 100 different elements, each with its own kind of atom.
The atomic structure is specific to the different elements, but each atom can have a negative or positive charge. As we know from magnets, a negative charge will attract a positive charge and vice versa. When a negative charge is joined to a positive charge, a chemical bond is created. It is the joining together of these elements in various combinations and configurations that creates all the millions of chemicals that make our world.
Molecules
When an atom joins other atoms, it forms a molecule. An example of a molecule is H2O. The letter H is the symbol for the element hydrogen; the letter O is the symbol for the element oxygen; H2O means two atoms of hydrogen joined to 1 atom of oxygen, making one molecule of water. This specific molecule is the smallest form in which the chemical known as water can exist. How many molecules there are in a space or how they are joined together determines the form that the water is taking:
· lots of molecules tightly packed together will be water but in the form of ice.
· fewer molecules loosely packed together will be flowing water.
· very few molecules with only some packed together will be steam (or vapour gas)
Water has the chemical symbol of H2O but, if only one more element is added, for example, carbon, and the number of hydrogen, oxygen and carbon elements varied, the chemicals that are formed are vastly different from simple water: alcohols (such as the one found in alcoholic drinks: ethanol C2H5OH), fatty acids (such as acetic acid in vinegar: CH3COOH) and even solvents (such as acetone, widely used in the nail industry).
We are familiar with each of these chemicals in their liquid form but should already be aware of possible dangers. Water is quite safe to drink, but too much of it in the wrong circumstances is dangerous; we can drown in it.
Vapours, fumes, and odours
Molecules of chemicals can escape into the air and become vapours. Water does not smell but is present in the air all the time. Some chemicals can escape into the air much more easily than others. For example, water under normal conditions does not escape too readily, but if left long enough, it will evaporate. Other types of liquid chemicals, such as solvents, which can escape very easily are known as ‘volatile’, and this property is useful for fast drying. Molecules of the actual chemical are in the air when this happens, but they cannot necessarily be detected by smell. These molecules are called vapours, and the liquid is said to be vaporising. Volatile liquids vaporise very easily, so they should be kept in containers that prevent this. The smell of these liquids is often called fumes. This is very inaccurate. We refer to car exhaust fumes, and this is accurate. Fumes are burned particles in smoke. What is often found in the context of nails is a vapour – that is, the volatile chemicals escaping into the air. Smell or odour is different again. We can detect some chemicals via our noses, others we cannot detect, but that does not mean they are not there. A strong smell of nail products suggests chemicals have escaped into the air as vapours and are being breathed in.
Bonding
A basic understanding of how molecules bond together to create something different will help understand the chemistry of nail systems. It is also important to understand that some molecules will bond together naturally owing to their positive and negative attractions; others need help. The help required could come in the form of heat, light, or another chemical to speed up the process. This process is a crucial part of the understanding of nail systems, as the methods used, and the speed of reaction affects the results and the application.
Acrylics, polymerisation, and monomers
Almost every product used in the various nail systems belongs to a vast family of chemicals called ‘acrylics. Acrylic is a man-made type of plastic, and those that are used in the nail industry use the same chemical process to form a solid from a liquid or from a semi-liquid: this process is called ‘polymerisation’.
· Polymerisation is a process that joins single but complex molecules called monomers together to form a solid even more complex structure called a polymer. The term monomer is made up of ‘mono’: single + ‘Mer’: unit; ‘polymer’, similarly, is ‘poly’: many + ‘Mer’: unit. If we think of water molecules discussed earlier, single molecules can flow around as a liquid; when their temperature is drastically lowered, they join to form a solid that is ice. It is the lowering of the temperature that has made this happen. (This reaction is not strictly the same as polymerisation but thinking of it in this way makes it easier to understand.)
· Monomers are present in some form in all nail system products. As explained, the single units or molecules are monomers; there is also a slightly different arrangement where a few units are formed together. These are called ‘oligomers. As a rule, monomers are the products that are liquid in form, and oligomers are in a semi-liquid form, such as a gel or resin.
· Proteins are formed when amino acids join in long chains, and these chains are linked together by amino acid bonds. These can be described as polymers as they are single units (the amino acids) joined together to form long chains. Nails are made up of keratin, so therefore nails are also polymers.
· The cells formed in the matrix on the nail unit have in the nucleus (or ‘brain’) of the cell the instructions to create the keratin. The nucleus initiates the process by collecting the relevant amino acids and causing them to link together in a specific format that will make the protein keratin. This is a process of polymerisation, but an instruction from the nucleus is needed to make it happen. To relate this to nail products is now a simple exercise. Monomers (or oligomers) are present in a nail product. When the polymerisation process is initiated, the single units join to create long chains with bonds linking them together and a solid is formed. This solid is what becomes an artificial nail. The precise way in which this happens is different for each of the systems.
The acrylic system
This system is the most popular in the UK and the US, holding probably about 50 per cent of the nail market. It is also popular in Europe, but other systems hold the largest market share in some countries, such as Germany, where a UV gel system is favoured. The acrylic system was the first to be used commercially and came directly from the dental industry. Even the colours used came from dentists, as they used pink for dental plates and various shades of white for dentures. (Pink and white are often used to create a natural-looking nail with a white free edge.)
The acrylic system is a two-component system using a liquid monomer and a powder. As already explained, the monomer (liquid) needs to polymerise and become a solid, and it needs instruction to do this. If a liquid monomer is left exposed to light at room temperature, it will start to polymerise of its own accord. However, this reaction would occur very slowly, and the resulting polymer would be very soft and jelly-like.
The initiator and the catalyst: The instruction, or initiator, must come from somewhere. The solid that is to be formed must also be a strong solid rather than a soft jelly. This is where the powder comes in. The powder in acrylic is, in fact, tiny polymer beads that have been manufactured to exact specifications. It is the powder that usually carries the initiator to start the polymerisation process.
Two conditions are needed for the process to be successful for the nail industry. An initiator is needed to start the process off, and a catalyst is needed to determine the speed of the process. Two different chemicals, when they come together, create these two conditions. They start the process by giving the monomers a ‘blast’ of energy. This comes from the chemical reaction that occurs when the two come together – a release of energy that ‘kicks’ the monomers into linking together.
The two chemicals are both essential. The amount of each is also an important factor, and a balance created for a different application (such as making dentures) could produce problems. The blast of energy produced needs to be controlled, as too much would speed up the process too quickly; not enough would result in a very slow polymerisation.
The catalyst process: The most used catalyst system (the two chemicals that start the process) are benzoyl peroxide in the powder and an ‘amine’ in the liquid. When these two react together, they create the ‘instruction’ for the monomers to join. A similar reaction is used in permanent or semi-permanent hair dyes. Hydrogen peroxide and amines are used to create the necessary reaction to allow the pigments in the hair dye to enter the hair shaft. Every acrylic system needs an initiator and catalyst to create the acrylic polymer used for artificial nails.
The polymer beads: The polymer beads have several roles, including the delivery of the instruction’ to polymerise. The polymer beads remain as beads during the process and after polymerisation is complete. They stay in among the long polymer chains formed and give support and strength to the final structure. The monomer alone would produce a soft and flexible structure but, with the polymer beads, the structure remains flexible and has the strength of the supporting spheres.
The liquid and the powder: The amount of the liquid and powder mixed, that is known as, the ‘ratio’, is important to the finished solid. Too much powder can make a very hard solid that may be brittle. Too much liquid can result in a soft and weak solid. The correct ratio plays an important role in the performance of the system and needs practice.
Another role of the powder is to carry coloured pigment. Technicians and their clients like to choose a natural nail or a permanent ‘French manicure’. This can be achieved on artificial nails using a pink powder over the nail bed and a white powder on the tip. Some powders provide a peach tone for sallow and dark skins. It is possible to use powders that have strong colour pigments and are designed to take the place of coloured varnish. (If these are used, the whole overlay should be removed every few weeks to ensure that there is no problem with the natural nail, as this will not be seen through the opaque overlay.)
Methacrylate’s – EMA and MMA: The chemicals used in this system commonly belong to the methacrylate family. The two most common are ethyl methacrylate (or EMA) and methyl methacrylate (or MMA). Both were used at one time as monomers, as they were in the dental industry. However, it was discovered that MMA caused many allergic reactions and was too aggressive for the skin. As a liquid monomer, it is now banned in the US, although the very low-cost acrylic systems available there are sometimes MMA. MMA is a stronger polymer but, as a monomer, produced very hard and brittle overlays.
EMA is now the substance most used for monomers. It can cause allergic reactions, but by working correctly, this should not cause a problem. Monomers are a highly reactive substance in that they have a great deal of energy, with the molecules rushing about all over the place. They want to polymerise and will do so given enough time. This is the reason why they can cause allergic reactions if they touch the skin too often. When they are polymerised, their energy has gone, and it is then less likely that clients will react to them.
Powders in acrylic nail systems: Powders in this nail system are usually made from the same chemicals, as members from the same family tree will have very similar characteristics. Powders are already polymers, and they can be a ‘homopolymer’ – that is, it is made from one polymer, either MMA or EMA, or, more usually, from two or more polymers MMA plus EMA, which is called a ‘copolymer’.
EMA will form a softer, more flexible polymer so, when used as a monomer, it needs the strength of a good polymer powder to support it. However, a homopolymer reacts faster with a monomer that is the same. Therefore, an EMA liquid monomer will react faster with an EMA powder polymer but will produce a relatively soft overlay. An EMA monomer reacts slower with an MMA powder polymer but can produce a stronger overlay. A regularly used mixture is an EMA monomer with a copolymer of EMA and MMA. This will result in a reasonably fast reaction with a good combination of flexibility and strength.
When a liquid monomer and a powder polymer are mixed, the resulting product goes through several stages, which are ‘stage managed’ by the catalyst system. Timings are infinitely variable:
· The first stage is when the monomer meets the powder, and the additives to the powder, or beads, are released, which can be called ‘swelling’. This is when the reaction really gets going, and it happens quite quickly. It can be seen as the product starts to melt.
· The next stage is when the polymerisation starts, and the mixture stops melting. It begins to have more of a gel consistency. At this gel stage, the product can be moved around the nail. The length of this stage varies for different brands.
· The next stage is when the product leaves the ‘gel’ stage and goes into the beginning of the final ‘cure’ or setting stage. The product cannot be moved around easily now without leaving dips or bumps. Once this stage has been reached, the final cure will not be far away. This whole process can take anything from 3 minutes to over 10 minutes and finishes when the product is hard enough to file (or produces a clicking noise when tapped with a brush handle). The overlay may be hard enough to file, but the polymerisation process will continue within it for many hours. Harsh abrasives or hard knocks to the overlay can interfere with this process and create weak areas in the artificial nail.
Temperature and polymerisation: There are external factors that can influence the process, the most obvious of which is temperature. Higher temperatures will speed up the process.
Fast polymerisation can create a heat sensation on the nail. The process itself produces a small amount of heat as it is an ‘exothermic’ reaction (one that gives off heat), but this is too small to be felt by a healthy nail plate under normal circumstances. Fast polymerisation can also create a brittle overlay with weak areas. Normal room temperature is ideal, which is one reason why technicians are advised not to work under desk lamps that get hot.
A low temperature will slow down polymerisation. This can be seen when the liquid monomer is cold, or the client’s hands are cold. When the overlay is applied, crystals or frosting can be seen in the area near the cuticle. This occurs because the process is slow to start, and the volatile monomer evaporates, leaving some of the powder on the nail. Using the monomer at room temperature and keeping your client’s hands warm can prevent this.
When chemical engineering is unbalanced: The acrylic nail system, as can be seen, is a delicately balanced piece of chemical engineering. Several things can affect this balance. The addition of extra chemicals, for example, can have disastrous results – the most common chemical is brush cleaner, which can contaminate the mix.
The traditional acrylic system (with benzoyl peroxide as a catalyst system) is prone to discolouration, or yellowing, caused by ultraviolet light from either the sun or sunbeds. Some system brands have an additive (called a UV absorber) that prevents this type of discolouration by working in a way that is like sunscreens for the skin. Some have a blue or violet colour added to the liquid. This is present as an optical brightener to make the white look whiter, and the pink look pinker, but it will also cover any slight yellowing.
Some system brands require the application of a UV block, in the form of a varnish, over the finished nail. The block needs to be reapplied regularly. Acrylic systems that do not use benzoyl peroxide do not suffer from this problem of discolouration. However, all brands are prone to discolouration owing to contamination.
The chemical balance in this system is crucial to its performance. You are strongly advised not to mix brands – that is, a liquid monomer of one type with a powder from another. The catalyst system may not be compatible, and other additives may not work together. Always use products that are designed to be used together.
Tip adhesives
The chemical reaction that takes place within tip adhesives is closely associated with the fibreglass system as it involves cyanoacrylates. Tip adhesives are almost always an ethyl cyanoacrylate that is sensitive to moisture, and the cure is inhibited by oxygen. The viscosities can vary from a water-like liquid to a thick gel. As a rule, the thicker the adhesive, the slower the cure and variations will apply to personal preference and the job at hand.
· As the name implies, Tip adhesives are used to stick a plastic tip to the natural nail. As the adhesive is sandwiched between the tip and the nail, the oxygen is expelled (therefore no inhibition to the cure). There is sufficient moisture in the nail to encourage polymerisation. Thin adhesives cure very quickly; in a couple of seconds, the thicker ones take a little longer.
· Personal preference relates to how quickly the technician wants the tip to stick firmly. Beginners prefer to have a bit longer to position the tip before it is too late; experienced technicians like to work as fast as possible. However, speed is not always the main consideration. A thin adhesive can produce only a thin layer of adhesive between the tip and the nail, which is fine if the tip fits the nail exactly, and the nail plate does not have any irregularities. If this is not the case, air pockets are created that look bad and create problems later. A thicker adhesive can form a thicker layer and fill up any irregularities. The gel-like adhesives are an invaluable help when dealing with a severe nail-biter or a nail shape that tilts upwards, as the surfaces can be safely filled with adhesive.
· Cyanoacrylate adhesives can, over time, break down in water, so, in the artificial nail, you should not put too much confidence in the strength of the bond between the tip and the nail. The strength needs to be between the overlay and the nail.

Primers
Function of a primer
Some brands do not require any help for the overlay to bond to the natural nail; they may just need a very clean, oil-free surface that has had the shine removed. Some systems have a built-in method of bonding man-made plastic to a natural surface of keratin. The majority need some help to create this bond, and the product is generally known as a ‘primer’. A primer is necessary in these cases as whatever is being applied to the surface must bond with it; otherwise, it will peel or fall off. A primer prepares the surface to accept a substance that does not naturally bond with it. Shiny surfaces do not bond together, and a roughened surface will accept another substance more readily. Nails, when shiny, almost have a seal on the surface that prevents too much penetration by substances. When the shine is removed, the surface bonds more readily with adhesive or overlays and allows a small amount to penetrate and create a stronger bond.
Methacrylic acid
Some nail systems require extra help in the form of a separate primer. The most common primer in use is a chemical called methacrylic acid. As can be seen from the name, this chemical belongs to the acrylic family and, therefore, will have an affinity to the overlay. The acid part of it, although mild, will gently etch the surface of the nail and encourage it to accept the overlay. It forms both a chemical and a mechanical bond by holding the overlay onto the nail plate.
Methacrylic acid is a strong irritant and is corrosive. Care must be taken when using it not to allow it to touch any soft tissue. Bottles must be kept with the lid on, and spillages dealt with carefully.
Acid-free primers
There are other primers available, which are generally called ‘acid-free’. They will work in such a way as to hold on to both the natural nail and the overlay. They interface’, or soak into, the nail plate and, as a type of monomer, will polymerise with the overlay to create a complete structure.
The best primer to use is the one that is recommended by the manufacturer of your system, as they will have developed the primer to give the best results with its own system. As with all nail systems, information on how to use products efficiently and safely must come from the manufacturer.
Artificial Nail Removal
A final explanation of the chemistry of artificial nails is their removal. The most used method of removal is to soak the nails in acetone or some other solvent. The solvent does not dissolve the overlay but breaks down the bonds between polymer chains. The stronger the bonds, the more difficult it is to break them down.
Using a solvent
In the various systems, the cyanoacrylate resin in the fibreglass system has the weakest bonds as there are no cross-links in the structure. UV gel is usually the most difficult to remove, as the bonds are exceptionally strong. Many gels cannot be removed with solvents, and the only way is to buff them off.
When the nails are soaked in the solvent, the bonds break down, and the structure becomes soft. While in the solvent, the overlay can be scraped off quite easily. If the nails are removed from the solvent before this is done, the softened acrylic immediately becomes hard again.
The use of acetone
There have been some worries about using acetone to remove acrylic nails. All solvents are classed as hazardous chemicals and all chemicals, even water, are hazardous if care is not taken in their use and storage. Over-use of any hazardous chemical is a danger, but sensible use should not be a problem. Continually soaking the skin in acetone, or any other solvent, could cause health problems, but there should be no need to continually remove artificial nails. Usually, the only reasons to remove artificial nails are if a problem with the natural nail or skin is suspected or if clients decided that they no longer want or need them. Correctly maintained artificial nails do not need to be removed. Occasional removal by soaking in acetone or similar solvent is not a problem, if the correct procedures are followed, and the used solvents are disposed of carefully.
Creating Length
There are two methods of lengthening nails: one is by applying a plastic tip to provide the length and then an overlay over the top; the other is by ‘sculpting’ the overlay onto the nail to provide the length. The application of plastic tips is relevant to all the different nail systems, as it forms the basis of this method of applying artificial nails.
Preparing the natural nail
Before any artificial product is applied to nails, they must be carefully prepared. If steps in this stage are missed or done inefficiently, a problem with the artificial nail will result, such as lifting the overlay. This procedure must be carried out before any artificial product is applied and precedes tip application.
Sanitise the nail plate
The nail plate must be spotless before any work is carried out. The nail plate is cleaned of surface debris and oils using a solvent. A disposable nail wipe is used, and the nail should be wiped from the edge to the cuticle. In this way, oils from the skin will not be drawn onto the nail plate.
Removing the cuticle
The true cuticle is a thin, transparent layer of skin that is attached to the nail plate. It grows continually, and there is always some to be removed. If a client has not had a manicure or any nail treatment for some time the cuticle could be covering the lower part of the nail. As it is so thin and transparent, it is difficult to see. Removal of this is essential as any overlay products will not bond to this skin; they will bond only to a clean nail plate. An area of missed cuticle will cause lifting of the overlay that, in turn, can result in other problems.
The nail fold at the base of the nail must not be pushed or forced, significantly when it is not softened. Applying products to soften the nail fold at this stage is not recommended, as they will be difficult to remove and may be absorbed by the nail plate. If the nail fold is unsightly, the technician should recommend that the client have a few manicures to minimise the skin. Before applying artificial nails, the most efficient method of removing the cuticle is with a clean cuticle knife. Some can have a very sharp blade, but every metal tool needs to be used carefully as it can cause severe damage to the nail plate. This stage must never be missed, and the whole nail must be checked for cuticle. Hold the cuticle knife reasonably flat on the nail plate and, starting around the centre of the nail, gently scrape down towards the nail fold. Any cuticle on the nail plate will be easily removed if the knife is held at the correct angle, and the nail will not be affected. If the knife is held upright, it is possible to dig into the nail.

Once the whole nail has been checked for cuticle, special attention needs to be paid to the sides of the nail. The skin can be pulled back by a finger and thumb, and the cuticle knife can check for excess cuticle down the side walls. The nail fold at the base of the nail should be gently lifted, never forced. The knife should then be used to clean away any debris from around the edges and nail fold.
Removing the shine
A nail plate is naturally smooth and relatively shiny. This helps it to resist moisture absorption. Two shiny surfaces do not bond together well with an adhesive as there is not enough ‘grip’. The adhesive or overlay has more surface to hold onto if the shine of the nail has been removed. The nail plate, like the skin all over the body, has bacteria living on the surface. Some of these bacteria are harmless and sometimes useful. Other bacteria may not be so friendly, so it is safer to remove all the bacteria when applying artificial nails.
Using a gentle abrasive to remove the shine on the nail will also help remove some of these unwanted ‘visitors. The natural nail should never have an abrasive used on it with less than a grit of 240 as it would cause too much damage. The end of a file of 240 grit or less is ideal for removing the shine. The end shape can get very close to the nail fold without causing damage to the soft tissue, and the sides of the file are perfect for getting down inside the sidewall and ensuring there is no area of nail missed. The file should be used in the direction of nail growth, from the cuticle area towards the free edge. Keeping to this one direction will minimise any trauma to the nail plate and help avoid any more of the surface being removed than necessary. It is only the shine that needs to be removed and not a layer of the nail or any amount of nail that will make the nail plate thinner. When the entire surface of the nail has been gently filed, the free edge can be tidied up and shaped to fit into the tip if there is any present. At this stage, the nail plate should look dull all over.
Dehydrating the nail plate
The nail plate mustn't have any trace of oil or moisture on the surface immediately before applying the overlay. Oil or moisture could be carrying bacteria or fungal spores that could cause problems, and any overlay or adhesive will not bond to the nail if there is any oil or moisture present. The nail bed is excreting natural oils and moisture that keep the nail healthy and flexible, and this will continue. This moisture will not affect the overlay once it is bonded to the nail, but the bond must occur while the nail plate is moisture-free.
As the nail plate has a slightly more porous surface than usual, owing to the removal of the shine, any dehydrator used on it will penetrate the upper layer very slightly and remove excess moisture that is present. Dehydrators used on the nail plate not only remove excess moisture but also act as sanitisers. Most bacteria and fungi require moisture to live, and by removing this essential moisture, any organisms present will not be able to survive. The mild products used for this purpose will not necessarily kill the organisms, as the products must be mild enough to be used on the skin, but they will stop or inhibit their growth.
The dehydrator can be wiped over the nail on a cotton wool disc or nail wipe towards the finger. This will remove the dust that has been generated by filing. The nail is now perfectly clean and prepared, and ready for the application of artificial products. At this stage, the client must be prevented from using the prepared hand, and the best way to avoid this happening is to ask the client to keep their hand flat on the towel. It is so easy for the client to touch their face or head then all the preparation work has been lost as oil, moisture, or make-up could have been transferred to the nail plate.
Adhesives
Tips are applied to the nail with an adhesive (glue is an incorrect term as this describes a product made from natural materials). The adhesives used in the nail industry are cyanoacrylates, specifically ethyl cyanoacrylates. It is widely used in artificial nails, as it is used for applying tips and is also the basis of the resin in the fibre system.
The adhesive is manufactured in several viscosities (thicknesses) and speeds of cure. It also has several grades. The highest grade is used in surgical procedures. The adhesive used for nails should be high grade, while its viscosity and speed are other areas for personal preference. As a rule, thin adhesives cure very quickly and thicker versions more slowly. For tip application, a thin adhesive will bond quickly but is prone to air bubbles and will not fill up any irregularities in the nail surface; a thick adhesive will take longer to bond and will cushion the nail and fill irregularities (this type is ideal for a bad nail biter). Adhesives are broken down with solvents, the most efficient being acetone. If any skin is bonded together during its use, cotton wool on an orange stick soaked in acetone will quickly solve the problem.
Applying a plastic tip
Plastic tips come in many shapes and sizes, colours, and lengths. The application of the tip must be perfect and, on completing this stage, the nails must look like they grew on the finger and are not a piece of plastic stuck to the end. If the tips are not a perfect fit, they cannot be corrected by the overlay.
The shape of the overlay has its own rules and requirements and must not be concerned with correcting a poorly applied tip. The tip plays only a small part in the strength of the finished nail. The overlay provides the most crucial area of strength. The tip alone is only as strong as the bond between it and the natural nail, and this is not a good bond. If the overlay does not provide the real strength, the tip will snap off. A well-applied tip provides some strength in one area, and that is the sidewall near the free edge. This area of the nail, either real or artificial, is very vulnerable and is the most usual place for a nail to break. A tip will add some strength here.
ABS plastic or acetate tips
A good-quality tip is made from ‘virgin’ ABS plastic. ABS is a plastic within the acrylic family; it is relatively strong and can be made in many different colours. Today, most tips are made from ABS plastic, but occasionally a tip may be made from another type of plastic called acetate. These tips have a translucent quality and are usually more transparent than traditional tips. They tend to be cheaper and were initially made for the false nails that were sold for retail use to be stuck over the whole nail. These are not suitable for artificial nail systems as they are difficult to blend into the natural nail and have a higher oil content that may affect the overlay.
Every tip, whatever its shape or size, has several features that are relevant to the technician:
Contact area or well. This is a thinner area and the part that is in contact with the natural nail.
Stop point. This is the demarcation point of the contact area and the actual tip. The natural nail free edge should fit snugly into this without any gaps to trap dirt, and it will protect the edge of the nail and help it from absorbing too much water. When the tip is blended correctly, this line will produce a natural-looking smile line.
Sidewalls. Tips either have parallel or tapered sidewalls to suit the natural shape. A well-constructed tip will have a reinforced side to the contact area to provide maximum strength in this vulnerable area.
Upper arch. Like natural nails, tips have differently curved upper arches from flat to very curved. Choose the one that fits the natural nail shape or, if the natural upper arch is flat, it will need some correcting, and a tip with a curved upper arch will help. If the nail has a high arch, a curved tip will exaggerate this even more, so a flatter tip will help compensate.
Lower arch. Like nails that have grown naturally, a tip needs to have a lower arch. This is not so obvious if the shape of the finished nail is going to be oval, but the lower arch is still there and makes the tip look as if it has grown from the finger and not been stuck on top.
‘C’ curve. As with the upper arch, this can vary between types of tips, and the shape of the natural nail should dictate which is most suitable. Unlike the upper arch, it is not advisable to choose a different shape from the natural ‘C’ curve. The tip needs to sit on the nail comfortably without distorting the shape of the tip. If the natural nail is relatively flat and a tip is applied with a deeper curve; the tip will need to be flattened to adhere across the width of the nail. Once applied, the tip will return to its shape, which will put undue stress on the nail bed. When this happens, clients will feel a great deal of discomfort, as the nail bed will throb as if it is bruised. It is even possible that if the nail plate is very thin, nail separation could occur.
If the natural nail has a deep curve and a tip is applied that is flatter, the only way to stick it to the nail is to hold the sides of the tip onto the nail and make it follow the natural curve. After application, the tip will try to return to its original shape that may not necessarily cause discomfort but may result in lifting down the side walls.
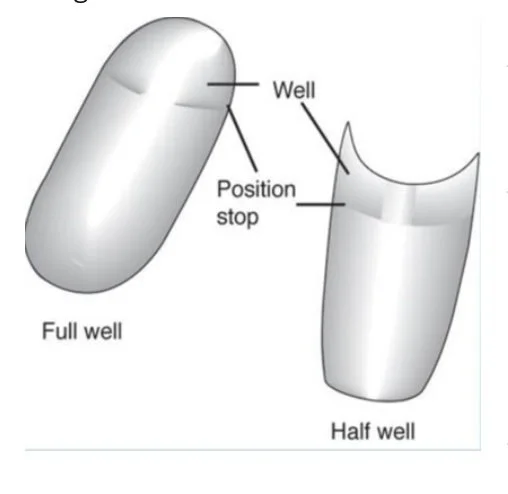
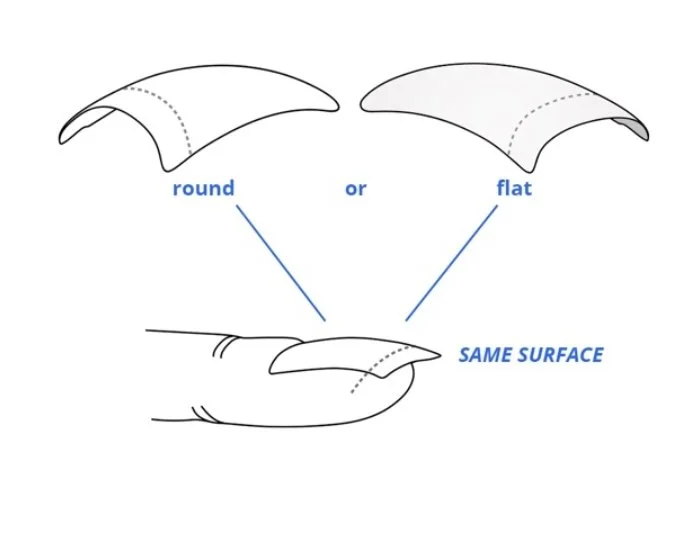
Choosing the correct tip
The first thing to look for when choosing the correct tip is the ‘C’ curve of the natural nail. Match the shape of the natural nail.
The next area to consider is the natural upper arch. Match the natural shape or choose a tip to correct an over-or underexaggerated arch. The above guidelines will help save some time trying several tips. However, the best way to choose a tip is to try it on the nail. If it follows the curves, it is the right one. It is worth a technician having at least two different types of tips available.
Once the correct tip has been chosen, the right size or width must come next. Most tips come in ten different sizes, with one being the biggest and ten the smallest. Sizes 4 – 6 are the most used.
When choosing the correct size, the width of the contact area must be ignored as it is the width at the stop point that is important. This must be the same width as the nail at the smile line (or onychodermal band) without any gaps when the skin is pulled back from the sides. It is a very common mistake to fit a tip that is too narrow. It cannot always be seen on a new set, but there will be a step at the side with some natural nail exposed when the nail grows. Some clients have puffy or thick skin at the sides of their nails, and unless this is firmly pulled back, the full width of the nail will not be seen. If one size is too wide and the next is too narrow, choose the wider one and file a minimal amount from either side until it fits perfectly. If there is any doubt about the correct size, one side of the tip can be ‘tucked down’ into one sidewall, and the other side looked at. Very often, this will show that a tip that looked right is too narrow.
Full contact area versus reduced contact area
Most tips have a full contact area. These can be applied directly to the nail plate with adhesive, or they can be tailored beforehand. There are eight main reasons why it is worth removing most of the contact area before application:
When applying a tip with a full-contact area, it is easy to get bubbles under the tip. If this happens, the tip must be removed. The bubbles are unsightly and are areas where bacteria or fungus could grow.
The bond between the nail and the tip relies on the adhesive used. This will be a cyanoacrylate, and this can eventually break down in water. If the bond covers most of the nail, there is a larger area to be broken down.
The strongest bond in the artificial nail structure is between the nail and the overlay. If most of the nail plate is left exposed, the bond will be more effective.
A full contact area needs blending until it is invisible, and no shadow can be seen through the overlay. This involves more work, and there is a greater risk that the natural nail will be buffed. Blending a small area is very quick.
When any tip is applied to a nail with a flat upper arch, the contact area must be entirely in contact with the nail. A full contact area will cause the tip to be tilted upwards at a very unnatural angle.
By having a minimal contact area, the angle of the tip can be placed so that the finished nail looks most natural.
By placing the tip at the correct angle with a reduced contact area, the line to be blended will be at the top of the upper arch curve and, therefore, easier to blend without touching the nail plate.
Sometimes the contact area is almost as long or longer than the client’s nail plate, and there is very little room left to blend the area without damaging the soft tissue. This is particularly the case with nail biters.
Removing the contact area
No rule states that the contact area must be removed or left in place. However, it is a beneficial skill, and a thorough understanding of the question allows individual technicians to make up their mind what is right for their client. The most important result is a natural-looking, strong artificial nail applied without damage to the natural nail and under safe and hygienic conditions.
There are two methods of removing the contact area:
Using a file. The contact area can be removed quickly, leaving a curved edge by holding the tip and the file at the appropriate angle. By leaving this shape instead of a straight edge, the sidewalls of the natural nail's free edge are provided with extra protection and support.
Using scissors or clippers. Scissors with a curved blade are ideal for snipping around the contact area, following the shape of the stop point. Nail clippers can also be used to cut out a ‘V’ shape. Applying the tip to the nail Once the tip had been chosen and any necessary tailoring carried out, it must be applied to the nail with adhesive. The choice of adhesive is for the technician unless the client is a severe nail biter or has a damaged nail plate. If this is the case, a thick adhesive or gel should be used to fill and cushion the irregularities of the nail plate or, in the case of a nail biter, fill the area where the nail has been bitten down below the hyponychium. If this area is left as air space, there could be problems with bacteria or excess moisture.
A small amount of adhesive should be carefully placed in the contact area of the tip. Placing adhesive here is preferable to it being placed directly on the nail. When placed on the nail, it can quickly run down into the side walls or over the edge of the finger. When placed on the tip, it starts affecting the plastic of the tip immediately, softening it ready for accurate placement.
The tip should be brought to the free edge of the nail at an angle of around 45°. This will allow the nail to be placed correctly in relation to the nail plate and then levered down onto the nail, expelling any air bubbles as full contact is made. As soon as the excess adhesive is seen being squeezed out onto the nail plate, the tip should be held in place for a few seconds until the bond is made. At this stage, the finger should be pushed up from underneath by the hand that is holding it rather than the tip pushed down. If the tip is pushed down, it is very easy to lift it too high and break the contact at the free edge and pull in air.
The lack of oxygen present between the tip and the nail encourages the adhesive to cure quickly, much quicker than when exposed to the air. However, the thicker the adhesive, the longer this curing takes. This should be repeated for each finger on one hand.
When all five tips are applied, they can be cut slightly longer than the desired finished length. The client should decide the length, but with advice from the technician if the requirements are unreasonable, such as too long for the nail bed or lifestyle.
At this point, it is worth asking the client what shape is required – oval, square, rounded square or tapered. If the client has no preference, the shape of the base of the nail should be followed to create a beautiful nail.
Cutting techniques
There are several tools on the market designed to make cutting tips easier. They are adaptations of a tool used for clipping animal claws, but instead of a round hole that the claw fits through, they have a curved hole for the tip. These clippers are quick and efficient and allow the tip to be shortened with one movement. When using cutters, the metal plate that has the curved hole must be nearer the finger. This will protect the finger from being cut as the blade is on the other side. If the cutter is angled under the client’s hand, a slightly curved shape will be cut on the tip. The more upright the cutter is held, the straighter the edge. Care should be taken not to hold the cutter away from the client as this will result in an edge that curves in the wrong direction and, if the cutter is moved during cutting, could result in pulling the tip-off.
Scissors or nail clippers can be used for cutting tips. Plastic tips are easily ‘stressed’ or bent, which results in white areas. When using clippers or scissors, the tip should never be cut across in one action as this will cause the stress lines. Each side should be cut separately. The angle of the clipper blade will produce an outline of the finished shape – that is, oval, square or tapered. The piece of the tip should be discarded as it cannot be used for anything else.
Blending the tip
Once all the tips have been cut to the required length and the unwanted ends discarded, the tips must be blended to the natural nails. The result should be entirely natural in appearance and look as if the nail grew there. More importantly, there must be no damage to the nail plate. There are two methods of blending the tip: manually – with a file – or chemically with acetone or a branded tip blender.
Manual blending
During training, procedures are quickly learned if eight easy steps are followed. These steps will help to produce a perfectly blended tip:
1. Holding the file parallel to the finger, ‘tuck’ it down in the sidewalls and, with a few strokes, blend the sides of the contact area of the tip so that it is the same width as the nail plate. By keeping the file parallel, the sides of the free edge will remain straight.
Shape the free edge to the approximate shape and length required. Look at the tip on the finger as a whole and not just the nail plate to check that it is a suitable length and shape and straight to the finger.
Holding the file flat to the tip, gently start buffing the surface, starting at the tip, and working backwards towards the contact area. The shine of the tip must be removed entirely.
Using at least two-thirds of the length of the file, gently buff the contact area. Care must be taken not to buff in the same place for too long. Keep moving the file all over the area but avoiding the nail plate. It is not necessary to press hard with the file as gentle pressure is much more effective. The contact area will become much thinner until it is transparent and cannot be seen. A little nail adhesive often squeezes out onto the nail during the tip application and becomes shiny. This can be a useful guide to help know when the tip has been blended, and the nail is being avoided. The tip must be completely invisible, and there must be no evidence of a ‘shadow’ where the contact area is.
Refine the shape of the free edge until it is perfect and even and remove any debris that may have collected underneath during filing.
Look at the nail from the side to check that the upper arch is correct and even and that the lower arch is correct.
Gently refine the ‘smile line’ area to produce a neat and natural-looking effect.
The tip should now look like a perfect natural nail and the ideal ‘canvas’ to apply the overlay.
Chemical blending
This method works by melting the plastic of the tip as an alternative to blending with a file. Some people, trainees like to use this method as they feel that damage to the nail plate can be avoided. It is not necessarily quicker than manual blending as, once mastered, manual blending is very fast. Acetone may be used, or there are many branded products on the market.
Once the tips are applied, paint a small amount of the tip blender with either a disposable cotton bud or a brush used solely for this purpose over the contact area. Wait a few minutes while the plastic melts. This time can be used to apply the blender to other tips to help speed up the process. Do not apply too much, as any liquid can be absorbed into the nail plate and cause unnecessary dehydration. Too much liquid will also run into the sidewalls and cause dehydration.
While waiting for the blender to work, the free edge can be shaped to the required length.
When the tip starts to look very shiny, use a fine file to file the melted plastic. The blender can be reapplied, if necessary, but too much solvent on the nail plate should be avoided.
Follow steps 5 to 8 for manual blending now to ensure a perfect nail.
Ensure that there is no melted plastic covering the nail plate, which could prevent a good bond with the overlay and result in lifting in the centre of the nail leading to an air pocket.
Brush the file as the melted plastic can stick to the abrasive and make it less effective. Discard the file if the plastic cannot be removed.
Removing the dust
Once all the tips are perfect, the dust produced must be removed from the nails. A bristle brush may be used, but thorough hygiene procedures must be followed to keep this very clean.
Remove dust inside the nail folds with care, making sure that oil from the skin is not brought onto the surface of the nail. The product is used for preparing the nail plate is often very useful for this job as the moisture will remove the dust, and the product will ensure a clean, oil-free nail.
Once the tips are blended and cleaned, they should look like perfect natural nails. If this is not the case and there are shadows on the contact area, or the free edge is curving up and not down, they are too wide or too narrow; they cannot be corrected by applying the overlay. No amount of creative overlay application will correct a poorly applied tip. It will only make it worse.
Problem nails
Clients come in all different shapes and sizes, and so do their nails. It is not enough to apply nails that follow the natural shape. Many natural shapes are not perfect and are not always very attractive. The technician must correct natural imperfections. Many natural imperfections or problem shapes can start to be corrected with the tip application. This, followed by a planned overlay shape, will result in the desired perfection.
Practice is the only real way to perfect the art and skill of correcting problem shapes, but the following suggestions are a starting point to help that practice along.
Fan-shaped nail
Looking at the nail from the top, the sidewalls of a good shape should be parallel to each other. A fan-shaped nail is very common; this is where the edge of the nail is wider than the base, that is, the side walls’ fan’ out. This nail plate is usually relatively short, and artificial nails can look very wide and clumsy and not at all elegant if the skilful technician does not correct the shape.
The correct tip size should be chosen carefully, and the width of the nail plate at the free edge is the area that will decide the correct tip size. A tip with a full-contact area usually appears much too wide as the contact area will often be wider than the nail plate's centre. This does not matter as the contact area can be removed. The stop point of the tip must be the exact width of the free edge. Once the correct size is chosen, the contact area can be removed. Most of the area will likely need to be removed to avoid it being wider than the nail plate. Sometimes it is also necessary to angle the remaining contact area inwards so that it fits the nail.
The tip being tailored should keep being fitted to the nail to make sure the shape is right. This shape of the nail is also usually relatively flat with little or no upper arch or ‘C’ curve. A tip with a flatter shape should be chosen to avoid any stress being put on the nail bed by a curved nail. If the flatter tip is still too curved to comfortably fit the nail without pressing it flat, a wider tip should be chosen, and the sides filed to the correct width. When this has been achieved, and the tip has been applied at the correct angle for a gentle upper arch (remembering that the tip will need to be angled down slightly to help create an upper arch), it can be cut to length.
The free edge shouldn't be any longer than half the length of the nail bed. Anything longer than this will not look attractive and will not be as strong as a shorter nail. When shaping the free edge, the side walls need to be tapered to compensate for the wide free edge. An oval is often better for this shape of nail as the base of the nail is usually oval, but a square can be achieved if required that does not look too wide. This is achieved by making the parallel side walls taper slightly towards the tip of the free edge. If done correctly, the sides will still look parallel but more elegant than if left, as this can accentuate the ‘fan’ shape of the natural nail. The square edge can then be achieved, and the overlay applied.
Hooked or claw nail
A hooked or claw nail has an exaggerated upper arch, and the free edge tends to curve over the end of the finger. Clients with this shape of the nail are often unable to grow their nails as the downward curve is unattractive. The solution for this problem is to remove any free edge on the natural nail. Choose a tip that fits (this is often one with quite a deep ‘C’ curve) and remove a great deal of the contact area. When the tip is applied to the nail, the side view should be checked, and the upper arch corrected.
Care must be taken that the underside of the tip does not have a gap between it and the nail plate, as debris could collect and cause problems. The length should be relatively short as the longer the free edge, the more the curve will appear. Adjustments in the structure of the overlay will further compensate for this shape.
Ski-jump or spoon-shaped nail
A relatively common shape, the ski-jump is a nail that curves up towards the tip. If a tip were put onto this shape without any correction, the nails would appear to be pointing upwards. The corrective solution is very similar to that of the claw nail. The free edge should be as short as possible, and the contact area of the tip removed. As the finished artificial nail's strength is in the overlay and not the tip, the contact area can be tiny, if necessary, to achieve the correct upper arch.
As before, when applying the tip, look at the side view and make sure the tip is curving down, even though the nail bed is curving the other way. The length should be quite short, and the overlay will need to be adjusted to compensate for the unusual shape produced by tip application.
Bitten nails
Bitten nails are probably the biggest challenge for the technician. If a good-looking set of artificial nails can be achieved from a set of severely bitten ‘stubs’, the technician can do anything! There are many degrees of nail-biting, from the occasional nibbler to the person who bites their nails down past the hyponychium and on to the nail bed.
The worst scenario is the experienced biter who not only bites down onto the nail bed but also chews and picks at the soft tissue around the nail. The technician can do their best with the nails but can do little other than offer advice for the surrounding skin. Recommending a course of manicures before applying artificial nails is preferable. The cuticle and nail fold can be improved, and some nail growth will help the strength of artificial nails; however, it is unlikely that the client will agree to this or succeed if they do agree.
Biters do not usually bite deliberately and often try to stop the habit. They will try quite hard and achieve a little growth, but then, while watching a film, reading a book or after a stressful day, they will unconsciously nibble and spoil all the hard work. When this happens, there is often little point in leaving the other nails, so they all go, and the biter is back to the beginning. Having a set of artificial nails can often be the answer for several reasons. A skilful technician can make the nails and hands look so good that the client does not want to spoil them. Having paid for the service, the client is more likely to make sure the money is not wasted. The unconscious move to the mouth is immediately noticed as the teeth come across hard plastic instead of soft skin. Nails applied well need the determination to bite off, although the biter who is determined will do it whatever it takes!
Although it is a challenge that will take the technician longer than usual, even the worst biter can have a set of beautiful nails. The challenge starts with preparation. A biter will often have a pronounced layer of cuticle and a pronounced nail fold. The cuticle can be removed relatively quickly, but the nail fold will take more time as it must not be forced.
Manicures would help a great deal, but this may not be an option. If the nail fold cannot be lifted, it must be left to be dealt with after the artificial nails have been applied, either during homecare or manicures. The remaining nail plate will be soft owing to the length of time it spends soaked in saliva. There may also be dents and crevices where bacteria can breed. Preparation must be efficient and thorough, with the nail and surrounding skin very clean and the nail plate dehydrated as much as possible. The skin around a bitten nail is usually puffy, again owing to the amount of time it spends soaked in saliva. The end of the finger is often slightly swollen from this puffiness, the sides of the nail plate hidden from view and the overall shape flattened. All this will change dramatically after a couple of weeks with artificial nails.
Milder cases of nail-biting need to have the tips applied in the usual way, remembering all the rules about leaving most of the nail plate exposed for the overlay bond and creating good curves. If the nail plate is bitten down past the hyponychium, the skin exposed will usually be swollen and higher than the nail plate, and the tip will need a great deal of tailoring before application. A tip, even with the contact area removed, will point upwards as the skin will not allow it to lay flat when applied to this type of nail. A flat tip needs to be chosen and, if necessary, a wider one made narrow to provide the right ‘C’ curve (or lack of it). To find the right size, the skin at the sides of the nail must be pulled back very firmly with the finger and thumb of the technician, so the full width of the nail plate is exposed. Like the fan nail, the width at the edge of the nail and the stop point must match exactly, regardless of any other part of the tip. When the correct size has been chosen (or made), the contact area must be removed so that only a minimal amount of tip will be on the nail plate, leaving the maximum amount of nail plate exposed for the overlay bond.
At this stage, the tip will still not sit on the nail properly, as the skin will push it up. The sides of the tip from the stop point down the sides of the free edge need to be carved out for the puffy skin to fit into. This will form a ‘bridge’ that will curve over the puffy skin and create a good arch that curves down instead of up. This ‘bridging’ is necessary as, without it, not only will the nails look unattractive, but the skin that has been pushed down to fit the tip to the nail will push the nail upwards and make it very weak and liable to breakages.
When applying the tip with adhesive, it is advisable to use a much thicker adhesive than usual. With the skin in the way, the tip cannot be angled onto the nail and needs to be placed from the top. There is also usually an area around where the hyponychium should be lower than the nail and the skin. If using a thin adhesive, it is difficult to avoid air bubbles when placing the tip in this way, which might allow a space where bacteria can thrive. A thicker adhesive will help avoid the bubbles and fill up and cushion the area of the hyponychium. The length must be very short; just to the end of the finger is ideal. The artificial nail will not be as strong as that on an unbitten nail, and the client will be unused to having nails and will be clumsy for a few weeks. Blending the tip on a small area can be tricky, and if it is difficult to avoid the usually delicate soft tissue, it may be advisable to use a chemical tip blender.
Although some people prefer an oval-shaped nail, a free edge that is slightly square usually better suits the wider fingertip of a nail biter. The overlay will further improve the appearance of the nails, and the homecare advice must be specific, as must the need for maintenance visits.
Alternative Tips
French white tips
A French white tip is an opaque white; it is designed to create a quick and easy permanent ‘French manicure’ look. Although this tip can be used with any system, there are restrictions on who can wear this tip. The tip must be applied to the end of the nail and not blended. The shape forms a perfect ‘smile line’, and the overlay will create the necessary strength. This tip is not suitable for:
· A client who has a different ‘C’ curve from the tip (there are now several shapes of white tips available, so having a selection is worthwhile)
· A short nail bed, as the extra white tip, when correctly placed, will make the nail look unattractive with too much white and not enough pink
· A client without any free edge; the tip’s ‘smile line’ will need to be placed onto the nail bed instead of where it would naturally be and would result in an unattractive nail
· A natural nail that does not have an upper or lower arch that matches the tip There is a correct placement for this type of tip that can create a perfect French manicure appearance. There is also a wrong placement that can make the finished nail look very unattractive. A client wearing this type of tip must have the growth of natural nail covered during maintenance treatments.
Clear tips
These are tips that are transparent and are usually used for various types of nail art. They are dealt with in precisely the same way as traditional tips. When they are blended in, they will look dull and scratched, but as soon as an overlay is applied, the dullness and scratches will disappear. These tips should only be applied to elegant nails and without any free edge at all, as every irregularity will be seen through them.
Liquid and powder
This system is probably more commonly known as ‘acrylic’, although the term is strictly inaccurate as all the systems are based on acrylics. The system was arguably the first to be used for artificial nails using materials from the dental industry, and the term ‘acrylic’ has stayed since then. It uses a liquid monomer and powder polymer that cure to form a solid polymer. Its versatility in the hands of a skilled technician is immense, and it is generally considered the trickiest to learn. It is sensitive to many external conditions, application techniques, and the time available to get it right before it hardens is limited. It is, however, a very popular system and is the favourite in the UK and the US.
It has many advantages in that any shape can be sculpted onto a tip or a free form; it can easily be used to correct difficult nail shapes; powders are available in different colours to allow the technician to create permanent French manicures or enhance natural skin tones. The overlay can be built to create the most robust structure, and the strength within the overlay is excellent.
Its main drawback is the fact that the monomer is quite volatile and has a strong odour. Many technicians do not like the smell, or strong odours may be inappropriate in a beauty salon. Working cleanly, correctly, and hygienically can minimise this problem. There are some products on the market that are classed as ’low odour’. This usually means that the evaporation rate is lowered. The newer versions of this type of product can work very well and, if odours are a problem and a technician prefers a liquid and powder system, they are certainly worth considering.
A version of this system that has some additional benefits is the UV light-cured liquid and powder system. These are applied in a very similar way to the traditional acrylics; the main difference is that they do not polymerise until UV light is applied as the catalyst. This can be very beneficial for beginners as they have plenty of time to apply the overlay in the correct shape. For experienced technicians, both hands can be worked on, which avoids any additional time for curing. These monomers are in the low-odour category and can be more user-friendly if odours are a problem. The overlay that is produced is as versatile and strong as traditional acrylic but, with some brands, has a characteristic that must be dealt with carefully:
· many UV-cured materials do not achieve a total cure, and a sticky residue is left on the surface where oxygen has inhibited the cure.
· This residue is an unpolymerized monomer, which is a skin irritant. It must be carefully removed with an appropriate solvent before buffing, as continual contact with the skin for either the client or the technician can result in an allergic reaction.
Most brands of this system have powders in several colours. This gives the technician the ability to create very naturally looking artificial nails that suit the client’s preferences. The most usual combination of colours available are:
Clear - Used for either the entire nail or over the nail bed. Suitable for a nail bed that has a good colour.
Pink - A powder with a slight pink pigment added to it to enhance the nail bed's colour. Used in the same way as clear. Some brands produce different shades of pink, so the shade best suited to the client can be chosen. Some pinks can be a little ‘violent’ and, if there is only one choice in the brand, consider this when choosing which brand to use.
Bright white - This is a heavily pigmented powder for use on the free edge only. It will create a very specific appearance of a French manicure. This needs lots of practice as it is essential to achieve a perfect smile line for it to look good. This is also used during maintenance to put the smile line back to the right place.
Natural white - This has less pigment than a bright white and will create a more natural-looking nail. Its application on the free edge still needs care, but the smile line is not so sharp. Even if this is not used during the first application of artificial nails, it is beneficial to cover up the natural nail growth at the free edge. This growth of nail visible through the overlay often prevents wearers from having their nails varnish free as it does not look attractive. When choosing brands, check that the natural white is dense enough to do this job.
Natural - This is not so common in modern brands now but is a milky version of clear. It was very common in early liquid and powder systems as a good clarity in the overlay was difficult to achieve, and the milkiness hid imperfections. Some clients still like the look of a milky nail, but it should never be used to hide shoddy workmanship, such as visible lines from previous maintenance treatments.
Coloured powders - Many brands have introduced multicoloured powders. These are either as a ‘permanent’ colour instead of varnish or used to create nail art designs. The preparation and application are the same, but various colours may be applied in different sequences rather than following the order indicated.
The liquid and powder systems are applied with a brush made of natural hair, usually sable or the better-quality Kolinsky sable, by dipping the tip of the brush first into the liquid monomer and then into the powder polymer, where it picks up a bead of the material. This bead is then applied to the nail and pressed into place.
Polymerisation either occurs within a few minutes or when placed under a UV light if it contains a photo initiator.
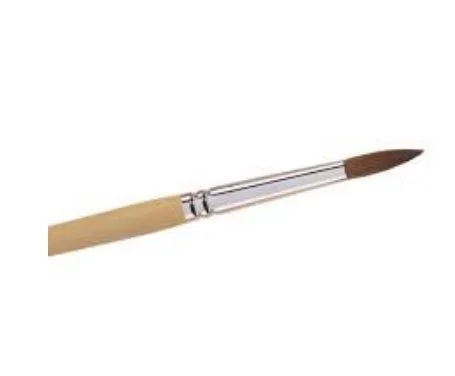
The structure of the overlay
The three zones
When applying an overlay, it will help to think of the nail with its tip in terms of three different zones:
Zone 1 is the free edge where the overlay needs to be thin on the edge so that the finished nail does not look artificial.
Zone 2 is the area over the smile line and slightly onto the nail bed where maximum strength is needed. This is the area of the nail that receives the most stress. It is often called the ‘stress area’ and should have the highest point called the ‘apex’. The strongest natural structure is a curve (pressure is dispersed along the curve and is not concentrated over one point). The apex should be where two curves, the upper arch, and the ‘C’ curve, come together at their highest and thickest part. This will create maximum strength for the whole nail without putting any stress on the natural nail, the nail bed, or the matrix.
Zone 3 is the area near the base of the nail. Like Zone 1, this should be thin so that any ridges on the nail bed are avoided and, by being thin, it will be more flexible and able to move with the softer natural nail in this part of the nail plate. If these zones are always kept in mind when applying an overlay, the correct shape and strength will be easier to achieve.
The application procedure
The steps in the application procedures listed below are general. Although they will be appropriate for many products, it is advisable to check with the manufacturer or distributor their recommendations for application techniques. Always follow the manufacturer’s instructions when using nail products and always avoid mixing system products from different brands. Polymerisation chemistry is carefully balanced and mixing potentially hazardous chemicals could be dangerous and could cause problems.
Liquid and powder
Practising product control: Picking up the product with a brush so that it can be applied to a nail is one thing that looks very easy. It does, however, take a little bit of practice! For a beginner, picking up the perfect ‘bead’ can sometimes seem impossible.
Some liquid and powder brands need a specific ratio (this is the amount of liquid to powder); others are less sensitive. There are some brands whose manufacturers recommend that a dry ratio is used in Zone 1 (more powder means harder), a medium ratio in Zone 2 (combination of hardness and flexibility) and a wet ratio in Zone 3 (maximum flexibility over the softer part of the nail).
Usually, the bead that needs to form on the tip of the brush needs to look smooth and glossy. Practising product control for a little while is time well spent for a beginner. Understanding how the product behaves and practising picking up various beads will save a great deal of time, especially if these first attempts are placed on a nail and either must be removed or buffed into shape.
To do this, get a piece of unwanted plastic or glass, dappen dishes with monomer and powder (use coloured powder as well as clear or pink as they behave differently owing to the density of pigment), a brush and some disposable towels.
Dip the tip of the brush into the liquid and wipe it on the sides of the dish, dip the tip of the brush into the surface of the powder (not deep), hold it there for about two seconds and lift it out. It should have a bead of the wet product on the tip.
If the bead is so wet it falls off, there was probably too much liquid still in the brush, so it would need to be wiped on the side of the dish a bit more. It may be that the brush needed to be in the powder a bit longer to pick up a bigger bead.
If the bead that is picked up is rough, with obvious powder on the surface, the ratio is much too dry. Maybe there was not enough liquid in the brush, or the brush was left in the powder too long and picked up too much powder. Practise this a few more times until a bead can be picked up that is smooth and glossy in appearance and does not fall off the brush. Different methods of dipping the brush into the liquid can be tried, such as sliding the brush down the side of the dish, noticing how far the brush goes into the liquid, squeezing both sides of the brush on the sides. As a brush is made of natural hair and many brushes are handmade, each one will have its own characteristics. One brush may hold much more liquid than another. Picking up powder: There are different methods of picking up powder: little circles can be drawn in the surface of the powder, or the brush can be drawn through in a line. The brush should never be dipped in further than the tip, and there should be sufficient powder in the dish to avoid the brush touching the bottom. If this happens, the bread sticks to the dish and is challenging to get out. It is also worth tapping the dish on the desk to smooth out the surface of the powder. A smooth surface makes picking up a bead much more effortless.
Bead control: When a bead can be picked up confidently, it is worth moving on to ‘bead control’. This will demonstrate what the ratio of the bead is, and the trainee technician can determine if this is correct.
This is done by picking up a bead and gently placing it on the plastic or glass. If the bead is on the very tip of the brush, it should come off the brush onto the surface with ease. Once the bead is on the surface, it should start to melt. How it does this demonstrates if the ratio is correct. By melting, the bead loses its shape and eventually becomes flat.
All brands are slightly different but, as a general guideline, if the bead melts in less than 3 seconds, it has a wet ratio; if it takes over 5 seconds, it is dry. A medium ratio, which is usually the one to aim for, should hold its shape momentarily and then start a slow melt.
Doing this a few times, using the various ways to pick up a bead, will show the trainee how to pick up a bead of the right ratio. This can now be taken a step further. Nails are different sizes, and so are the zones on each nail. Now the right ratio can be achieved; it is time to practice picking up a bead that is the right ratio and the right size! A step further again: the right ratio of the right size in a different colour, for example, white tip powder. Coloured powder usually needs more liquid due to the colour pigments present, so it should be tried out first to get the right ratio. After that, different-sized beads can be picked up to see how much liquid is needed in the brush, how long the brush should be kept in the powder, and so on. After this has been practised, it is worth deciding what the bead will be for. Determining how big the bead needs to be before it is picked up will save time later and is part of creating a good structure with a brush and not correcting a bad structure with a buffer. Condition of the liquid: During this little exercise, the condition of the liquid should be noted. If it is looking cloudy or if there is powder at the bottom of the dish, it is badly contaminated. If this liquid was used on a nail with a transparent or pink overlay, it would look cloudy and mottled. This contamination must be avoided during working and is easily achieved. When working, the brush should be occasionally dipped into the liquid and taken straight out without wiping it on the sides of the dish, but then wiping it on a disposable towel or tissue. This, if done a couple of times, will remove the build-up of powder that accumulates in the hairs and then goes into the liquid. When using white-tip powder, the brush should be cleaned in this way after each nail. This is because the powder will remain in the brush, and the next time the brush is dipped in and pressed on the side of the dish, the powder will be left in the liquid, and the nails will become more and more cloudy. Some technicians even have a separate dish of liquid just for the white-tip powder to prevent this from happening. Application on the nails: Once a certain amount of product control is achieved, the application onto the nails can start. This procedure is the same as that for a natural nail overlay.
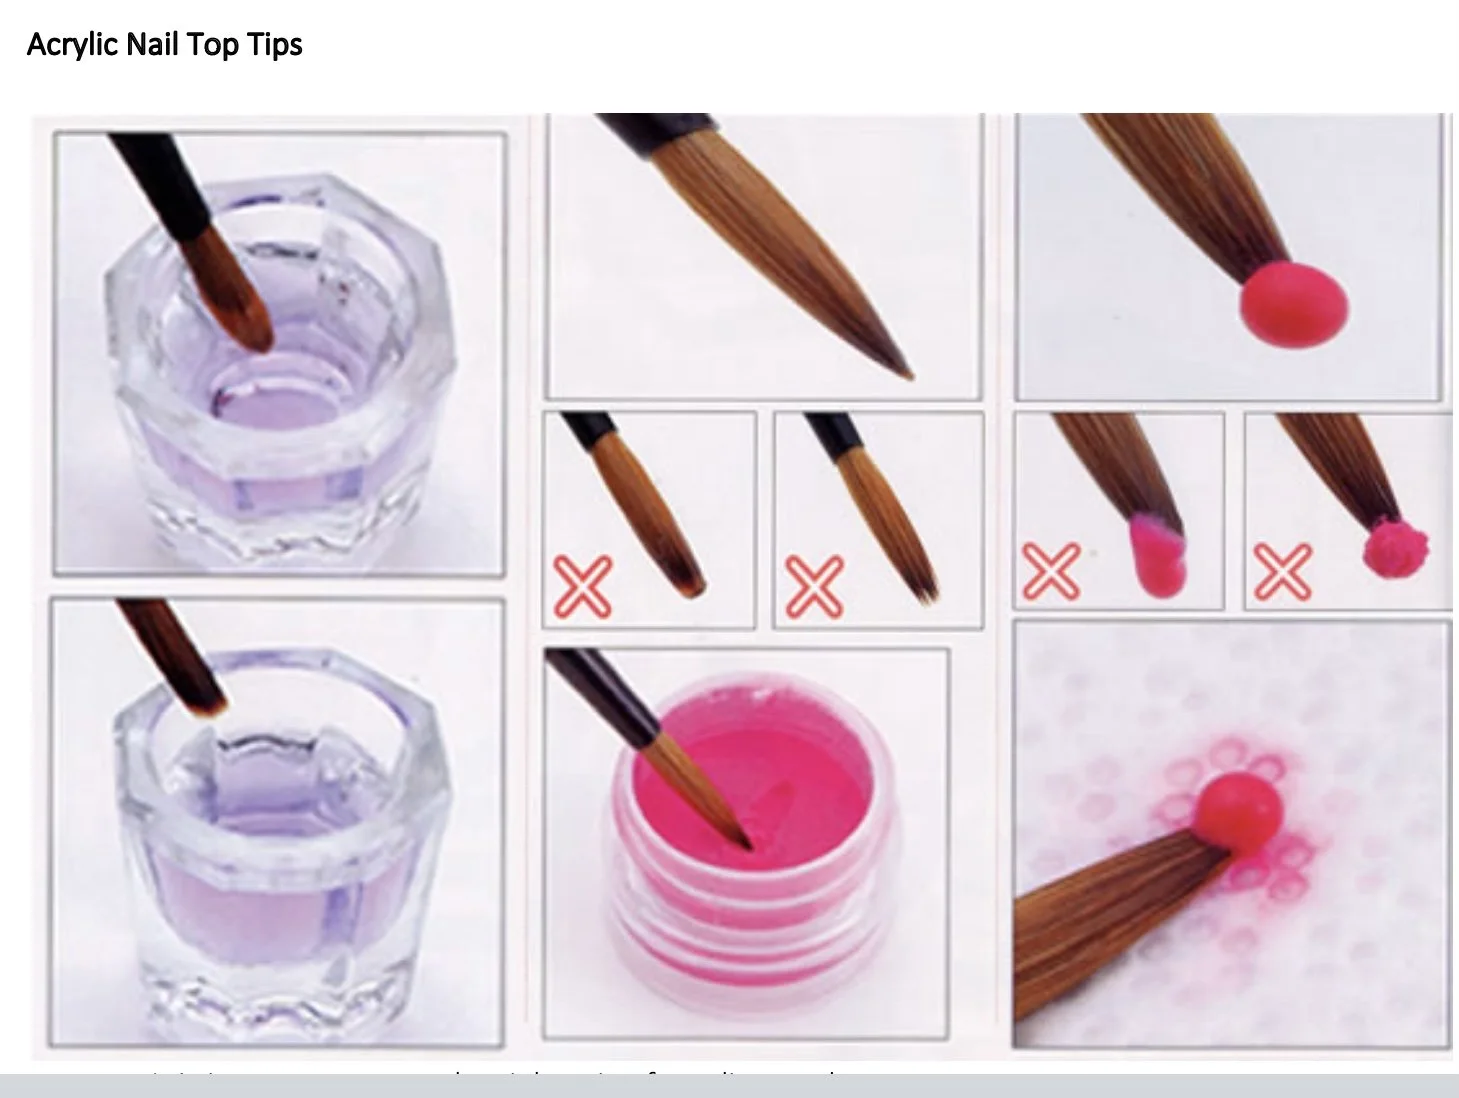
· It is important to get the right mix of acrylic powder to monomer.
· The bead of acrylic must be on one side of the brush only to facilitate easy release from the brush onto the nail.
· Your brush size should be size 10 or 12 this will give you good coverage, ease of application and does not waste monomer plus will keep the fumes down due to you wiping excess monomer onto your paper towel.
· Dip your brush into the monomer making sure it is well saturated and free of trapped air between the bristles.
· Drag one side of the flags of the brush up the dappen dish containing the acrylic fluid, dip the west side of the brush into the acrylic so that the monomer picks up acrylic powder on one side of the brush in the form of a bead.
· The acrylic must be thin at the back of the nail, this will enable infills to be done more easily and reduce lifting due to water being trapped between the acrylic and the cuticle when washing your hands etc.
· Your acrylic application should be thin at the cuticle area, thicker in the middle (stress area) and thinner at the front (free edge).
· You must never get acrylic onto the skin surrounding the nail plate also be aware of acrylic getting under the free edge, remove it before it sets.
· Sculpt with the brush, not the file.
Creating the perfect shape: One of the most essential aims of applying overlays is to create as close to the perfect shape as possible with the brush and not rely on correcting mistakes with a buffer afterwards. This takes practice. Liquid and powder overlays continue to polymerise for quite some time after they become hard enough to buff. Too much buffing can interrupt the polymer chains being formed and create weak spots. Also, buffing away what has just been applied can waste a great deal of time. It is much easier to apply it correctly in the first place and the buffing as a refinement stage.
Application using white-tip powder
The nails should have the tips perfectly blended, the dust removed and be clean and oil-free. One hand is worked on at a time from start to finish.
Apply primer (if instructed by manufacturers) very sparingly around the base of the nail. Make sure the primer is dry before applying the overlay.
Clean the brush first by dipping it into the liquid, taking it straight out and wiping it on or between sheets of a disposable towel.
Start with the little finger, pick up a bead of white-tip powder that is approximately the right size and place it in the centre of Zone 1, closer to the smile line than the edge.
Wipe the brush on the towel.
Holding the brush at the same angle as the upper arch of the nail and with the tip of the brush, press the bead. Take part of the bead to one side wall and create the point of the smile line; take part of the bead to the other side wall and create the point of the smile line; create the smile line as neatly as possible with the tip of the brush and smooth the surface of the whole zone. If the brush is angled down slightly and the overlay is gently pushed up towards the smile line, a sharper line can be created and a thinner edge of the nail. If the smile line is uneven and needs straightening, the extreme tip of the brush (cleaned and dry) can be used to ensure that the nail plate does not get monomer on it from the brush. Check the shape by looking down the barrel of the nail to make sure the overlay is even. The centre of this smile line will form the apex of the nail. (Some technicians like to apply a white tip to each nail before Zone 2. This is usually to avoid contaminating the liquid. However, as the overlay starts polymerising immediately, the bond between the overlay at Zones 1 and 2 may have a weak point in it as Zone 1 has polymerised too much to blend with Zone 2. A more robust overlay is achieved if the whole nail is completed, and contamination is easily avoided.)
Clean the brush.
Pick up a bead of pink or clear of the right size and place it in the centre of Zone 2 next to the white tip.
Wipe the brush.
The bead will have started to melt while wiping the brush and will be ready to press into shape. Making slow and deliberate movements and keeping the brush parallel with the nail, press the bead and, like Zone 1, take part of the bead out towards the side wall, leaving most in the centre and blend over the white tip; take part out to the other side wall and blend over the white tip. Blend the whole zone over the tip. Check down the barrel for evenness and thin sides.
Pick up a bead for Zone 3 and place it in the centre of the zone.
Wipe the brush.
Press the bead and blend up over the whole nail.
With the brush flattened, press the overlay towards the nail fold, taking great care not to touch the skin with the brush and leaving a tiny margin of the bare nail bed. With the flattened brush between the overlay and the nail fold, gently press the overlay to thin the zone and create a good bond with the nail plate.
Check shape from both sides to ensure the upper arch is in place, and the overlay is smooth. Check overlay from down the barrel.
Repeat the process for each finger. Polymerisation has occurred when the overlay can be tapped with the handle of the brush, and a ‘clicking’ sound can be heard. If the click sounds dull, it is not sufficiently cured. Discard the towel that has been used to wipe the brush.
When all the nails, on the one hand, are finished, go back to the little finger with a 240-grit file. Gently buff over the whole surface to smooth out any bumps and ridges. Carefully blend the edges of the overlay, making sure the tiny margin of the exposed nail plate is not buffed. Check overlay from all angles to ensure a perfect structure. Refine the free edge to make it as thin and even as possible.
Repeat for all nails.
Return to the little finger and buff the whole surface with a white block as this will start to refine the surface, ready for the final stage.
Repeat for all fingers.
Using a three-way buffer in the correct sequence (usually black, white, grey), buff all nails to a high-gloss shine without any dull spots (dips in the overlay).
Remove all the dust, including that which has collected under the nail and discard the layer of the disposable towel with all the dust.
Apply oil to each nail and massage into the nail and cuticle.
Repeat the whole process, on the other hand.
When both hands are completed, tidy the desk by cleaning the brush thoroughly and storing it flat and away from dust; discard any unused monomer onto the disposable towel remaining on the desk. Make sure powder dishes are covered. Wipe the surface of the desk with a cloth dampened with a mild disinfectant and prepare for the next client with clean towels, etc.
If the overlay is being applied without a white tip, it should still be applied in zones, but it would not be necessary to create a smile line. Otherwise, the process is the same.
Troubleshooting: If the overlay looks powdery in Zone 3, it is usually because the client’s hands are very cold, or the liquid monomer is cold. This hinders the rate of polymerisation, leaving unpolymerized powder on the surface. This can be corrected by warming the client’s hands before application or making sure that the monomer is at room temperature before using. If it is an emergency, for example, the first client of the day in a salon that has not yet warmed up, the covered dappen dish with the monomer can be placed in a bowl of tepid water (not hot) to bring it to room temperature.
If the brush was not cleaned properly after the last use and has a lump of product in it, soften the product in some monomer (nothing else) and use a paper towel to remove the debris. Do not use your fingers as sensitivity to the product may result. An orange stick can dislodge the debris, but this will usually result in damaged hairs and a brush that does not work very well. Discard the monomer that was used.
Infill Procedure
· Infill is the term used for a maintenance carried out after 2-3 weeks
· It is the replacement of acrylic in zone 3 only
· Using a 180 or 240 grit file, remove the shine from the existing product and reduce the level of thickness by 1/3rd. During this filing process, all areas of lift should be filed away and blended to the natural nail
· Wash and dry the hands
· Apply primer to the exposed natural nail. Do not get primer on the remaining enhancement as it may turn it yellow.
· If filling in only the re-growth area, pick up a small, medium consistency bead and place it on the natural nail. Flatten the bead by pressing it into the nail plate; this will spread the bead toward the sidewall line, then stroke to blend with the existing product
· Pick up a second small, medium consistency bead, and place it immediately next to the previous application. Press to flatten, then stroke to blend into the previous application and to the already applied fresh product
· To finish, follow the finishing procedures for a new set
Removing Nail Enhancements
· Clip the enhancements to the length of the natural nails
· File the acrylic layer to thin it out using a 100-grit file. Do not damage the natural nail beneath
· Fill dish with acetone and soak the nails for a few minutes
· Using tissue, wipe off the softened acrylic enhancement. Do this quickly, as the nail will begin to harden again with contact with the air
· A 180-grit file can also be used to cautiously file the nail enhancement
· Once the nails have been removed, the hands should be washed, and a manicure treatment provided
· For the first few hours after removing the enhancements, the nails will feel weak, this sensation will disappear
Aftercare Advice
The following aftercare advice should be given to clients after every artificial nail treatment:
Return for recommended maintenance treatments
If there appears to be discolouration under the artificial nail, return immediately
Do not pick off the overlay
Do not use nails as tools
Massage nail oil into the cuticle area every day
Do not file the surface of the nail
It is not advisable to shorten the nail as the thin layer at the free edge will be filed away to a thicker area
Use acetone-free varnish remover if necessary.
Wear gloves when washing up or carrying out any cleaning.
Potential retail recommendations
nail oil
varnish remover
varnish
hand cream
topcoat.